One rainy October afternoon, when my grandchildren came over for a playdate, we ended up building a blanket fort in the living room. The house smelled faintly of cinnamon from a candle I had burning, and as the little ones giggled under their “castle,” I thought about how to bring a little more magic to the day.
Halloween was just around the corner, and I wanted something simple but festive that we could all enjoy together. That’s when I remembered an old church fall festival where they served chocolate “dirt cups” with gummy worms. It was such a hit back then, and I thought—why not give it a seasonal twist?
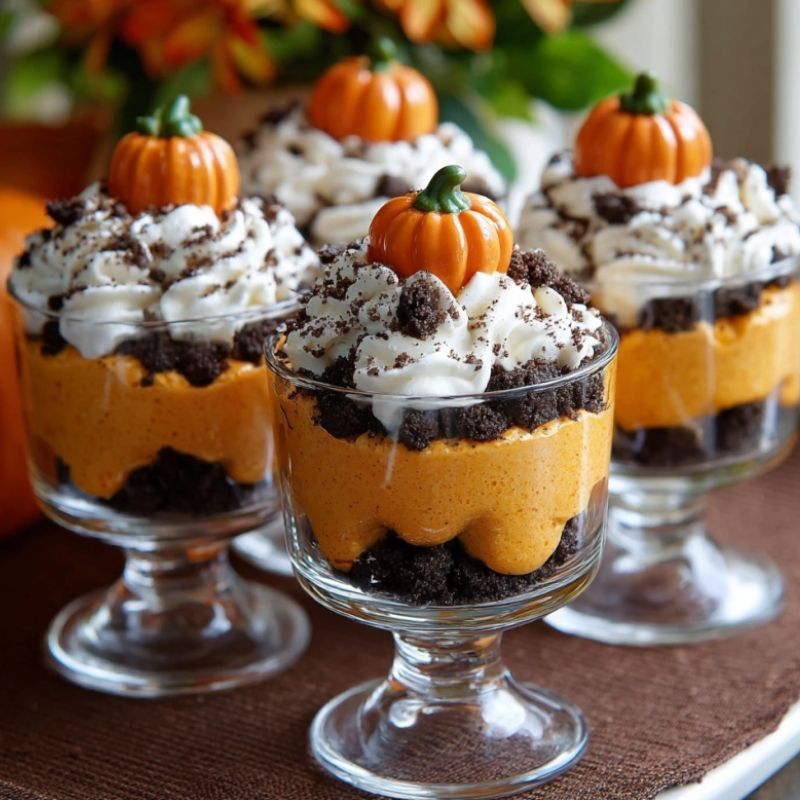
So, we pulled out a package of pudding mix, some Oreos, and a tub of whipped topping from the fridge. The kitchen quickly became a flurry of activity, with little hands crushing cookies while I whisked pudding. When we tucked the tiny candy pumpkins into the tops, the children squealed with delight, declaring them a “pumpkin patch you can eat.”
It turned out to be the highlight of the afternoon. Those cups weren’t just a treat—they were a memory in the making, one I’ll cherish as much as the kids cherish eating them.
Short Description
Pumpkin Patch Dirt Cups are a fun, no-bake Halloween dessert made with chocolate pudding, crushed Oreos, whipped topping, and candy pumpkins. Easy, festive, and kid-friendly, they’re perfect for parties, after-school treats, or cozy family gatherings.
Key Ingredients
- 1 package (3.9 ounces) instant chocolate pudding mix
- 2 cups cold milk
- 1 package (14.3 ounces) Oreo cookies, crushed
- 1 container (8 ounces) whipped topping, thawed
- 8 pumpkin-shaped candies
- 4 pretzel sticks, broken into small pieces
- 8 small clear plastic cups
Tools Needed
- Mixing bowl
- Whisk
- Rubber spatula
- Resealable bag (for crushing Oreos) or food processor
- 8 small clear cups
- Measuring cups
Cooking Instructions
Step 1: Mix the pudding
In a large bowl, whisk together pudding mix and cold milk until thickened, about 2 minutes. Chill in the refrigerator for 5 minutes.
Step 2: Fold in whipped topping
Gently fold whipped topping into the pudding with a rubber spatula until smooth and fully combined.
Step 3: Build the base
Spoon 1–2 tablespoons of crushed Oreos into the bottom of each clear cup to form the first “dirt” layer.
Step 4: Add pudding mixture
Fill cups about three-quarters full with the pudding mixture.
Step 5: Create the topping
Sprinkle remaining crushed Oreos on top to resemble soil.
Step 6: Decorate
Press a pumpkin candy into each cup and insert a pretzel stick behind it to mimic a stem.
Troubleshooting Tip: If the pudding feels too runny, let it chill a few extra minutes before assembling. The mixture should be thick enough to hold the cookie topping without sinking.
Why You’ll Love This Recipe
Kid-Friendly Fun: Perfect activity for little helpers in the kitchen.
Festive and Seasonal: Brings Halloween charm to your dessert table.
Quick and Easy: Ready in under 20 minutes, no baking required.
Budget-Friendly: Made with simple, affordable ingredients.
Crowd Pleaser: Loved by both kids and adults alike.
Mistakes to Avoid & Solutions
Over-mixing pudding and whipped topping: This can make the mixture too thin. Fold gently instead of stirring vigorously.
Skipping chill time: Warm pudding won’t set properly. Always chill for at least 5 minutes.
Crushing Oreos too finely: A little texture makes it look more like “dirt.” Avoid turning them into powder.
Not using clear cups: The layers are part of the fun. Choose see-through cups for the best presentation.
Adding pumpkins too early: They can sink. Always add decorations last, right before serving.
Serving and Pairing Suggestions
Serve as a fun centerpiece for a Halloween buffet.
Pair with warm apple cider or hot cocoa.
Arrange on a tray with other spooky snacks like candy apples or popcorn balls.
Serve individually at kids’ parties or make larger trifle-style versions for adults.
Storage and Reheating Tips
Store in the refrigerator for up to 2 days, covered with plastic wrap.
Do not freeze—the pudding and whipped topping will separate.
Add decorations just before serving for the freshest look.
FAQs
1. Can I make these ahead of time?
Yes, assemble up to a day ahead, but wait to add pumpkins and pretzels until serving.
2. Can I use homemade pudding instead of instant?
Absolutely, just be sure it’s cooled and thick before layering.
3. What can I use instead of Oreo cookies?
Any chocolate sandwich cookie or even crushed chocolate graham crackers will work.
4. Can I make these dairy-free?
Yes, use non-dairy pudding mix, almond milk, and coconut whipped topping.
5. How do I crush Oreos without a food processor?
Place them in a resealable bag and crush with a rolling pin for easy cleanup.
Tips & Tricks
For extra fun, add gummy worms crawling out of the “dirt.”
Use different shaped candies like ghosts or bats for variety.
If making for adults, add a splash of coffee liqueur to the pudding for a grown-up twist.
Keep pudding mixture cold until assembly, it sets better that way.
Recipe Variations
Pumpkin Spice Dirt Cups: Add ½ teaspoon pumpkin pie spice to the pudding mixture for extra fall flavor.
Peanut Butter Patch: Fold ¼ cup peanut butter into the pudding mixture before layering for a nutty surprise.
Trifle Version: Layer ingredients in a large glass bowl for a party-sized version.
Healthier Swap: Use reduced-fat milk, light whipped topping, and sugar-free pudding mix.
Harvest Patch: Add candy corn and fall-colored sprinkles for more seasonal color.
Final Thoughts
These Pumpkin Patch Dirt Cups bring people together, spark creativity, and never fail to make little ones’ eyes light up. Sometimes, the best memories don’t come from fancy dinners or hours in the kitchen, but from quick, playful treats like this that everyone can join in on. I’ll never forget the laughter around my table as the children proudly held up their “pumpkin patches” and took their first messy bites.
These cups are more than a dessert—they’re a celebration of family, imagination, and the joy of the season. If you’re looking for a way to make Halloween a little sweeter and a lot more fun, this recipe is just the thing.

Pumpkin Patch Dirt Cups
Ingredients
- 1 package 3.9 ounces instant chocolate pudding mix
- 2 cups cold milk
- 1 package 14.3 ounces Oreo cookies, crushed
- 1 container 8 ounces whipped topping, thawed
- 8 pumpkin-shaped candies
- 4 pretzel sticks broken into small pieces
- 8 small clear plastic cups
Instructions
- Mix pudding mix with cold milk until thick, then chill 5 minutes.
- Fold in whipped topping until smooth.
- Layer crushed Oreos in the bottom of clear cups.
- Spoon pudding mixture in, filling cups ¾ full.
- Top with more crushed Oreos for “dirt.”
- Finish with a candy pumpkin and pretzel stick stem.