One chilly October afternoon, I found myself at the kitchen table surrounded by my grandkids, all of them still in their school clothes and eager for a project. The youngest, Lily, had spotted a photo of bubbling cauldron cookies online and declared we simply had to make them.
I couldn’t resist her enthusiasm. We pulled out our mixing bowls and turned the kitchen into a mini workshop. The windows rattled lightly as the autumn wind blew outside, and the scent of cinnamon-scented candles filled the air.
As we stirred the thick, chocolatey dough, my husband peeked in from the living room to offer his “quality control” services, which mostly meant tasting the frosting before it was ready. The kids squabbled playfully over who would press the indentations into the warm cookie cups, and I had to laugh—those little arguments always remind me of baking with my own brother decades ago. Back then, we fought over who would lick the spoon clean.
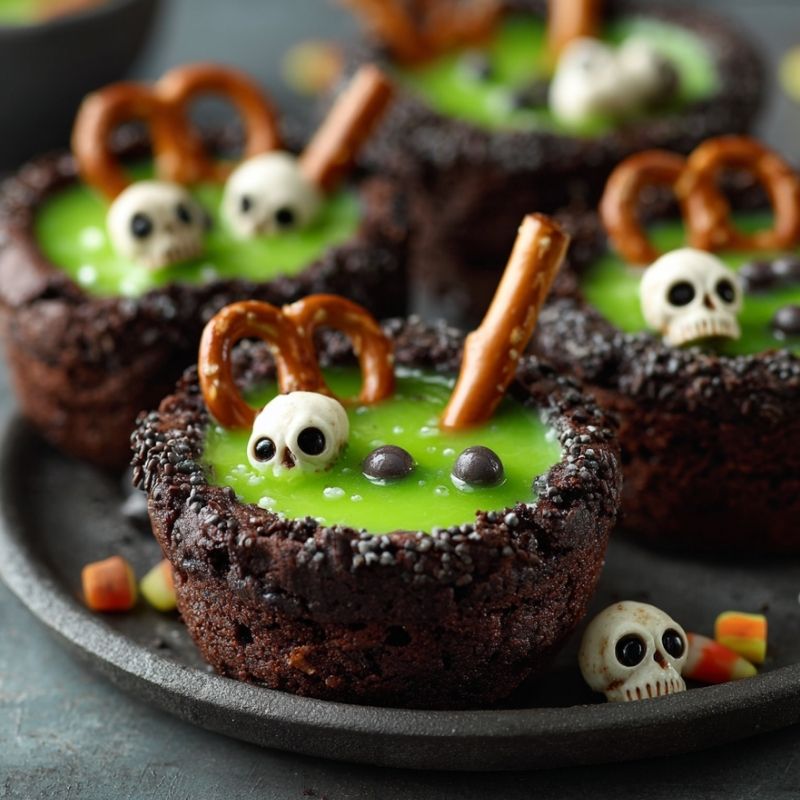
By the time we piped the green frosting to look like a witch’s potion and added the candy eyeballs, it felt as though we’d brewed up more than just a sweet treat. We’d conjured a memory—one that I know we’ll recall each Halloween season. It wasn’t about the perfection of the frosting swirls or how neat the sprinkles looked; it was the chatter, the giggles, and the sugar-dusted noses that made the afternoon magical.
Short Description
These Cauldron Cookie Cups are fun, festive mini treats made with chocolate cookie bases, creamy green buttercream, and playful decorations that look like bubbling witches’ brews—perfect for Halloween parties or family baking sessions.
Key Ingredients
For the Cookies
- 1 (15.25-ounce) box Devil’s Food cake mix
- 2 large eggs
- ½ cup canola or vegetable oil
- Black food coloring (optional for a darker cauldron look)
For the Frosting
- 1 cup unsalted butter, softened
- 3 cups powdered sugar
- 1 teaspoon vanilla extract
- ½ teaspoon salt
- 1–3 tablespoons milk
- Green food coloring
Decorations
- Round green sprinkles
- Halloween-themed sprinkles
- Candy eyeballs
- Pretzel sticks
Tools Needed
Three 12-count mini muffin pans
Mixing bowls (large and medium)
Electric mixer or hand whisk
Measuring spoons and cups
Rubber spatula
1-tablespoon measuring spoon (for indentations)
Piping bag with round tip
Cooking Instructions
Step 1: Preheat the Oven
Preheat your oven to 350°F and lightly grease three 12-count mini muffin pans.
Step 2: Make the Cookie Dough
In a large mixing bowl, combine the Devil’s Food cake mix, eggs, oil, and a few drops of black food coloring if you want the cookies darker. Stir until everything is well combined and the dough is smooth.
Tip: If the dough feels too sticky, add 1 tablespoon of flour at a time until it’s easier to handle.
Step 3: Shape the Cookie Cups
Scoop about ½ tablespoon of dough for each muffin cup. Place the dough into the mini muffin pan and flatten it gently with your fingers to create an even base.
Step 4: Bake the Cookies
Bake in the preheated oven for 8–10 minutes or until the edges are set but the centers are still soft.
Step 5: Create the Indentations
Remove the pan from the oven and, while the cookies are still warm, press the back of a 1-tablespoon measuring spoon into the center of each cookie to form a cup shape. Let them cool completely in the pan.
Step 6: Prepare the Buttercream Frosting
In a medium bowl, beat the softened butter with an electric mixer until creamy. Gradually add the powdered sugar, vanilla extract, and salt, mixing until smooth. Add milk, 1 tablespoon at a time, until the frosting is smooth and easy to pipe. Stir in green food coloring until you reach your desired shade.
Step 7: Decorate the Cookie Cups
Transfer the green frosting to a piping bag fitted with a round tip. Pipe the frosting into the cooled cookie cups to mimic bubbling potion. Sprinkle each cup with green round sprinkles and Halloween sprinkles, then add candy eyeballs for a spooky effect. Break pretzel sticks in half and insert one into each cup to resemble a wooden stirring stick.
Step 8: Serve and Enjoy
Arrange the Cauldron Cookie Cups on a festive platter and serve at room temperature.
Why You’ll Love This Recipe
Fun and Festive: Perfect for bringing a touch of whimsy to Halloween gatherings.
Kid-Friendly Activity: Easy enough for children to help with shaping and decorating.
Rich Chocolate Flavor: The Devil’s Food cake mix creates a moist, chocolatey cookie base.
Customizable: You can adjust the frosting color or decorations to fit any party theme.
Make-Ahead Friendly: Bake the cookie cups ahead of time and decorate them later for convenience.
Mistakes to Avoid & Solutions
Overbaking the Cookie Cups: If baked too long, the cups will be dry and crumbly. Keep a close eye during the last 2 minutes of baking.
Not Pressing the Indentations Soon Enough: Press while the cookies are still warm to avoid cracking.
Runny Frosting: Add powdered sugar a tablespoon at a time if the frosting is too thin.
Dough Sticking to Hands: Lightly grease your fingertips with cooking spray before shaping.
Pretzel Sticks Falling Over: Insert pretzels after frosting has set slightly so they stay upright.
Serving and Pairing Suggestions
Serve these cookie cups on a Halloween dessert table alongside candied apples, pumpkin pie bites, or caramel popcorn.
Pair with warm apple cider, spiced hot chocolate, or even a pumpkin spice latte for adults.
Display on a tiered stand lined with black and orange napkins for a striking holiday centerpiece.
Serve family-style at parties so guests can help themselves.
Storage and Reheating Tips
Room Temperature: Store undecorated cookie cups in an airtight container for up to 3 days.
Refrigeration: Once frosted, store in the fridge for up to 5 days to keep the buttercream fresh.
Freezing: Freeze undecorated cookie cups for up to 1 month. Thaw at room temperature before decorating.
Reheating: These don’t need reheating; serve at room temperature for the best texture.
FAQs
1. Can I use a different cake mix flavor?
Yes! Chocolate fudge or even red velvet will work, though the cauldron look is best with dark chocolate.
2. How do I keep the frosting from melting?
Keep your buttercream at room temperature if it’s cool or refrigerate it if your kitchen is warm. Avoid direct sunlight at parties.
3. Can I make these gluten-free?
Absolutely. Substitute the cake mix with your favorite gluten-free chocolate cake mix and adjust the baking time slightly if needed.
4. What if I don’t have a piping bag?
Use a plastic sandwich bag with a corner snipped off—it works just as well for piping frosting.
5. Can I prepare these ahead of time for a party?
Yes. Bake and freeze the cookie cups in advance, then thaw and decorate the day before or morning of the event.
Tips & Tricks
Chill the dough for 20 minutes if it’s too soft; this makes shaping easier.
Add a few drops of peppermint extract to the frosting for a cool, spooky twist.
For extra shine, lightly brush the cookie cups with edible black gel after baking.
Use different sprinkle shapes—like bats or stars—for unique cauldron effects.
Recipe Variations
Witch’s Brew Cauldrons: Add gummy worms peeking out of the frosting for a fun twist.
Glow-in-the-Dark Cauldrons: Use neon-colored frosting (yellow or purple) with a swirl effect for a magical vibe.
Chocolate Lovers’ Version: Stir mini chocolate chips into the dough before baking for extra richness.
Pumpkin Patch Cauldrons: Swap green frosting for orange and top with tiny candy pumpkins to celebrate fall.
Final Thoughts
Baking these Cauldron Cookie Cups brought a bit of Halloween magic into our home, not just because of the whimsical look but because of the laughter and stories shared around the mixing bowl. Watching my grandchildren’s faces light up as they decorated their “potions” reminded me that the heart of cooking lies in the moments we share with others.
This recipe turned a simple afternoon into a creative adventure that we’ll all remember fondly. I’ve learned that the best dishes often carry a story along with their flavor, and these cauldrons are a perfect example. I hope they bring as much fun to your kitchen as they did to ours.

Cauldron Cookie Cups
Ingredients
For the Cookies
- 1 15.25-ounce box Devil’s Food cake mix
- 2 large eggs
- ½ cup canola or vegetable oil
- Black food coloring optional for a darker cauldron look
For the Frosting
- 1 cup unsalted butter softened
- 3 cups powdered sugar
- 1 teaspoon vanilla extract
- ½ teaspoon salt
- 1 –3 tablespoons milk
- Green food coloring
Decorations
- Round green sprinkles
- Halloween-themed sprinkles
- Candy eyeballs
- Pretzel sticks
Instructions
- Preheat the oven to 350°F and lightly grease three 12-count mini muffin pans.
- In a large bowl, mix the Devil’s Food cake mix, eggs, oil, and black food coloring if using. Stir until smooth. If the dough is sticky, add flour a tablespoon at a time.
- Scoop about ½ tablespoon of dough into each muffin cup and flatten gently.
- Bake for 8–10 minutes until the edges are set but the centers remain soft.
- While still warm, press the back of a 1-tablespoon measuring spoon into each cookie to form a cup, then cool completely in the pan.
- Beat softened butter until creamy, then add powdered sugar, vanilla, and salt. Mix until smooth, adding milk a tablespoon at a time until the frosting is pipeable. Tint with green food coloring.
- Pipe frosting into the cooled cookie cups to look like bubbling potion. Add green sprinkles, candy eyeballs, and Halloween sprinkles. Insert half a pretzel stick into each as a stir stick.
- Arrange on a festive platter and serve at room temperature.