Last Saturday morning, I strolled through our local farmer’s market carrying my favorite old wicker basket. The air was crisp, filled with the smell of cinnamon-roasted nuts, ripe apples, and the faint earthy scent of fallen leaves. I stopped at a stall with a pyramid of tiny pumpkins, each no bigger than a grapefruit, and suddenly felt that familiar spark of Halloween mischief.
As I picked out a few, I remembered how my grandchildren giggle over anything shaped like a ghost or a pumpkin face. It struck me that this year, instead of buying candy by the bagful, I’d bake something fun and festive we could all enjoy together.
Back home in my kitchen, I opened the pantry and found the pie crusts I had tucked away, a jar of berry preserves, and a can of pumpkin filling, my head already buzzing with ideas. I pictured my grandkids’ eyes widening as they peeled back a pie lid to reveal a spooky face grinning back at them. Those memories of when my children were little—how we’d spend hours cutting paper bats and hanging them by string—made me feel as if the season’s spirit was right there with me again.
Halloween has always been about more than costumes and candy in our family. It’s about laughter over a bubbling pot of cider, about recipes that smell of butter and sugar and stick in your memory long after the night is over. These Mini Halloween Pies felt like the perfect way to keep that tradition alive, adding a playful twist that makes baking as delightful as sharing the finished treats.
Short Description
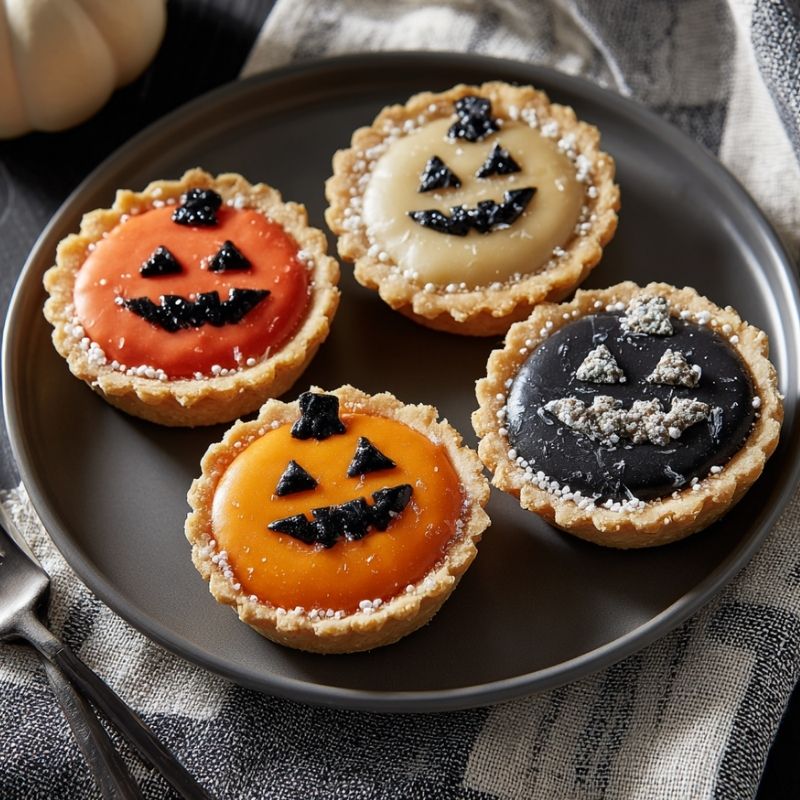
These Mini Halloween Pies are buttery, flaky, and brimming with your favorite fillings. Each pie features a charming cut-out face that bakes up golden and crisp, perfect for Halloween parties, school events, or simply sharing at home.
Key Ingredients
- 4 pie crusts (store-bought or homemade)
- Pie filling of your choice: apple, pumpkin, berry, or even a savory option
- Melted butter (about 2 tbsp) for brushing tops
Tools Needed
- Mason jar lids or a round 3-inch cutter
- Small sharp knife or mini cookie cutters for spooky faces
- Rolling pin
- Parchment-lined baking sheet
- Pastry brush
- Spoon for filling
Cooking Instructions
Step 1: Preheat the Oven
Preheat your oven to 375°F (190°C) and line a cookie sheet with parchment paper so the pies don’t stick.
Step 2: Prepare the Dough
Roll out the pie crusts on a lightly floured surface. Cut out 8 circles from each round using a Mason jar lid or a cutter—8 for the bases and 8 for the tops. If the dough feels sticky, dust it lightly with flour.
Step 3: Create Spooky Faces
Set aside 4 of the circles for the tops. Use a small knife or cookie cutters to cut out playful Halloween shapes—pumpkin eyes, ghostly smiles, or even monster grins.
Step 4: Prepare the Lids
Flip the Mason jar lids so the rubber side faces down. Press one dough circle into each lid, molding it evenly across the bottom and up the sides.
Step 5: Fill the Pies
Spoon your chosen filling into the dough-lined lids, filling just below the edge to avoid overflow while baking.
Step 6: Add the Tops
Lay the spooky-faced dough circles on top of each pie. Gently tuck the edges under to align with the base.
Step 7: Crimp and Brush
Crimp the edges using your fingers or a fork to seal the pies. Brush each top with melted butter for a glossy golden finish.
Step 8: Bake
Place the pies on the prepared cookie sheet. Bake for about 25 minutes or until the tops are crisp and golden brown, and you can see the filling gently bubbling through the cut-outs.
Step 9: Cool and Serve
Allow the pies to cool for 10 minutes before gently pushing up from the bottom of the Mason jar lids to release them. Serve warm or at room temperature.
Why You’ll Love This Recipe
Festive Fun: Spooky cut-out faces make them a hit at Halloween gatherings.
Customizable: Choose sweet or savory fillings to please everyone.
Kid-Friendly: Easy enough for little hands to help with the cut-outs.
Portable Treat: Perfectly portioned for parties, lunchboxes, or bake sales.
Comforting Taste: Flaky crust and warm filling bring a classic homemade pie experience in miniature form.
Mistakes to Avoid & Solutions
Overfilling the Pies: This can lead to messy leaks. Fill just below the edge for clean results.
Skipping the Parchment Paper: Without it, pies may stick or crumble when you try to remove them.
Cutting Faces Too Large: Oversized cut-outs can make the tops collapse; keep designs small and simple.
Not Sealing Edges Properly: Gaps allow filling to spill out; crimp edges firmly with a fork or pinch with fingers.
Baking Too Long: Overbaked pies will have tough crusts. Watch for a golden-brown hue and bubbling filling as a sign they’re done.
Serving and Pairing Suggestions
Serve as part of a dessert table alongside caramel apples, spiced nuts, or candy corn.
Pair sweet pies with hot apple cider or chai tea; savory versions go well with a light salad or pumpkin soup.
Arrange them on a tiered stand at parties for a festive display.
Storage and Reheating Tips
Storage: Keep cooled pies in an airtight container at room temperature for up to 2 days, or refrigerate for up to 4 days.
Freezing: Wrap each pie tightly in plastic wrap, then in foil; freeze for up to 2 months.
Reheating: Warm in a 300°F (150°C) oven for 8–10 minutes to refresh the crust’s crispness. Avoid microwaving to prevent soggy bottoms.
FAQs
1. Can I use homemade crust instead of store-bought?
Absolutely, just make sure it’s chilled and rolled evenly for best results.
2. What fillings work best for these pies?
Any thick filling works well—apple, pumpkin, berry jams, or even savory meat and veggie mixtures.
3. Can I make the pies ahead of time?
Yes, assemble and freeze them unbaked. Bake straight from frozen, adding 5 extra minutes to the baking time.
4. How do I keep the crust from getting soggy?
Ensure fillings aren’t too watery. Draining fruit or thickening it with cornstarch can help.
5. Do I need to grease the Mason jar lids?
Not if you use parchment-lined sheets and the dough is pressed firmly. The buttered tops also help prevent sticking.
Tips & Tricks
Chill the cut-out tops in the fridge for 10 minutes before baking to help them hold their shape.
Use an egg wash instead of butter for extra shine and a deeper golden color.
For added flavor, sprinkle cinnamon sugar or grated Parmesan over the tops before baking.
Recipe Variations
Caramel Apple Mini Pies: Fill with diced apples tossed in cinnamon, sugar, and a drizzle of caramel sauce.
Pumpkin-Spice Cream Cheese Pies: Layer pumpkin filling over a thin layer of sweetened cream cheese for a richer flavor.
Savory Chicken and Veggie Pies: Use diced cooked chicken, peas, carrots, and a spoonful of gravy for a hearty dinner version.
Berry Almond Pies: Mix berry jam with slivered almonds for added crunch and a nutty twist.
Chocolate-Cherry Pies: Combine cherry filling with a few chocolate chips for a dessert that’s decadent and fun.
Final Thoughts
Baking these little pies brought so much laughter into my kitchen. The house smelled of buttery crust and sweet fruit filling, and even my husband, who usually sneaks off with a cookie before dessert’s ready, was impressed by how cheerful they looked. I loved watching the kids pick their favorite spooky face before biting in—half the fun was in the guessing game.
To me, the best recipes are the ones that invite everyone into the process. These pies are simple, a little playful, and surprisingly elegant for how little effort they take. They’re a reminder that Halloween baking doesn’t need to be complicated to be memorable. Sometimes all it takes is a bit of dough, a dash of imagination, and a warm oven to make a chilly autumn day feel magical.

Mini Halloween Pies
Ingredients
- 4 pie crusts store-bought or homemade
- Pie filling of your choice: apple pumpkin, berry, or even a savory option
- Melted butter about 2 tbsp for brushing tops
Instructions
- Preheat the oven to 375°F (190°C) and line a cookie sheet with parchment paper.
- Roll out the pie crusts on a lightly floured surface and cut 8 circles from each round—8 for the bases and 8 for the tops. If the dough is sticky, dust it lightly with flour.
- Set aside 4 circles for the tops and cut out playful Halloween faces with a small knife or cookie cutters.
- Flip the Mason jar lids so the rubber side faces down, then press one dough circle into each lid, spreading it evenly across the bottom and up the sides.
- Spoon the filling into each dough-lined lid, filling just below the edge to prevent overflow.
- Place the spooky-faced dough circles on top, gently tucking the edges under to align with the base. Crimp the edges with fingers or a fork to seal and brush the tops with melted butter.
- Arrange the pies on the prepared cookie sheet and bake for about 25 minutes until golden brown with filling bubbling through the cut-outs.
- Cool for 10 minutes before gently pushing up from the bottoms to release the pies. Serve warm or at room temperature.