One breezy October afternoon, I was sitting at the kitchen table with my youngest granddaughter, Sophie, who was busy sketching Halloween critters on scraps of paper. She drew a round spider with wobbly eyes and long, spindly legs, and that’s when the idea struck: those little spiders deserved to be cookies. We both giggled at the thought of a plate full of edible spiders.
The kitchen soon smelled of butter and cocoa as we shaped the dough together. Sophie stood on her stool, carefully pressing peanut butter cups into the warm cookies as soon as they came out of the oven. Her tiny hands shook with excitement as we poked in the pretzel legs—sometimes breaking them, sometimes sneaking a nibble before they reached the cookie. When the candy eyes went on, she squealed, “They’re alive!”
Those cookies vanished in no time. My husband, who rarely goes for sweets, went back for seconds, then thirds. They’ve since shown up at bake sales, school parties, and porch gatherings, always sparking smiles, giggles, and a few playful shivers. Baking these cookies has become a way to bring the family together over a shared project that’s both delicious and delightfully spooky.

Short Description
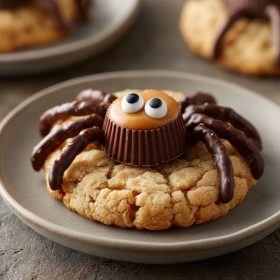
These Spider Cookies are soft, chocolate-rich treats topped with mini peanut butter cups for the spider’s body, pretzel legs, and candy eyes. They’re a playful addition to any Halloween dessert table and a fun activity for kids and adults alike.
Key Ingredients
- 1 cup unsalted butter, softened
- 1 cup sugar
- 1 cup brown sugar
- 2 eggs
- 1 teaspoon vanilla extract
- 2½ cups all-purpose flour
- ½ cup cocoa powder
- 1 teaspoon baking soda
- ½ teaspoon salt
- 10 mini peanut butter cups
- Pretzel sticks, broken into halves
- Candy eyes
Tools Needed
- Mixing bowls (large and medium)
- Electric mixer or sturdy whisk
- Measuring cups and spoons
- Rubber spatula
- Baking sheet
- Parchment paper
- Wire cooling rack
Cooking Instructions
Step 1: Preheat the oven
Set the oven to 350°F (175°C). Line a baking sheet with parchment paper to prevent sticking.
Step 2: Make the cookie dough
In a large bowl, cream the softened butter, sugar, and brown sugar together until light and fluffy. Beat in the eggs one at a time, followed by the vanilla extract.
Step 3: Combine dry ingredients
In a separate bowl, whisk the flour, cocoa powder, baking soda, and salt. Gradually mix the dry ingredients into the wet mixture until just combined. Avoid overmixing to keep the cookies tender.
Step 4: Bake the cookies
Drop rounded tablespoons of dough onto the prepared baking sheet, spacing them about 2 inches apart. Bake for 10–12 minutes, until the cookies are set but still soft in the center.
Step 5: Create the spiders
While the cookies are still warm, gently press a mini peanut butter cup into the center of each. Insert pretzel halves around the cup to form spider legs and add candy eyes on top.
Step 6: Cool and serve
Transfer the cookies to a wire rack and let them cool completely so the decorations stay in place.
Tip: If the pretzel legs break easily, warm them briefly in your hands before inserting to prevent cracking.
Why You’ll Love This Recipe
Fun and festive: These cookies double as both dessert and decoration.
Kid-friendly project: Children love shaping spiders and adding eyes.
Pantry-friendly: Uses simple ingredients you likely already have.
Soft and chocolatey: The tender cocoa cookie pairs perfectly with peanut butter cups.
Guaranteed crowd-pleaser: Always a hit at bake sales, parties, or cozy nights at home.
Mistakes to Avoid & Solutions
Overbaking: Remove cookies when just set for soft, moist centers.
Adding candy too late: Press peanut butter cups in while cookies are warm so they stick.
Pretzel breakage: Insert at an angle and handle gently.
Spreading too much: Chill dough for 15–20 minutes before baking if it feels too soft.
Loose candy eyes: Dab a little melted chocolate to keep them secure.
Serving and Pairing Suggestions
Arrange on an orange or black platter for a spooky party spread.
Pair with milk or spiced cider for a cozy seasonal treat.
Add to a Halloween dessert board alongside caramel apples and popcorn balls.
Wrap individually in clear bags tied with festive ribbon for party favors or bake-sale items.
Storage and Reheating Tips
Store cooled cookies in an airtight container at room temperature for up to 4 days.
Refrigerate to extend freshness up to a week.
Freeze undecorated cookies for up to 2 months; thaw before decorating.
Avoid microwaving decorated cookies, as candy pieces can melt unevenly.
FAQs
1. Can I use gluten-free flour?
Yes. Use a 1:1 gluten-free baking blend and add a tablespoon of milk if the dough feels dry.
2. Do I have to use peanut butter cups?
No. Try chocolate truffles or marshmallows for a nut-free option.
3. Can I prepare the dough ahead of time?
Yes. Wrap tightly in plastic wrap and refrigerate for up to 24 hours.
4. How do I keep the legs from falling out?
Make small indents in the cookie before inserting pretzels.
5. Can kids help with this recipe?
Absolutely! Kids can help mix, decorate, and add eyes—just have adults handle the hot baking sheets.
Tips & Tricks
Use room-temperature butter for smoother mixing.
Choose high-quality cocoa powder for a richer chocolate taste.
Lightly flour your hands if the dough feels sticky.
Bake on the middle rack for even browning.
Decorate quickly so the peanut butter cups adhere before the cookies cool.
Recipe Variations
Minty Spiders: Use mint chocolate patties instead of peanut butter cups.
Salted Caramel Spiders: Drizzle caramel over the peanut butter cup before adding eyes.
Gluten-Free Spiders: Swap in gluten-free flour and pretzels.
Spiced Cocoa Spiders: Add ¼ teaspoon cinnamon and a pinch of cayenne for warmth and a slight kick.
White Chocolate Spiders: Replace cocoa with extra flour and use white chocolate cups for a pale spider look.
Final Thoughts
These cookies bring more than flavor to the table—they create a sense of playfulness and togetherness. Every batch sparks laughter as the spiders take shape, and there’s always a proud smile when the platter is finally full. Perfect for Halloween gatherings, bake sales, or a cozy afternoon project, they capture the season’s charm in each bite.
Spider Cookies
Ingredients
- 1 cup unsalted butter softened
- 1 cup sugar
- 1 cup brown sugar
- 2 eggs
- 1 teaspoon vanilla extract
- 2½ cups all-purpose flour
- ½ cup cocoa powder
- 1 teaspoon baking soda
- ½ teaspoon salt
- 10 mini peanut butter cups
- Pretzel sticks broken into halves
- Candy eyes
Instructions
- Preheat the oven to 350°F (175°C) and line a baking sheet with parchment paper.
- In a large bowl, cream the butter, sugar, and brown sugar until light and fluffy. Beat in the eggs one at a time, then stir in vanilla.
- In a separate bowl, whisk together the flour, cocoa powder, baking soda, and salt. Gradually mix the dry ingredients into the wet mixture until just combined.
- Drop rounded tablespoons of dough onto the baking sheet, spacing them about 2 inches apart. Bake for 10–12 minutes until set but still soft in the center.
- While the cookies are still warm, press a mini peanut butter cup into the center of each one. Add pretzel halves as legs and place candy eyes on top.
- Let cool completely on a wire rack so the decorations stay in place.