Red Velvet Brownies came together during a calm afternoon when the house finally settled after a busy start. A cool breeze drifted through the open windows, the radio hummed softly, and a neighbor’s quick stop with the mail lingered as a quiet moment of connection.
With a mixing bowl waiting on the counter, the idea of a red velvet dessert felt right for a day that needed a gentle pause.
It wasn’t tied to a celebration, yet small details made the moment feel special. A short call from my daughter, a handwritten note about dinner plans, and the familiar thought of brownies passed around at church gatherings all pointed toward baking.
Red Velvet Brownies suited an afternoon meant for slowing down, especially as the batter turned glossy and richly colored, filling the kitchen with soft cocoa notes.
As the pan baked, the kitchen grew warmer and more inviting. Later, those Red Velvet Brownies were easy to share over coffee or wrap into neat squares for neighbors.
Their color and richness add a quiet sense of care, proving that simple ingredients and an unhurried afternoon can come together in the most satisfying way.

Short Description
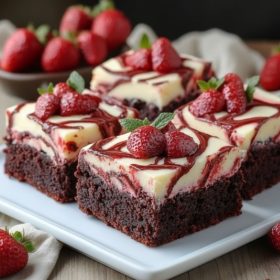
Red Velvet Brownies are rich, cocoa kissed brownies with a signature deep red color and a soft, fudgy texture. They are simple to prepare and perfect for gatherings, gifting, or everyday treats.
Key Ingredients
- ½ cup unsalted butter, softened
- 1½ cups sugar
- 1 oz red food coloring, adjusted to preference
- 3 tbsp cocoa powder, natural or Dutch process
- 2 large eggs, room temperature
- 1¼ cups all purpose flour
- ¼ tsp salt
Tools Needed
- Mixing bowl
- Hand mixer or stand mixer
- Rubber spatula
- Measuring cups and spoons
- 8×8 inch baking pan
- Non stick cooking spray
- Wire cooling rack
Cooking Instructions
Step 1: Prepare the Oven and Pan
Preheat the oven to 350°F. Lightly coat an 8×8 inch baking pan with non stick cooking spray and set aside.
Step 2: Cream Butter and Sugar
In a mixing bowl, beat the softened butter and sugar for 2 to 3 minutes until light and fluffy. The mixture should look pale and smooth.
Step 3: Add Color and Cocoa
Add the red food coloring and mix until evenly blended. Sprinkle in the cocoa powder and beat again until the batter turns a rich red brown shade.
Step 4: Incorporate the Eggs
Add the eggs one at a time, beating well after each addition. The batter should become glossy and slightly thick.
Step 5: Add Dry Ingredients
Gently fold in the flour and salt by hand using a spatula. Mix just until combined, stopping as soon as no dry streaks remain to avoid overmixing.
Step 6: Bake the Brownies
Pour the batter into the prepared pan and smooth the top. Bake for 35 to 45 minutes until the center no longer jiggles and a toothpick inserted comes out clean or with a few moist crumbs.
Step 7: Cool Completely
Remove the pan from the oven and place it on a wire rack. Allow the brownies to cool completely before slicing or frosting.
Step 8: Optional Frosting
Once fully cooled, frost with cream cheese frosting if desired for an added layer of richness.
Why You’ll Love This Recipe
Deep cocoa flavor with a classic red velvet color
Soft, fudgy texture without being heavy
Simple ingredients and easy steps
Perfect for holidays, celebrations, or casual treats
Customizable with frosting or toppings
Bakes beautifully in a single pan
Suitable for sharing and gifting
Mistakes to Avoid & Solutions
Overmixing the Batter
Overmixing can make brownies dense and tough.
Solution: Fold in the flour gently and stop mixing as soon as the batter is smooth.
Using Cold Eggs
Cold eggs may cause uneven mixing.
Solution: Let eggs come to room temperature before adding.
Overbaking
Too much time in the oven leads to dry brownies.
Solution: Start checking at 35 minutes and look for moist crumbs, not a wet center.
Uneven Coloring
Improper mixing of food coloring can cause streaks.
Solution: Add coloring early and beat thoroughly before adding dry ingredients.
Cutting Too Soon
Warm brownies can crumble when sliced.
Solution: Allow brownies to cool fully before cutting.
Serving and Pairing Suggestions
Serve plain with a dusting of powdered sugar
Pair with cream cheese frosting or whipped cream
Enjoy with coffee or unsweetened tea
Serve as dessert squares at gatherings
Add fresh berries on the side for balance
Storage and Reheating Tips
Store in an airtight container at room temperature up to 3 days
Refrigerate frosted brownies up to 5 days
Freeze unfrosted brownies up to 2 months
Thaw at room temperature before serving
Warm slightly in the oven for a softer texture
FAQs
1. Can I reduce the food coloring?
Yes, adjust the amount to your preference without affecting texture.
2. Can I use Dutch process cocoa?
Yes, both natural and Dutch process cocoa work well.
3. Are these brownies very sweet?
They are balanced with cocoa and not overly sweet.
4. Can I double the recipe?
Yes, use a 9×13 inch pan and adjust baking time slightly.
5. Is frosting necessary?
No, the brownies are flavorful on their own.
Tips & Tricks
Line the pan with parchment for easier removal
Use a metal pan for more even baking
Let brownies rest overnight for cleaner slices
Wipe the knife between cuts
Measure flour accurately to avoid dryness
Recipe Variations
Cream Cheese Swirl
Drop spoonfuls of sweetened cream cheese on the batter and swirl gently before baking.
Chocolate Chip Red Velvet Brownies
Fold ½ cup chocolate chips into the batter before baking for extra richness.
Gluten Free Version
Substitute all purpose flour with a 1:1 gluten free baking blend.
Walnut Addition
Fold ½ cup chopped walnuts into the batter for texture.
Mini Brownie Bites
Bake the batter in a lined mini muffin pan for 18 to 22 minutes.
Final Thoughts
There are afternoons when baking feels less like a task and more like a quiet pause, and Red Velvet Brownies fit beautifully into those moments. Their bold color and familiar flavor make them feel celebratory even on ordinary days. Sharing them later with family or neighbors adds to that sense of simple enjoyment.
Red Velvet Brownies hold their place as a dessert that feels thoughtful without being complicated. They offer richness, balance, and just enough indulgence to make the moment feel special. For me, they belong in kitchens where conversation flows easily and the oven hums softly in the background.
Fudgy Red Velvet Brownies
Ingredients
- ½ cup unsalted butter softened
- 1½ cups sugar
- 1 oz red food coloring adjusted to preference
- 3 tbsp cocoa powder natural or Dutch process
- 2 large eggs room temperature
- 1¼ cups all purpose flour
- ¼ tsp salt
Instructions
- Preheat oven to 350°F and lightly grease an 8×8 inch pan with non-stick spray.
- Beat softened butter and sugar for 2–3 minutes until light and fluffy.
- Mix in red food coloring, then add cocoa powder and beat until smooth and evenly colored.
- Add eggs one at a time, beating well after each to create a glossy batter.
- Fold in flour and salt gently by hand until just combined.
- Pour batter into pan, smooth the top, and bake for 35–45 minutes until set and a toothpick comes out with a few moist crumbs.
- Cool completely on a wire rack before slicing.
- Optionally, frost with cream cheese frosting once cooled.