Easter No Bake Mini Cheesecakes often come together in my kitchen as spring begins to settle in and Easter plans start taking shape. One afternoon not long before the holiday, my grandchildren arrived with drawings of pastel eggs tucked under their arms, eager to talk about school crafts and upcoming egg hunts. The kitchen felt brighter already, even before any decorations came out.
Sunlight filtered through the window as I set out bowls and measuring cups on the counter. My husband sorted through mail nearby while my daughter helped line the muffin tin. There was a quiet hum to the afternoon, broken only by laughter and the soft scrape of a spoon against a mixing bowl as the crust came together.
Each year as Easter approaches, Easter No Bake Mini Cheesecakes create a gentle pause in the day. With no oven to manage and simple ingredients to work with, the kitchen becomes a place where conversation flows easily and small moments are shared before the pace of the season picks up again.

Short Description
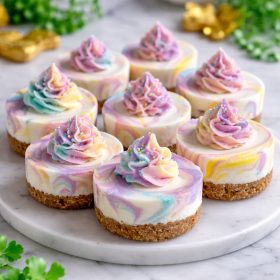
Easter No Bake Mini Cheesecakes are individual sized desserts with a graham cracker crust and creamy cheesecake filling, finished with pastel colors and festive Easter toppings.
Key Ingredients
- 1½ cups graham cracker crumbs
- ¼ cup unsalted butter melted
- 2 tablespoons sugar
- 8 oz cream cheese softened
- ½ cup powdered sugar
- 1 teaspoon vanilla extract
- 1 cup whipped topping or heavy cream whipped
- Pink food coloring optional
- Easter sprinkles
- Mini chocolate eggs or pastel candies
Tools Needed
- Mixing bowls
- Measuring cups
- Measuring spoons
- Electric mixer or hand mixer
- Mini cheesecake molds or muffin tin
- Paper liners
- Spoon or piping bag
Cooking Instructions
Step 1: Prepare the Crust
In a medium bowl, mix the graham cracker crumbs, melted butter, and sugar until evenly combined. The texture should feel like damp sand and hold together when pressed.
Step 2: Form the Crusts
Press the crumb mixture firmly into the bottoms of mini cheesecake molds or lined muffin tins. Use the back of a spoon to compact the crust. Chill in the refrigerator for 10 minutes to set.
Step 3: Mix the Cheesecake Filling
In a separate bowl, beat the softened cream cheese, powdered sugar, and vanilla extract until smooth and creamy, scraping down the sides as needed to avoid lumps.
Step 4: Fold in the Whipped Cream
Gently fold the whipped topping into the cream cheese mixture until fully incorporated. The filling should be light and airy.
Step 5: Add Color and Layer
Divide the filling in half. Leave one portion plain and tint the other with pink food coloring if desired. Spoon or pipe the white layer over the crusts, followed by the pink layer on top.
Step 6: Chill Until Set
Refrigerate the mini cheesecakes for at least 2 hours, or until firm enough to hold their shape.
Step 7: Decorate Before Serving
Just before serving, decorate with Easter sprinkles and mini chocolate eggs or pastel candies.
Why You’ll Love This Recipe
No baking required
Smooth and creamy texture
Easy to prepare ahead
Festive and seasonal presentation
Perfect individual portions
Mistakes to Avoid & Solutions
Crust falling apart
The base does not hold together when removed from the mold.
Solution: Press the crust firmly and chill long enough before adding the filling.
Lumpy filling
The cheesecake mixture has visible lumps.
Solution: Make sure the cream cheese is fully softened before mixing.
Filling too loose
The cheesecake does not set properly.
Solution: Fold the whipped topping gently and chill for the full recommended time.
Colors blending together
The layers lose definition.
Solution: Spoon the layers carefully and avoid over mixing once added.
Serving and Pairing Suggestions
Serve on a dessert platter with fresh berries
Pair with tea or light coffee
Add to an Easter dessert table
Present individually in cupcake wrappers
Storage and Reheating Tips
Store in an airtight container in the refrigerator for up to 3 days
Keep decorations separate until serving
Do not freeze, as texture may change
Serve chilled
FAQs
1. Can I make these the day before Easter?
Yes, they hold their shape and flavor well when chilled overnight.
2. Can I use flavored graham crackers?
Yes, cinnamon or honey varieties work nicely.
3. Is whipped topping required?
No, freshly whipped heavy cream works just as well.
4. Can I skip the food coloring?
Yes, the cheesecakes are just as enjoyable without color.
5. How do I remove them cleanly from the molds?
Use liners or gently loosen the edges with a knife before lifting.
Tips & Tricks
Chill mixing bowls for a lighter whipped texture
Use a piping bag for cleaner layers
Decorate just before serving for best appearance
Recipe Variations
Chocolate Crust Version: Replace graham crackers with chocolate cookie crumbs and follow the same crust steps.
Lemon Cheesecake Minis: Add 1 teaspoon lemon zest and 1 tablespoon lemon juice to the filling for a fresh flavor.
Single Layer Cheesecakes: Skip the color divide and use one smooth layer for a classic look.
Final Thoughts
As Easter draws closer, Easter No Bake Mini Cheesecakes bring a gentle sense of celebration into my kitchen. Their soft colors and simple preparation fit easily into busy spring days filled with family plans and seasonal traditions.
Preparing Easter No Bake Mini Cheesecakes often leads to quiet conversation, a few shared smiles, and the kind of calm moments that make holiday baking feel meaningful. These small desserts have a way of gathering people together, even before they ever reach the table.
Easter No Bake Mini Cheesecakes
Ingredients
- 1½ cups graham cracker crumbs
- ¼ cup unsalted butter melted
- 2 tablespoons sugar
- 8 oz cream cheese softened
- ½ cup powdered sugar
- 1 teaspoon vanilla extract
- 1 cup whipped topping or heavy cream whipped
- Pink food coloring optional
- Easter sprinkles
- Mini chocolate eggs or pastel candies
Instructions
- Mix graham cracker crumbs, melted butter, and sugar until the texture resembles damp sand.
- Press the mixture into mini cheesecake molds or lined muffin tins and chill for 10 minutes.
- Beat cream cheese, powdered sugar, and vanilla until smooth and creamy.
- Gently fold in the whipped topping until light and airy.
- Divide filling, tint one portion pink if desired, then layer over the crusts.
- Refrigerate for at least 2 hours until set.
- Decorate with sprinkles and mini chocolate eggs just before serving.