Chocolate Meringue Easter Nests began to appear in my kitchen as spring settled in quietly, bringing brighter mornings and lighter routines. Winter coats lingered on hooks near the door, but the house already felt different.
One afternoon, my husband sat at the table sorting seed packets, talking through garden plans while I lined baking trays along the counter. The grandchildren stopped by after school, eager to hear what might be planned for Easter this year, and their chatter filled the room with anticipation.
Chocolate Meringue Easter Nests came together gradually, taking shape across a calm afternoon. Egg whites transformed in the mixer as conversation drifted from old classroom stories to upcoming church gatherings.
The children leaned in close, watching the meringue turn glossy and thick, surprised by how much it changed. Chocolate was grated slowly, forming soft curls on the board, while gentle warmth from the oven eased the cool air in the kitchen.
Chocolate Meringue Easter Nests now sit naturally among other signs of the season. Painted eggs rested on newspaper near the sink, and woven baskets waited by the door for the days ahead. The nests add a lighthearted note to the table without drawing too much attention to themselves. Shaped with care and shared at an easy pace, they reflect the quieter side of Easter celebrations in our home.
Short Description
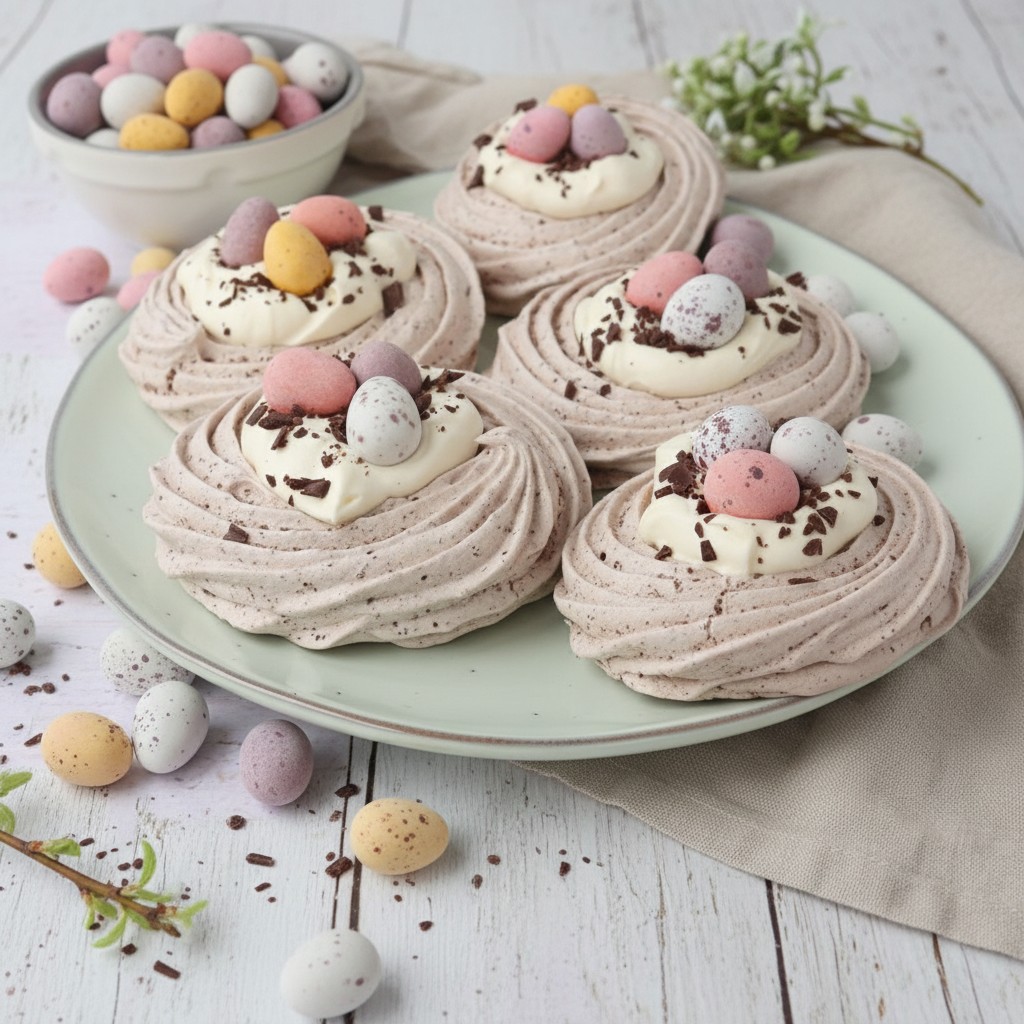
Chocolate Meringue Easter Nests are crisp chocolate meringues with soft centers, filled with lightly sweetened cream and topped with mini eggs for a festive Easter dessert.
Key Ingredients
For the meringue
- 100 g dark chocolate, finely grated
- 2 tablespoons cocoa powder
- 6 large egg whites
- 1 teaspoon cream of tartar
- 400 g caster sugar
- 1 teaspoon vanilla extract, optional
For filling and decoration
- 300 ml double cream
- 1 tablespoon icing sugar
- 1 teaspoon vanilla extract
- 120 g mini eggs
- 2 tablespoons dark chocolate curls or sprinkles
Tools Needed
- Stand mixer or electric hand mixer
- Mixing bowls
- Fine grater
- Spatula
- Piping bag with star nozzle
- Baking trays
- Baking paper
- Vegetable peeler for chocolate curls
Cooking Instructions
Step 1: Prepare the oven and trays
Preheat the oven to 100°C fan or 225°F gas mark ¼. Line two or three baking trays with baking paper. Use a small amount of meringue later to help stick the paper in place if needed.
Step 2: Prepare the chocolate mixture
Finely grate the dark chocolate and mix it thoroughly with the cocoa powder. Set aside so it is ready to fold into the meringue.
Step 3: Whisk the egg whites
Add the egg whites and cream of tartar to a mixing bowl. Whisk on medium speed until stiff peaks form. The mixture should hold its shape but still look soft and foamy.
Step 4: Add the sugar gradually
With the mixer running, add the caster sugar one spoonful at a time, allowing about 15 seconds between each addition. Add the vanilla extract once all the sugar is incorporated. The meringue should be thick, glossy, and smooth with no graininess when rubbed between fingers.
Step 5: Fold in the chocolate
Gently fold the chocolate and cocoa mixture into the meringue using a spatula. Take care not to knock out the air.
Step 6: Shape the nests
Transfer the meringue to a piping bag fitted with a star nozzle. Pipe a circular base, then build up the sides to form a nest shape. Alternatively, spoon dollops onto the tray and use the back of a spoon to create a hollow in the center.
Step 7: Bake and cool
Bake for 1 hour and 30 minutes. Turn the oven off and leave the door closed until fully cooled to prevent cracking. Leaving the meringues in the oven overnight works well.
Step 8: Prepare the filling
Whip the double cream with icing sugar and vanilla extract until soft peaks form. Spoon the cream into the center of each nest.
Step 9: Decorate and serve
Add three mini eggs to each nest and finish with dark chocolate curls or sprinkles. Store in the refrigerator and enjoy within 2 days.
Why You’ll Love This Recipe
Light texture balanced with rich chocolate flavor
Festive presentation suited to Easter tables
Naturally gluten free dessert option
Can be prepared ahead of time
Simple ingredients with a striking result
Mistakes to Avoid & Solutions
Adding sugar too quickly
Sugar added too fast can prevent the meringue from stabilizing properly.
Solution: Add sugar slowly, one spoonful at a time, allowing it to dissolve fully.
Overwhipping the egg whites
Overwhipped whites can become dry and grainy.
Solution: Stop whisking once stiff peaks hold their shape cleanly.
Opening the oven door too soon
Sudden temperature changes can cause cracks.
Solution: Let the oven cool completely with the door closed.
Folding too aggressively
Heavy mixing deflates the meringue.
Solution: Fold gently using slow, deliberate movements.
Adding cream too early
Cream added too far in advance can soften the nests.
Solution: Fill nests shortly before serving or the same day.
Serving and Pairing Suggestions
Serve on a dessert platter for Easter lunch
Pair with tea or light coffee
Add fresh berries alongside
Serve individually on small plates
Arrange at the center of a spring dessert table
Storage and Reheating Tips
Store filled nests in the refrigerator for up to 2 days
Keep unfilled nests in an airtight container at room temperature
Do not freeze filled nests
Avoid reheating to preserve texture
FAQs
1. Can I make the meringue nests ahead of time?
Yes, unfilled nests can be stored for several days in an airtight container.
2. Why do my meringues feel sticky?
Humidity can affect texture. Store in a dry environment.
3. Can I skip the cream of tartar?
Yes, but it helps stabilize the egg whites.
4. What if I do not have a piping bag?
Use a spoon to shape the nests instead.
5. Can I use milk chocolate instead of dark?
Yes, though the nests will be sweeter.
Tips & Tricks
Clean bowls thoroughly before whisking egg whites
Use superfine caster sugar for smoother meringue
Grate chocolate finely for even folding
Pipe nests evenly for consistent baking
Recipe Variations
Lemon Cream Nests: Add lemon zest to the cream and replace chocolate curls with lemon zest.
Berry Filled Nests: Top whipped cream with fresh raspberries or strawberries.
White Chocolate Nests: Use white chocolate shavings and skip cocoa powder.
Nutty Nests: Sprinkle finely chopped toasted hazelnuts over the cream.
Final Thoughts
Chocolate Meringue Easter Nests bring a gentle sense of occasion to spring celebrations. Their crisp shells and soft centers mirror the balance many Easter gatherings carry, quiet moments mixed with joyful conversation. Preparing them allows time to slow down and enjoy the rhythm of the season. They fit naturally among pastel colors, shared meals, and lingering afternoons.
Chocolate Meringue Easter Nests also offer a reminder that patience plays a role in baking. Waiting for the oven to cool, shaping each nest with care, and filling them at the right moment all add to the experience. These small steps often become part of the memory, long after the plates are cleared and the day settles into evening.

Chocolate Meringue Easter Nests
Ingredients
For the meringue
- 100 g dark chocolate finely grated
- 2 tablespoons cocoa powder
- 6 large egg whites
- 1 teaspoon cream of tartar
- 400 g caster sugar
- 1 teaspoon vanilla extract optional
For filling and decoration
- 300 ml double cream
- 1 tablespoon icing sugar
- 1 teaspoon vanilla extract
- 120 g mini eggs
- 2 tablespoons dark chocolate curls or sprinkles
Instructions
- Preheat oven to 100°C fan or 225°F and line baking trays with paper.
- Finely grate dark chocolate and mix with cocoa powder.
- Whisk egg whites with cream of tartar until stiff peaks form.
- Add sugar gradually, then vanilla, whisking until glossy and smooth.
- Gently fold chocolate mixture into the meringue.
- Pipe or spoon meringue into nest shapes on trays.
- Bake for 1 hour 30 minutes, then cool completely in the oven.
- Whip cream with icing sugar and vanilla to soft peaks.
- Fill nests with cream, decorate with mini eggs and chocolate, then chill.