This year, my kitchen was filled with a kind of quiet anticipation as my youngest grandchild’s birthday approached. Not the kind of party with balloons and bounce houses—just a cozy family celebration, filled with handmade touches and heartfelt effort. My gift? A Baby Bottle Cake, made from scratch, designed with little fingers, sweet smiles, and the joy of a first birthday in mind.
The morning of the celebration, the house was calm, still carrying the scent of last night’s simmered soup. I tied on my apron and pulled out the well-worn cake pans, the ones I’ve used for birthdays, graduations, and even the occasional rainy Saturday bake-a-thon. The batter came together with that familiar rhythm: whisking, folding, pouring. As the cake baked, the soft vanilla aroma drifted through the house, slowly drawing curious little noses toward the oven.
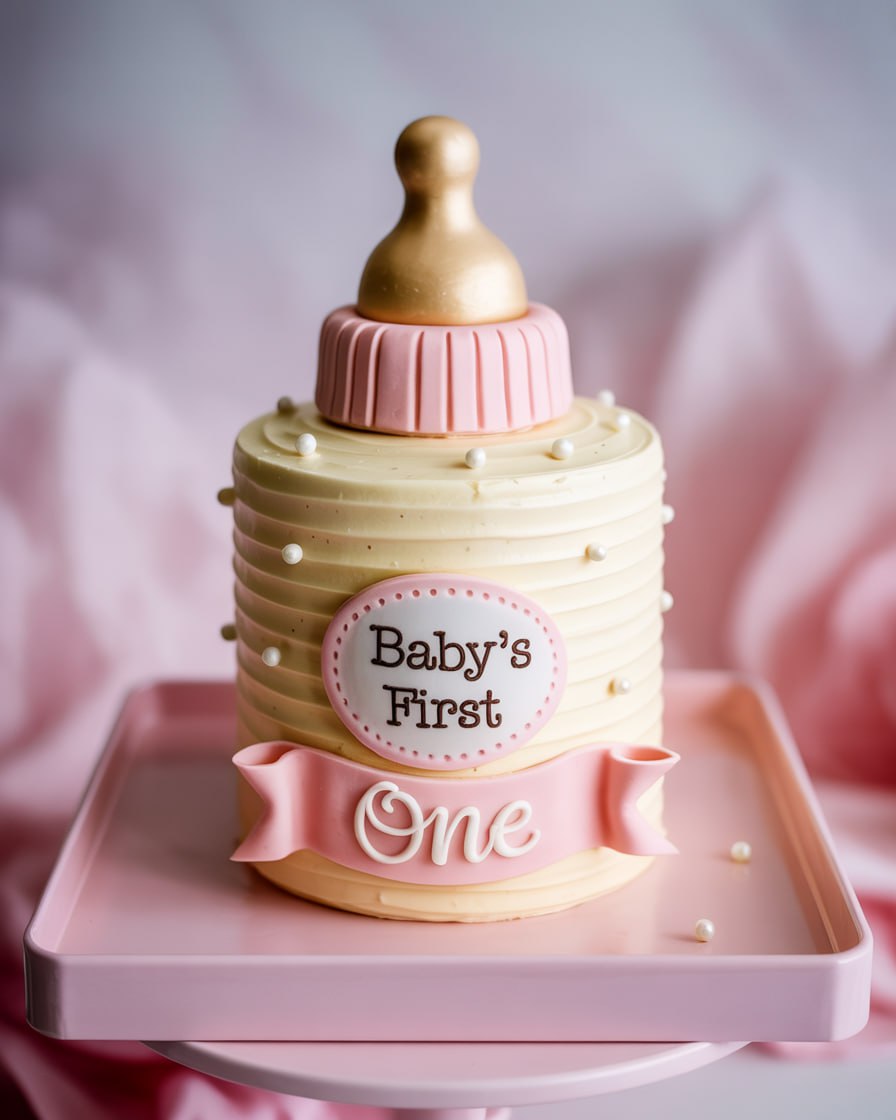
Later, with a serrated knife and a gentle hand, I shaped the cooled cake into something special. The bottle began to take form—slim in the middle, rounded at the top, wide at the base. A few swipes of pastel buttercream, a delicate swirl for the nipple, and a sprinkle of laughter from the kitchen table as the older kids snuck bits of frosting when they thought I wasn’t looking. By the time the candles were lit, the cake wasn’t just a centerpiece—it was a handmade memory, one slice at a time.
Short Description
This baby bottle cake is a charming and customizable centerpiece, perfect for baby showers, first birthdays, or full-month celebrations. Made with a soft vanilla cake and creamy buttercream, it’s both adorable and delicious.
Key Ingredients
For the Cake:
- 2 ½ cups all-purpose flour
- 2 ½ teaspoons baking powder
- ½ teaspoon salt
- 1 cup (2 sticks) unsalted butter, softened
- 2 cups granulated sugar
- 4 large eggs
- 1 tablespoon vanilla extract
- 1 cup whole milk
For the Buttercream Frosting:
- 1 cup unsalted butter, softened
- 4 cups powdered sugar
- 2 tablespoons milk or heavy cream
- 1 teaspoon vanilla extract
- Food coloring (blue, pink, yellow, or your choice)
Tools Needed
- Large mixing bowls
- Electric mixer or stand mixer
- Whisk and spatula
- Measuring cups and spoons
- 9×13-inch rectangular cake pan (or two, depending on size)
- Serrated knife (for shaping)
- Offset spatula or butter knife (for frosting)
- Piping bags (optional for detailed decorating)
- Toothpicks (to test doneness)
Cooking Instructions
Step 1: Preheat the Oven
Preheat your oven to 350°F (175°C). Grease and flour a rectangular cake pan. For easier shaping later, line the bottom with parchment paper.
Step 2: Mix the Dry Ingredients
In a medium bowl, whisk together the flour, baking powder, and salt. Set aside.
Step 3: Cream the Butter and Sugar
In a large mixing bowl, beat the softened butter and sugar on medium speed until pale and fluffy—about 3–4 minutes.
Step 4: Add Eggs and Vanilla
Add the eggs one at a time, beating well after each addition. Stir in the vanilla extract.
Step 5: Combine Wet and Dry
Alternately add the flour mixture and milk to the wet ingredients in three additions, starting and ending with flour. Mix until smooth but avoid overmixing.
Step 6: Bake the Cake
Pour the batter into your prepared pan(s), smoothing the top. Bake for 30–35 minutes, or until a toothpick inserted in the center comes out clean. Let cool in the pan for 10 minutes, then transfer to a wire rack to cool completely.
Step 7: Shape the Cake
Once completely cooled, carefully cut the cake into a baby bottle shape: round the top for the nipple, taper the middle, and keep the base wider. Use a template or freehand it with a serrated knife.
Step 8: Make the Buttercream
Beat the butter until creamy. Gradually add powdered sugar, then milk or cream, and vanilla. Beat on high until fluffy and spreadable.
Step 9: Tint and Decorate
Separate frosting into bowls and tint using your chosen food colors. Frost the cake: white or pastel for the bottle, yellow or beige for the nipple. Add measurement lines, a baby name, or other fun details.
Why You’ll Love This Recipe
– Beautiful centerpiece for special occasions
– Soft, moist vanilla cake with rich homemade buttercream
– Easy to customize colors and decorations
– Kid-friendly and fun to make
– Can be made ahead and chilled
– Perfect for baby showers, birthdays, or gender reveals
Mistakes to Avoid & Solutions
Overbaking the cake: Dry cake happens fast. Check at 30 minutes and remove when a toothpick comes out with moist crumbs.
Shaping while warm: Always cool the cake completely before cutting to avoid crumbling.
Overmixing the batter: This leads to a dense texture. Mix until just combined.
Too-stiff frosting: If your buttercream is hard to spread, add a bit more milk (1 tsp at a time) until smooth.
Uneven frosting: Use an offset spatula and chill the cake for 10–15 minutes between crumb coat and final layer for smoother results.
Serving and Pairing Suggestions
– Serve chilled or at cool room temperature for best texture.
– Pair with fresh berries or fruit salad to balance the sweetness.
– Great with a light herbal tea, vanilla milk, or sparkling water with lemon.
– Serve plated with a side dollop of whipped cream or yogurt for kids.
– Works well in buffet-style dessert tables at baby showers or birthday parties.
Storage and Reheating Tips
– Store covered in the refrigerator for up to 4 days.
– To avoid drying out, press plastic wrap gently against any cut sides.
– Let sit at room temperature for 15–20 minutes before serving.
– Do not microwave; it will melt the frosting.
– For longer storage, freeze slices wrapped in plastic and foil for up to 2 months.
FAQs
1. How far in advance can I make this cake?
You can bake the cake a day in advance and frost it the next day. Store unfrosted layers wrapped tightly at room temperature.
2. Can I use boxed cake mix instead of homemade?
Yes, you can use a boxed vanilla or yellow cake mix as a shortcut. Just follow the shaping and frosting steps as directed.
3. What if I don’t have food coloring?
You can leave the frosting white and use fruit-based powders or natural alternatives like beet or turmeric for soft hues.
4. How do I get clean, sharp edges on the bottle shape?
Use a serrated knife and cut slowly. Chill the cake for 15–20 minutes before carving for cleaner cuts.
5. Can this be made gluten-free or dairy-free?
Yes! Substitute a gluten-free flour blend and dairy-free milk and butter. Ensure your frosting ingredients are dairy-free too.
Tips & Tricks
– Chill the cake before shaping to reduce crumbling.
– Use gel food coloring for more vibrant frosting with less liquid.
– Piping bags make detail work easier—use a round tip for outlines.
– Add a touch of almond extract for a subtle flavor twist.
– Smooth frosting by dipping your spatula in hot water and wiping dry before use.
Recipe Variations
Chocolate Baby Bottle Cake
Replace ½ cup of flour with unsweetened cocoa powder. Use chocolate frosting or tint white buttercream with a few tablespoons of melted dark chocolate.
Strawberry Baby Bottle Cake
Add ½ cup finely chopped fresh strawberries to the batter and a teaspoon of strawberry extract. Tint frosting pink and decorate with heart shapes or polka dots.
Lemon Baby Bottle Cake
Add 1 tablespoon of lemon zest and 2 tablespoons of lemon juice to the batter. Use lemon extract in the frosting and decorate with yellow accents.
Two-Tier Baby Bottle Cake
Double the recipe and stack two layers using dowels or straws for support. Great for larger parties.
Final Thoughts
Baby Bottle Cake ‘s not just about dessert—it’s about sharing moments, making memories, and turning an ordinary afternoon into something truly special. This baby bottle cake stands as a symbol of thoughtfulness, love, and celebration.
For anyone hoping to add a personal touch to a meaningful day, this cake delivers both charm and flavor. The time you spend shaping and decorating it quickly becomes part of the occasion itself. Few things match the joy of seeing it complete—and even fewer match the joy of watching it disappear slice by slice.
Baby Bottle Cake Recipe
Print ThisIngredients
- For the Cake:
- 2 ½ cups all-purpose flour
- 2 ½ teaspoons baking powder
- ½ teaspoon salt
- 1 cup (2 sticks) unsalted butter, softened
- 2 cups granulated sugar
- 4 large eggs
- 1 tablespoon vanilla extract
- 1 cup whole milk
- For the Buttercream Frosting:
- 1 cup unsalted butter, softened
- 4 cups powdered sugar
- 2 tablespoons milk or heavy cream
- 1 teaspoon vanilla extract
- Food coloring (blue, pink, yellow, or your choice)
Instructions
Step 1: Preheat the Oven
Preheat your oven to 350°F (175°C). Grease and flour a rectangular cake pan. For easier shaping later, line the bottom with parchment paper.
Step 2: Mix the Dry Ingredients
In a medium bowl, whisk together the flour, baking powder, and salt. Set aside.
Step 3: Cream the Butter and Sugar
In a large mixing bowl, beat the softened butter and sugar on medium speed until pale and fluffy—about 3–4 minutes.
Step 4: Add Eggs and Vanilla
Add the eggs one at a time, beating well after each addition. Stir in the vanilla extract.
Step 5: Combine Wet and Dry
Alternately add the flour mixture and milk to the wet ingredients in three additions, starting and ending with flour. Mix until smooth but avoid overmixing.
Step 6: Bake the Cake
Pour the batter into your prepared pan(s), smoothing the top. Bake for 30–35 minutes, or until a toothpick inserted in the center comes out clean. Let cool in the pan for 10 minutes, then transfer to a wire rack to cool completely.
Step 7: Shape the Cake
Once completely cooled, carefully cut the cake into a baby bottle shape: round the top for the nipple, taper the middle, and keep the base wider. Use a template or freehand it with a serrated knife.
Step 8: Make the Buttercream
Beat the butter until creamy. Gradually add powdered sugar, then milk or cream, and vanilla. Beat on high until fluffy and spreadable.
Step 9: Tint and Decorate
Separate frosting into bowls and tint using your chosen food colors. Frost the cake: white or pastel for the bottle, yellow or beige for the nipple. Add measurement lines, a baby name, or other fun details.