Last spring, I invited my niece and her two kids to stay with me for a few days during their school break. My kitchen, once quiet and predictable, turned into a whirlwind of giggles, sticky fingers, and wide-eyed curiosity.
One afternoon, after we returned from the park with tired legs and grass-stained sneakers, the kids asked for something sweet—but not too heavy, and definitely “fun.” I rummaged through the pantry and fridge, spotting a box of banana pudding mix, a package of cream cheese, and a half-used bag of waffle cones from an ice cream night months ago. The idea struck me like an old friend tapping on my shoulder.
Back when I was teaching, I used to make banana pudding for the school bake sales—always a hit, always gone before lunch. But this time, I wanted to dress it up a bit, make it whimsical for the little ones without losing the nostalgic flavor I’d grown up with.
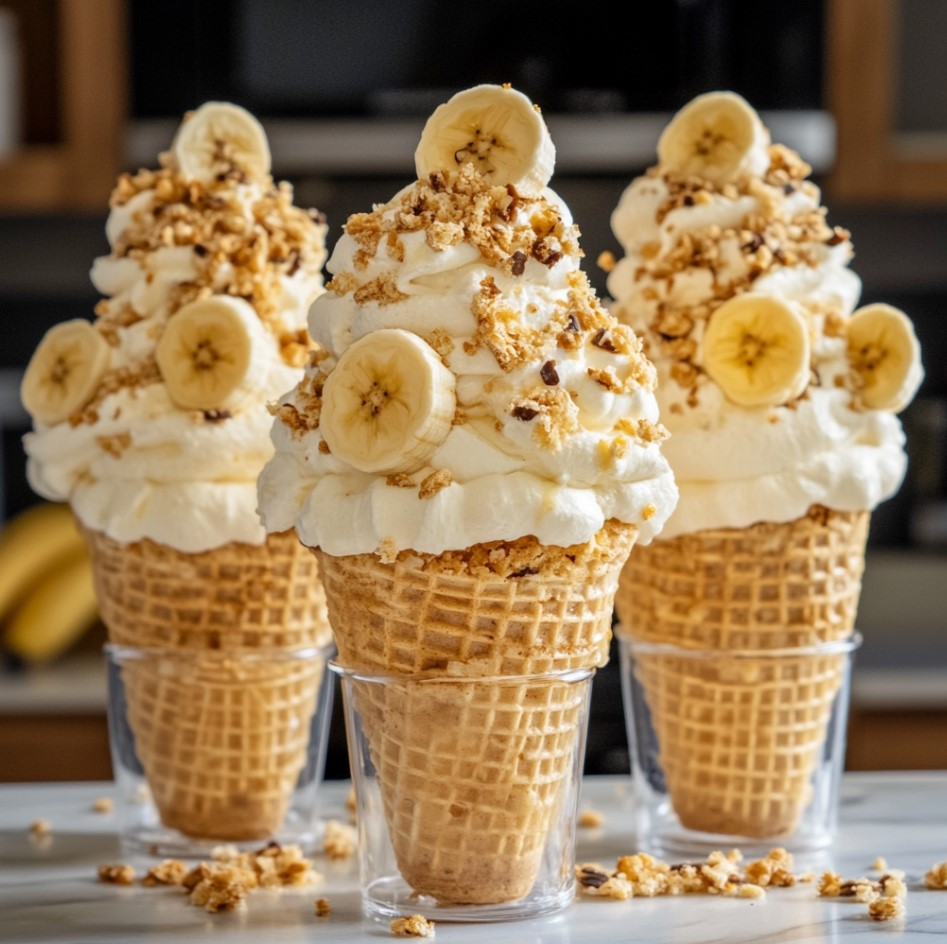
That’s how these Banana Pudding Cheesecake Cones came to life—something creamy, crunchy, and a little unexpected. As we layered, dipped, and decorated, I saw how food doesn’t just fill bellies—it brings people together, lets stories unfold, and creates little pockets of joy on slow afternoons. I’m convinced the kitchen is where memory and flavor get all tangled up in the best way.

Short Description
Banana pudding cheesecake cones combine the creamy richness of banana-flavored cheesecake with the nostalgic charm of a waffle cone. No baking required—just layer, chill, and enjoy!
Key Ingredients
For the Cheesecake Filling:
- 16 oz cream cheese, softened
- 1 cup powdered sugar
- 1/2 cup heavy whipping cream
- 1 tsp vanilla extract
- 1 package (3.4 oz) instant banana pudding mix
- 1½ cups cold milk
For the Cones:
- 10–12 waffle or sugar cones
- 1 cup crushed vanilla wafer cookies
- 2 tbsp melted butter
For Garnish:
- Sliced bananas
- Whipped cream
- Crushed vanilla wafer cookies
- Caramel drizzle (optional)
Tools Needed
- Electric hand mixer or stand mixer
- Mixing bowls (at least 3)
- Whisk
- Silicone spatula
- Small spoon or piping bag
- Ice cream cone stand or tall glasses (for holding cones upright)
Cooking Instructions
Step 1: Beat the Cream Cheese
In a large mixing bowl, beat the softened cream cheese and powdered sugar until completely smooth and fluffy. This takes about 2–3 minutes using a hand mixer.
Step 2: Whip the Cream
In a separate bowl, whip the heavy whipping cream until soft peaks form. Gently fold this into the cream cheese mixture with a spatula. Don’t overmix—keep it airy and smooth.
Step 3: Prepare the Banana Pudding
In another bowl, whisk together the banana pudding mix and cold milk until thickened, about 2–3 minutes. Let it sit for 1 minute to fully set.
Step 4: Combine the Filling
Gently fold the banana pudding into the cream cheese mixture until it’s fully combined. Cover and refrigerate the filling while you prepare the cones.
Step 5: Coat the Cone Rims
Mix the crushed vanilla wafers with melted butter. Dip the rims of the cones into the mixture and roll them in the crushed cookies. Let them set for a few minutes to firm up.
Step 6: Fill the Cones
Using a piping bag or spoon, fill each cone generously with the banana pudding cheesecake filling. Fill all the way to the top, pressing lightly to remove any air pockets.
Step 7: Garnish and Serve
Top each cone with a banana slice, a swirl of whipped cream, crushed cookies, and a drizzle of caramel if you like a little extra sweetness. Serve immediately for best texture and taste.
Why You’ll Love This Recipe
– No oven required—perfect for warm days
– Great for parties, picnics, or afternoon treats
– Kid-friendly and fun to make together
– Easy to customize with your favorite toppings
– Individually portioned and mess-free
– Rich flavor, light texture—very satisfying
– Keeps well in the fridge for a couple of days
Mistakes to Avoid & Solutions
Mistake 1: Runny filling
Solution: Make sure the banana pudding is thickened before folding it in. Use cold milk and give it time to set properly.
Mistake 2: Overmixing the whipped cream
Solution: Fold it gently to keep the filling light. Overmixing can deflate the cream and make it dense.
Mistake 3: Soggy cones
Solution: Fill the cones just before serving. If you need to prep in advance, store the filling separately and assemble later.
Mistake 4: Cracking cones during dipping
Solution: Warm the melted butter slightly and avoid pressing too hard when dipping. Gently roll to coat.
Mistake 5: Filling oozes out the bottom
Solution: Place a mini marshmallow or banana slice at the bottom of the cone to block leakage.
Serving and Pairing Suggestions
These cones are delightful on their own, but even better with:
A glass of cold milk or vanilla almond milk
A small scoop of vanilla bean ice cream on the side
Served on a dessert platter with fresh berries
Topped with chopped toasted pecans for crunch
Set out in cone stands at baby showers or birthday parties
Storage and Reheating Tips
Refrigeration: Store leftover filling in an airtight container in the fridge for up to 3 days.
Assembled cones: If already filled, keep in the fridge standing upright in glasses. Eat within 24 hours for best texture.
Preventing sogginess: Add crushed cookies and garnish right before serving.
Freezing: Not recommended—cones and filling lose their texture when thawed.
FAQs
1. Can I use homemade banana pudding instead of instant mix?
Yes! Just make sure it’s thick and cooled completely before folding it in.
2. What can I use instead of vanilla wafer cookies?
Try graham crackers, butter cookies, or even crushed shortbread.
3. Can I make this dairy-free?
Use dairy-free cream cheese, coconut whipped topping, and a plant-based pudding mix with almond or oat milk.
4. How far in advance can I prepare the filling?
You can make the filling up to 48 hours ahead. Keep it refrigerated in a covered container.
5. Can I use ice cream cones with a flat base?
Absolutely. Flat-bottomed cones make it easier to stand them up on a tray or serving plate.
Tips & Tricks
Chill your mixing bowl and beaters before whipping cream—it helps it whip faster.
For clean piping, use a large star tip with your piping bag.
Add a few mashed banana pieces to the filling for extra banana flavor.
For a deeper flavor, toast the crushed cookies for 2 minutes before using.
Want extra crunch? Sprinkle crushed nuts or mini chocolate chips inside the cones before filling.
Recipe Variations
1. Chocolate Banana Cones
Add 2 tbsp cocoa powder to the cheesecake filling.
Use chocolate cones or dip regular cones in melted chocolate before adding the cookie coating.
2. Peanut Butter Banana Cheesecake Cones
Swirl 1/4 cup peanut butter into the finished filling.
Garnish with crushed peanuts and a drizzle of chocolate.
3. Tropical Twist
Mix in 1/4 cup crushed pineapple (drained well) into the filling.
Top with toasted coconut flakes and a maraschino cherry.
4. Mini Cones for Parties
Use mini cones and pipe in smaller portions for bite-sized treats.
Perfect for buffet tables or holiday platters.
5. Gluten-Free Version
Use gluten-free cones and certified gluten-free cookies for coating.
All other ingredients remain the same.
Final Thoughts
That weekend flew by in the usual blur—too many snacks, movie nights that ran too late, and pillow forts taking over the living room. But when I think back, those Banana Pudding Cheesecake Cones stand out the most. Not just for the taste—though they were delicious—but for the laughter that filled the kitchen while we made them.
My niece snapped a photo of her youngest with whipped cream on his nose and banana slice in hand, grinning like it was the best thing he’d ever tasted. I printed it and tucked it into my recipe binder as a quiet reminder: sometimes, the sweetest moments don’t come from elaborate meals, but from sharing something simple and heartfelt.

Ingredients
- For the Cheesecake Filling:
- 16 oz cream cheese, softened
- 1 cup powdered sugar
- 1/2 cup heavy whipping cream
- 1 tsp vanilla extract
- 1 package (3.4 oz) instant banana pudding mix
- 1½ cups cold milk
- For the Cones:
- 10–12 waffle or sugar cones
- 1 cup crushed vanilla wafer cookies
- 2 tbsp melted butter
- For Garnish:
- Sliced bananas
- Whipped cream
- Crushed vanilla wafer cookies
- Caramel drizzle (optional)
Instructions
Step 1: Beat the Cream Cheese
In a large bowl, beat softened cream cheese and powdered sugar until smooth and fluffy, about 2–3 minutes.
Step 2: Whip the Cream
Whip heavy cream in a separate bowl until soft peaks form. Gently fold into the cream cheese mixture—keep it light.
Step 3: Make the Banana Pudding
Whisk pudding mix and cold milk until thick, about 2–3 minutes. Let sit 1 minute to set.
Step 4: Combine the Filling
Fold the pudding into the cream cheese mixture until fully blended. Chill while prepping cones.
Step 5: Prep the Cone Rims
Mix crushed vanilla wafers with melted butter. Dip cone rims, then roll in crushed cookies. Let set.
Step 6: Fill the Cones
Pipe or spoon filling into cones to the top, pressing lightly to avoid air gaps.
Step 7: Garnish and Serve
Top with banana slices, whipped cream, crushed cookies, and optional caramel. Serve fresh for best flavor.


