Saturday morning came with the kind of golden sunlight that seeps through kitchen curtains and practically begs for something warm and toasty from the oven. I opened the fridge and spotted half a rotisserie chicken from the night before, a block of cheddar, and a bottle of buffalo sauce lurking in the back. A plan started forming right there between the juice boxes and the eggs.
The first time I tried buffalo sauce in the morning, I was skeptical. Isn’t that game-day food? But when it’s balanced with melty cheese and soft, toasted buns, the heat actually wakes you up in the best way—without overpowering your palate. My husband, who usually skips breakfast unless there’s bacon involved, came in sniffing the air, grabbed a slider, and nodded mid-bite like, “Okay, this is breakfast.”
So now, here’s the recipe that turned a sleepy morning into a flavor-packed family breakfast—one that even the picky eater in the house approved of.
Short Description
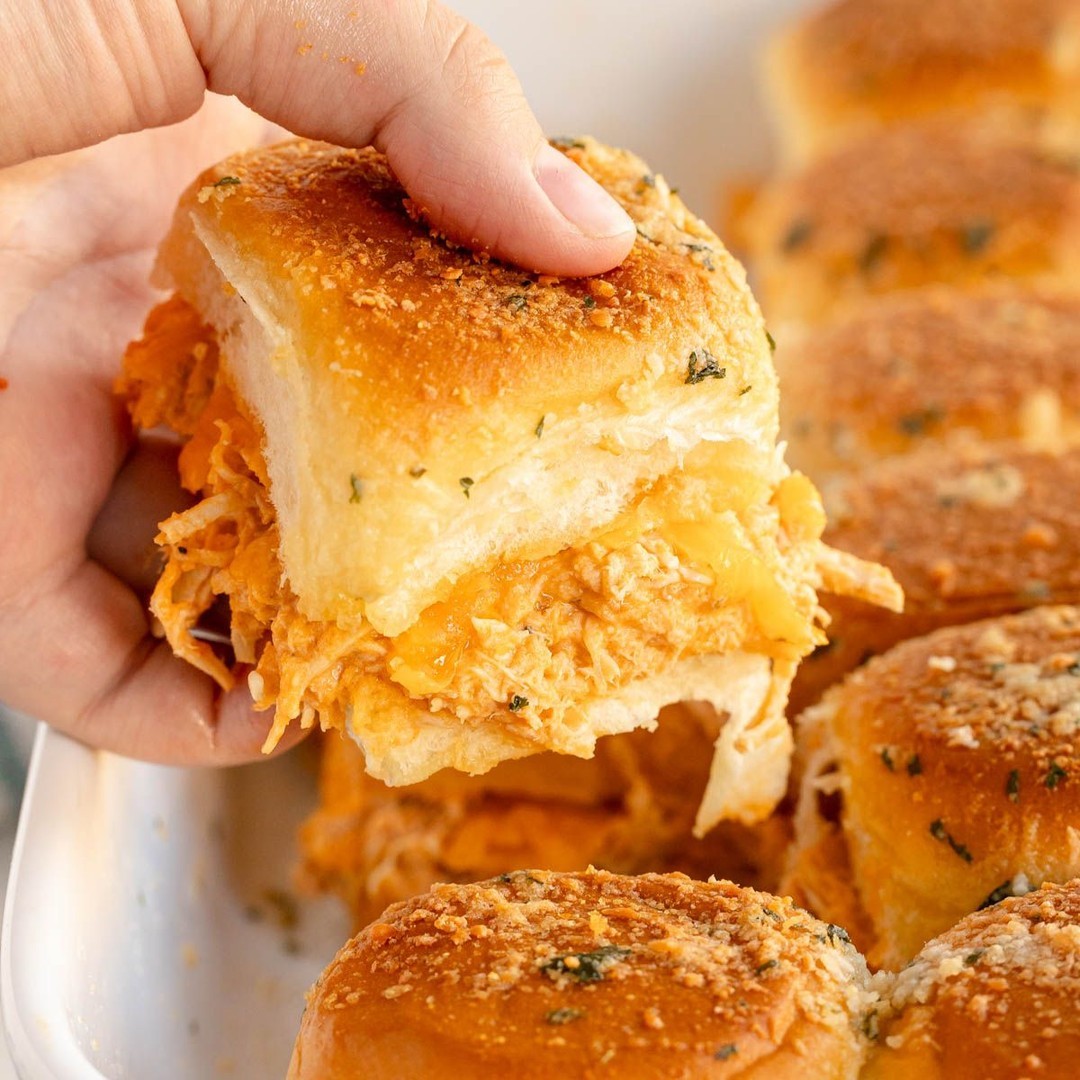
Buffalo Chicken Sliders are spicy, cheesy mini sandwiches made with shredded rotisserie chicken, buffalo sauce, and freshly grated cheese baked inside golden, soft rolls. A bold and satisfying breakfast twist that’s easy to make and hard to resist.
Key Ingredients
For the filling:
- 3½ cups shredded rotisserie chicken
- ½ cup buffalo sauce (preferably Frank’s RedHot)
For the assembly:
- 12 slider buns (Hawaiian rolls work great)
- 1½ cups freshly grated mozzarella or cheddar cheese
- 2 tablespoons melted butter (optional, for brushing tops)
Tools Needed
- Serrated bread knife
- Medium mixing bowl
- Baking dish (9×13-inch)
- Aluminum foil
- Cheese grater
- Pastry brush (optional)
Cooking Instructions
Step 1: Mix the Filling
In a medium bowl, combine shredded rotisserie chicken with buffalo sauce. Stir thoroughly to ensure every strand of chicken is well-coated. This prevents bland bites or overly spicy pockets.
Step 2: Prep the Rolls
Using a serrated knife, slice the entire set of rolls horizontally in half—keep them attached, like a sandwich loaf. This helps with even assembly and keeps the sliders intact during baking.
Step 3: Assemble the Sliders
Place the bottom half of the rolls in a greased 9×13-inch baking dish. Spread the buffalo chicken evenly across the surface. Sprinkle freshly grated cheese over the chicken layer. Place the top half of the rolls back on.
Step 4: Bake Covered
Cover the dish with aluminum foil and bake at 350°F (175°C) for 15 minutes. This step ensures the filling is warmed through and the cheese is melted without burning the buns.
Step 5: Bake Uncovered
Remove the foil and bake for an additional 5 minutes until the tops are golden brown and slightly crisp. If desired, brush the tops with melted butter for extra shine and flavor.
Step 6: Rest and Serve
Let the sliders rest for 5 minutes before slicing. This prevents the cheese and sauce from spilling out and gives you clean, neat portions.
Why You’ll Love This Recipe
– Perfectly portioned for breakfast, brunch, or snacks
– Packs bold buffalo flavor without being overpowering
– Uses rotisserie chicken for convenience and speed
– Melty cheese makes it ultra-satisfying
– Bakes in one pan, minimal cleanup
– Great for make-ahead or meal prep mornings
– Customizable to fit any spice level or cheese preference
Mistakes to Avoid & Solutions
Not mixing the chicken and sauce well
Solution: Use two forks to toss and shred the chicken as you mix. Make sure every bite is coated for even flavor.
Separating the rolls while slicing
Solution: Keep the buns attached when slicing horizontally. This makes assembly and baking easier and cleaner.
Using pre-shredded cheese
Solution: Always grate cheese fresh. Pre-shredded types contain anti-caking agents that prevent proper melting and that gooey stretch.
Over-browning the tops too early
Solution: Bake covered for the first 15 minutes. Only remove the foil at the end for a golden finish.
Cutting immediately after baking
Solution: Allow 5 minutes to cool. This keeps the layers intact and the cheese from oozing out too quickly.
Serving and Pairing Suggestions
Serve these sliders:
– Warm from the oven as a savory breakfast centerpiece
– On a weekend brunch buffet with fruit salad and yogurt parfaits
– Family-style on a big wooden board with a side of ranch or blue cheese dressing
– With a cold glass of fresh orange juice or a hot cup of coffee
– As a fun alternative to bagels or breakfast sandwiches at a casual brunch party
Storage and Reheating Tips
Storage: Store leftover sliders in an airtight container in the fridge for up to 3 days.
Reheating in Oven: Preheat to 325°F. Cover sliders with foil and bake for 10–12 minutes until warmed through.
Reheating in Microwave: Wrap in a paper towel and heat for 30–40 seconds, but note the buns may soften.
Freezing: Assemble but don’t bake. Wrap tightly in foil and freeze up to 2 months. Thaw overnight in the fridge and bake as directed.
FAQs
1. Can I use chicken breast instead of rotisserie chicken?
Yes, but make sure it’s cooked and shredded well. Rotisserie chicken adds more flavor and tenderness, though.
2. What’s the best cheese for these sliders?
Freshly grated cheddar or mozzarella works best. Monterey Jack or pepper jack adds a nice kick if you like spice.
3. Can I make these the night before?
Absolutely. Assemble everything, cover tightly, and refrigerate overnight. Bake fresh in the morning.
4. How do I keep the buns from getting soggy?
Don’t overload with sauce and be sure to bake uncovered at the end for a crispy top layer.
5. What if I don’t have buffalo sauce?
You can mix hot sauce with a bit of melted butter to mimic the flavor profile. Try ¼ cup hot sauce + 2 tablespoons butter.
Tips & Tricks
– Use parchment paper under the sliders for easier cleanup.
– Add a layer of ranch dressing under the chicken for an extra creamy bite.
– Sprinkle green onions or parsley over the cheese layer before baking for fresh contrast.
– Warm the buffalo sauce slightly before mixing—it coats the chicken more evenly.
– Toast the bottom half of the buns briefly before assembling if you like extra texture.
Recipe Variations
Blue Cheese Buffalo Sliders
Swap mozzarella for crumbled blue cheese and cheddar. Add a thin layer of blue cheese dressing before layering the chicken.
BBQ Chicken Breakfast Sliders
Replace buffalo sauce with ½ cup of your favorite BBQ sauce. Add caramelized onions and shredded gouda for a smoky-sweet flavor.
Veggie Buffalo Sliders
Use jackfruit or roasted cauliflower in place of chicken. Follow the same steps—just be sure your veggies are well-cooked and coated.
Spicy Morning Sliders
Add sliced jalapeños over the chicken layer and use pepper jack cheese for a bolder, fiery twist.
Final Thoughts
These Buffalo Chicken Sliders have become something of a weekend ritual in our kitchen—easy to make, packed with bold flavor, and perfect for sharing around the breakfast table. There’s a rhythm to pulling them from the oven, slicing through those soft buns, and watching the cheese pull as everyone grabs one (or two).
This recipe delivers the perfect balance of heat, comfort, and satisfaction for hosting brunch, feeding a hungry family, or simply treating yourself to a little indulgence. It’s not complicated, but it feels special—and sometimes, that’s exactly what breakfast should be.
Buffalo Chicken Sliders
Sandra Myers
Buffalo Chicken Sliders
Print This
Ingredients
- For the filling:
- 3½ cups shredded rotisserie chicken
- ½ cup buffalo sauce (preferably Frank’s RedHot)
- For the assembly:
- 12 slider buns (Hawaiian rolls work great)
- 1½ cups freshly grated mozzarella or cheddar cheese
- 2 tablespoons melted butter (optional, for brushing tops)
Instructions
Step 1: Mix shredded rotisserie chicken with buffalo sauce thoroughly to coat evenly.
Step 2: Slice the entire set of rolls horizontally, keeping them connected.
Step 3: Place the bottom half of rolls in a greased dish, spread the chicken mixture evenly, sprinkle freshly grated cheese, then place the top half of the rolls back on.
Step 4: Cover with foil and bake at 350°F (175°C) for 15 minutes to warm through and melt the cheese.
Step 5: Remove foil and bake uncovered for 5 more minutes until golden and slightly crisp. Optionally brush with melted butter.
Step 6: Let rest for 5 minutes before slicing to keep the filling neat.