The first time I brought out this jam and coconut traybake was during a weekend at my daughter’s new apartment in Bristol. She’d just moved in, still surrounded by boxes, with one saucepan and a kettle to her name. I had tucked a tin of this traybake into my bag, thinking she might fancy a slice with tea.
What I hadn’t expected was her neighbor’s little boy, Toby, to wander in shyly with a crayon drawing for her. As soon as he spotted the cake tin, his eyes lit up. He asked if it was “the kind with coconut snow on top.”
Turns out, his gran used to bake something just like it before she moved back to Jamaica. That small moment turned into an hour-long visit — him munching square after square while telling us about his school play and favorite video games. Later that afternoon, he came back with a thank-you note and a tiny bouquet of daisies from the park. It reminded me how food — especially nostalgic bakes like this — connects us across generations and backgrounds.
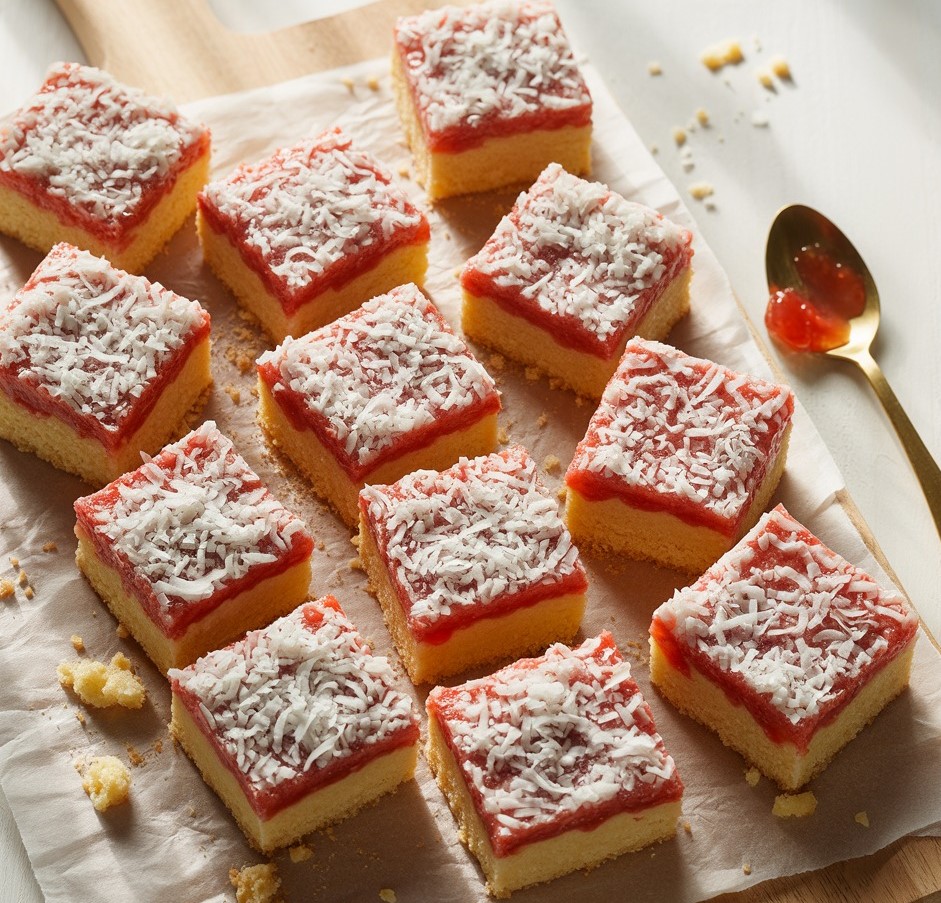
This traybake isn’t showy or modern. It’s soft sponge, a sweet layer of strawberry jam, and a snowy dusting of coconut. That’s it. But its simplicity is its strength. It’s been at classroom bake sales, tucked into lunchboxes, shared with coworkers at tea break, and always met with the same quiet joy. Sometimes, it’s the humble traybake that brings a little light into an ordinary afternoon.
Short Description
This classic Jam and Coconut Traybake features a light, buttery sponge topped with sweet strawberry jam and a sprinkle of coconut. It’s a simple, nostalgic treat that’s perfect for tea time or an easy family dessert.
Key Ingredients
For the Sponge:
- 200g butter, softened
- 200g caster sugar
- 4 large eggs
- 200g self-raising flour
- 2 tbsp milk
- 1 tsp vanilla extract
For the Topping:
- 4 tbsp strawberry jam
- 50g desiccated coconut
Tools Needed
- 20cm x 30cm rectangular baking tin
- Baking parchment
- Electric hand mixer or wooden spoon
- Mixing bowls
- Spatula
- Sieve (for flour)
- Skewer (for testing doneness)
Cooking Instructions
Step 1: Preheat the Oven
Set your oven to 180°C (fan 160°C). Grease and line a 20cm x 30cm baking tin with baking parchment. Make sure the paper reaches up the sides—this helps lift the traybake out later.
Step 2: Cream the Butter and Sugar
In a large bowl, beat the softened butter and caster sugar together until pale and fluffy. This should take about 3–4 minutes with an electric mixer or longer by hand. It should look almost like whipped cream.
Step 3: Add the Eggs
Add the eggs one at a time, mixing well between each addition. If the mixture starts to curdle, add a spoonful of the flour. This helps bring it back together.
Step 4: Fold in the Dry Ingredients
Sift in the self-raising flour and fold gently with a spatula. Add the vanilla extract and milk, and stir until you have a smooth, thick batter. Don’t overmix—stop once everything is just combined.
Step 5: Bake the Sponge
Pour the batter into the lined tin and spread it evenly. Tap the tin gently on the counter to level the surface. Bake for 25–30 minutes, or until golden and a skewer inserted in the middle comes out clean.
Step 6: Cool Completely
Let the sponge cool fully in the tin before adding the topping. If it’s too warm, the jam will melt and soak through.
Step 7: Add the Jam Topping
Once cooled, spread the strawberry jam evenly over the top using the back of a spoon. Don’t rush this—go right to the edges for full flavor in every bite.
Step 8: Sprinkle with Coconut
Evenly scatter the desiccated coconut over the jam. Press down very gently with your hand or spatula to help it stick.
Step 9: Slice and Serve
Cut into squares or rectangles, depending on your preference. Serve with a cup of tea, pack in lunchboxes, or bring to gatherings.
Why You’ll Love This Recipe
Comforting & nostalgic: Reminds many of school desserts or teatime with family.
Quick and easy: No complicated steps or special techniques.
Perfect for sharing: Great for parties, potlucks, or afternoon tea.
Versatile: Change the jam, add spices, or adjust to dietary needs.
Kid-friendly: A big hit with little ones and grown-ups alike.
Mistakes to Avoid & Solutions
1. Overmixing the batter
Problem: Makes the sponge dense instead of light.
Solution: Fold the flour in gently and stop as soon as the ingredients are combined.
2. Spreading jam on a warm cake
Problem: Jam melts into the sponge, making it soggy.
Solution: Always wait until the sponge is fully cooled before topping.
3. Using cold butter
Problem: Makes creaming difficult and affects texture.
Solution: Let butter sit at room temperature for 30–60 minutes before starting.
4. Uneven baking
Problem: Edges cook faster than the middle.
Solution: Make sure the batter is spread evenly and your oven is preheated fully.
5. Coconut falling off
Problem: Topping doesn’t stick properly.
Solution: Press the coconut lightly into the jam and use a thick, sticky jam.
Serving and Pairing Suggestions
Serve warm or at room temperature with a cup of black tea, Earl Grey, or chamomile.
Pair with fresh berries or a dollop of whipped cream for dessert.
For a school-lunch-style treat, cut into small squares and pack in lunchboxes.
Works beautifully for bake sales, afternoon tea, or family-style buffets.
Storage and Reheating Tips
Room Temperature: Store in an airtight container for up to 3 days.
Fridge: Keeps for up to 5 days—bring to room temperature before serving.
Freezer: Wrap individual pieces in clingfilm, then foil. Freeze up to 2 months.
Reheating: If desired, warm slices in the microwave for 10–15 seconds.
FAQs
1. Can I use different jam flavors?
Yes! Raspberry, apricot, or blackberry all work well. Just make sure it’s a thick, spreadable jam.
2. Can I make this traybake gluten-free?
Absolutely. Use a gluten-free self-raising flour blend and add ½ tsp of xanthan gum for structure.
3. Can I reduce the sugar?
You can reduce it slightly (try 170g), but keep in mind it may affect the sponge texture.
4. What if I don’t have self-raising flour?
Use 200g plain flour plus 2 tsp baking powder.
5. Can I make this ahead of time?
Yes! It actually tastes better the next day after the jam has settled. Bake the day before and store covered.
Tips & Tricks
For extra flavor, warm the jam slightly before spreading—it spreads more easily.
Add a pinch of salt to enhance the sponge’s flavor.
Line the tin carefully for easy lifting and clean edges.
Use a serrated knife for cleaner cuts.
For a moister sponge, add 1 extra tablespoon of milk if your batter feels too thick.
Recipe Variations
1. Lemon & Coconut Traybake
Swap the vanilla for 1 tbsp lemon zest and use lemon curd instead of jam. Add a light lemon glaze on top before sprinkling coconut.
2. Chocolate-Coconut Version
Replace 30g of flour with cocoa powder. Use cherry jam for a chocolate-cherry twist, and top with dark chocolate shavings and coconut.
3. Vegan Traybake
Use dairy-free margarine and 4 tbsp aquafaba (chickpea brine) in place of eggs. Ensure your jam is vegan-friendly.
4. Tropical Traybake
Use pineapple jam or mango preserve, and mix 1 tbsp chopped dried pineapple into the coconut before sprinkling.
Final Thoughts
Toby still asks about “that coconut cake” when I visit. I always bring a few squares, wrapped in parchment and tucked into a biscuit tin, just like before. Recipes like this don’t need reinventing — they carry stories, scents, and smiles from one home to the next.
If you’re making this for someone you care about, don’t rush. Let the jam spread thick, the coconut fall unevenly. Perfection isn’t what anyone remembers — it’s the sweetness in between bites and the moments they accompany.
Classic Jam And Coconut Traybake
Print ThisIngredients
- For the Sponge:
- 200g butter, softened
- 200g caster sugar
- 4 large eggs
- 200g self-raising flour
- 2 tbsp milk
- 1 tsp vanilla extract
- For the Topping:
- 4 tbsp strawberry jam
- 50g desiccated coconut
Instructions
Step 1: Preheat the Oven
Heat oven to 180°C (160°C fan). Grease and line a 20×30cm tin with parchment, letting it hang over the sides.
Step 2: Cream Butter and Sugar
Beat butter and sugar until pale and fluffy—about 3–4 minutes with a mixer.
Step 3: Add Eggs
Add eggs one at a time, mixing well. If it curdles, add a spoonful of flour.
Step 4: Fold in Dry Ingredients
Sift in flour, then gently fold. Add vanilla and milk, stir until just combined.
Step 5: Bake
Pour batter into tin, level it, and bake for 25–30 minutes until golden and cooked through.
Step 6: Cool
Let the sponge cool completely in the tin.
Step 7: Add Jam
Spread jam evenly over the top, right to the edges.
Step 8: Add Coconut
Sprinkle coconut over the jam and press gently to stick.
Step 9: Slice and Serve
Cut into squares or bars. Perfect with tea, lunchboxes, or sharing.