One December afternoon, I was volunteering at our local church basement, helping set up the annual Christmas bake sale. Between trays of sugar cookies and loaves of cranberry bread, I noticed a small bowl of pastel mints sitting quietly at the corner of the table.
They weren’t flashy, but something about their old-fashioned charm caught my eye. I picked one up—soft, creamy, and melting almost instantly on my tongue. That moment reminded me of my grandmother’s kitchen, where the scent of peppermint and butter filled the air every December.
That same evening, I went home determined to recreate those nostalgic treats. I pulled out my mixing bowl, a stick of butter, and a memory of Grandma humming “Silent Night” while shaping the little candies by hand. These mints aren’t just candy; they’re a piece of holiday tradition, simple enough for anyone to make yet special enough to bring a smile to every face around the table.
Now, each Christmas, my grandchildren help me roll and twist the red-and-white ropes, their laughter filling the kitchen. It’s a little messy, but that’s the fun of it and somehow, the mints always turn out perfectly imperfect.

Short Description
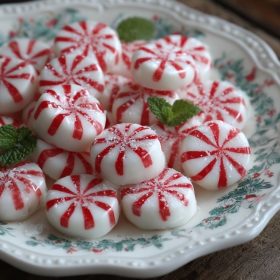
These Classic Soft Christmas Peppermints are creamy, melt-in-your-mouth candies made with butter, sugar, and peppermint extract. With a hint of nostalgia and a festive swirl of red and white, they’re perfect for gifting, decorating dessert trays, or enjoying after a holiday meal.
Key Ingredients
- ½ cup butter, softened
- 3 cups powdered sugar
- 2 tbsp heavy whipping cream
- ¼ tsp peppermint extract
- Red gel food coloring
Tools Needed
- Hand or stand mixer
- Mixing bowls
- Rubber spatula
- Parchment paper
- Knife or kitchen scissors
Cooking Instructions
Step 1: Beat the Butter
In a mixing bowl, beat the softened butter using a hand or stand mixer until light and fluffy. This step helps create that soft, melt-in-your-mouth texture.
Step 2: Mix in the Rest
Add heavy whipping cream, powdered sugar, and peppermint extract. Beat until the dough forms a thick, smooth consistency. If it feels too sticky, add 1 tablespoon of powdered sugar at a time until easy to handle.
Step 3: Divide and Color
Separate the dough into two portions, keep about ¾ white and tint the remaining ¼ with red gel food coloring. Knead the coloring in gradually for even tone.
Step 4: Roll and Twist
Roll each color into thin ropes. Twist one red and one white rope together to create a candy-cane pattern. Pinch off small pieces and shape them into bite-sized mints or festive twists.
Step 5: Dry and Set
Lay the mints on parchment paper and let them air dry for 1–2 hours to firm slightly. For the best soft-but-solid texture, allow them to dry for 24 hours before serving.
Why You’ll Love This Recipe
Nostalgic Flavor: Brings back the charm of homemade holiday candy, just like Grandma used to make.
Simple Ingredients: Requires only a few pantry staples and no cooking or baking.
Kid-Friendly: Perfect for little hands to help roll and twist.
Festive and Giftable: Lovely for Christmas trays, party favors, or homemade gift bags.
Soft and Creamy Texture: A delightful melt-in-your-mouth experience in every bite.
Mistakes to Avoid & Solutions
Using cold butter: If the butter isn’t fully softened, the mixture will turn grainy. Let it sit at room temperature for at least 30 minutes before starting.
Adding too much food coloring: Overmixing can make the dough sticky. Use gel coloring sparingly and knead gently.
Not letting mints dry: Skipping the drying time can make them too soft to handle. Let them set fully for the best consistency.
Overbeating the dough: Once the mixture is smooth, stop mixing to prevent it from becoming greasy.
Using liquid food coloring: Stick to gel to avoid thinning out the dough.
Serving and Pairing Suggestions
Arrange on a holiday dessert platter alongside cookies and fudge.
Wrap in clear bags tied with red ribbons for sweet homemade gifts.
Serve after Christmas dinner with coffee or hot cocoa.
Use them as edible decorations on cakes or cupcakes.
Offer them as a sweet treat at Christmas gatherings or cookie swaps.
Storage and Reheating Tips
Room Temperature: Store in an airtight container for up to 2 weeks.
Refrigeration: For longer storage, refrigerate for up to 1 month—just bring to room temperature before serving.
Freezing: Freeze in layers separated by parchment paper for up to 3 months.
Do not reheat: These are best enjoyed at room temperature to keep their soft, creamy texture.
FAQs
1. Can I use margarine instead of butter?
Butter gives the mints their signature creamy flavor—margarine can alter both texture and taste.
2. Do I need to refrigerate the dough before shaping?
No, the dough should stay soft but firm enough to handle. If your kitchen is warm, a quick 10-minute chill helps.
3. Can I use peppermint oil instead of extract?
Yes, but use sparingly, peppermint oil is stronger. Start with 1–2 drops and adjust to taste.
4. How do I keep the colors from bleeding together?
Make sure each dough portion is dry and not sticky before twisting them. Work on a lightly sugared surface.
5. Can I make these ahead for gifting?
Absolutely! Make them up to a week ahead and store in airtight tins or jars lined with parchment.
Tips & Tricks
For a smoother texture, sift the powdered sugar before mixing.
Add a drop of vanilla extract for a creamy undertone.
To create multi-colored mints, divide the dough into three parts and tint each one differently.
Roll small balls instead of ropes for “pillow” mints.
Sprinkle crushed peppermint candy on top for extra crunch.
Recipe Variations
Chocolate Peppermints: Add 1 tablespoon cocoa powder to the dough for a rich twist.
Lemon Mints: Replace peppermint extract with lemon extract and tint the dough pale yellow.
Spearmint Swirls: Use spearmint extract and green food coloring for a refreshing variation.
Candy Cane Bites: Roll the twisted ropes into long sticks, dry, and cut into mini candy-cane pieces.
Frosty Mint Patties: Press the dough into discs and dip halfway in melted white chocolate for a festive touch.
Final Thoughts
The night after the church bake sale, I set out a bowl of these mints on our coffee table. My husband took one, smiled, and said it tasted like “Christmas morning in candy form.” That’s when I knew I’d found something special. These mints don’t just satisfy a sweet tooth, they carry warmth, laughter, and family memories in every bite.
Now, each December, my kitchen smells faintly of butter and peppermint, and the counters are lined with twisted little candies drying overnight. I think of all the hands—young and old—that have rolled them beside me. Maybe that’s what makes them so special: they remind us that Christmas isn’t about perfection but about sharing small, homemade joys with the people we love.
Soft Christmas Peppermints
Ingredients
- ½ cup butter softened
- 3 cups powdered sugar
- 2 tbsp heavy whipping cream
- ¼ tsp peppermint extract
- Red gel food coloring
Instructions
- In a mixing bowl, beat softened butter until light and fluffy.
- Add heavy cream, powdered sugar, and peppermint extract, mixing until a smooth, thick dough forms. If it’s sticky, add more powdered sugar as needed. Divide the dough, keeping most white and tinting the rest red.
- Roll each color into thin ropes, twist them together, and pinch off small pieces to form bite-size mints.
- Arrange on parchment paper and let air dry for 1–2 hours, or 24 hours for the perfect soft texture.