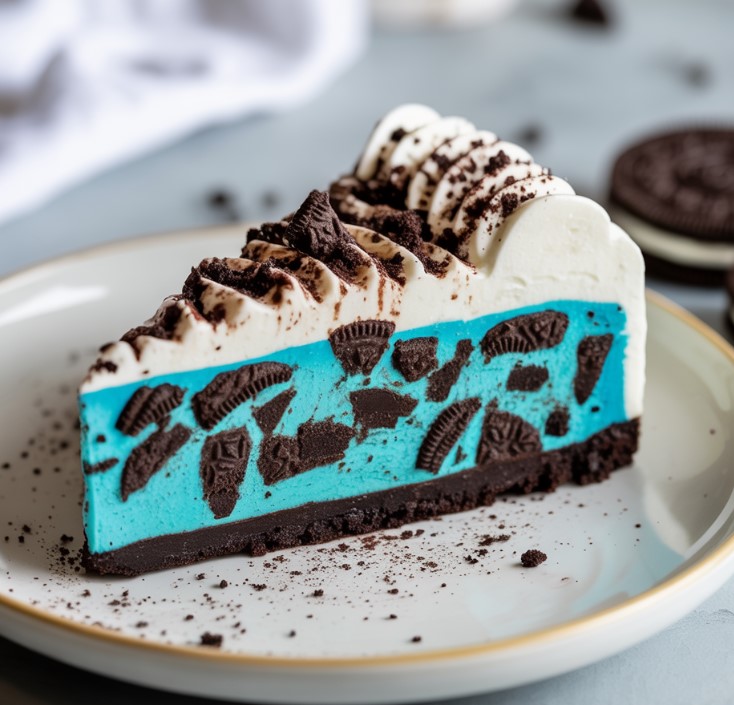
I once made this cheesecake for my grandson’s birthday—not because he asked for it, but because I thought it would make him smile. He was going through a phase where Cookie Monster was more of a household name than mine, and everything blue or cookie-related was his jam.
I remember sitting at the kitchen table with my old recipe binder, flipping past traditional pies and classic cheesecakes, until I landed on an idea: what if Cookie Monster became a cake?
That afternoon, I put on my apron—well-worn and flour-dusted like always—and got to work like a kid in a candy store. I crushed Oreos, whipped clouds of cream, and tinted the filling that perfect Sesame Street blue. With chopped cookies folded into the batter and goofy edible eyes peeking out on top, it wasn’t just dessert. It was joy on a plate.
When I brought it out, the look on his face was something I tucked away in my heart forever. Since then, this no-bake cheesecake has made appearances at picnics, potlucks, and even my quilting club’s summer luncheon. It’s whimsical, delicious, and surprisingly simple—just the way I like it. You don’t need a hot oven, just a cold fridge and a warm smile.

Short Description
This Cookie Monster No-Bake Cheesecake is a playful, creamy dessert made with crushed Oreos, whipped cream, and blue-tinted cheesecake filling, loaded with mini cookies and topped with googly eyes. A fun, make-ahead treat perfect for parties or anytime you want to make someone grin.
Key Ingredients
For the Crust
- 24 Oreo cookies, crushed
- 5 tablespoons unsalted butter, melted
For the Filling
- 16 oz cream cheese, softened
- 1 cup granulated sugar
- 2 teaspoons vanilla extract
- 2 cups heavy whipping cream (whipped to stiff peaks)
- 1 packet unflavored gelatin
- 1/4 cup cold water (for blooming gelatin)
- Blue food coloring (gel or liquid, to desired shade)
- 1 1/2 cups mini chocolate chip cookies, chopped
- 1 1/2 cups mini Oreos, chopped
For Topping (Optional)
- Additional mini cookies
- Extra mini Oreos
- Chocolate chips
- Edible googly eyes
Tools Needed
- 9-inch springform pan
- Electric hand or stand mixer
- Rubber spatula
- Small microwave-safe bowl
- Mixing bowls
- Measuring cups and spoons
Cooking Instructions
Step 1: Prepare the Crust
In a medium bowl, mix the crushed Oreos with melted butter until evenly coated. Press the mixture firmly into the bottom of a 9-inch springform pan to create an even base. Place in the fridge to chill while you prepare the filling.
Step 2: Whip the Cream
In a cold bowl, whip the heavy cream with a mixer until stiff peaks form. Be careful not to overbeat—it should hold its shape but remain smooth. Set aside.
Step 3: Bloom the Gelatin
Sprinkle the unflavored gelatin over 1/4 cup cold water in a small bowl. Let it sit for 5 minutes until thickened. Microwave for 10–15 seconds until fully dissolved, then let it cool slightly—don’t skip this step or your texture may suffer.
Step 4: Make the Cheesecake Base
In a large mixing bowl, beat softened cream cheese, granulated sugar, and vanilla extract until creamy and smooth, about 2–3 minutes. Pour in the cooled gelatin and beat again until fully incorporated.
Step 5: Add the Color
Start adding blue food coloring a drop or two at a time. Mix well and adjust until you reach that classic Cookie Monster blue—vibrant, but not too neon.
Step 6: Fold in Whipped Cream
Using a rubber spatula, gently fold the whipped cream into the blue cheesecake base. Do this slowly to keep the mixture light and fluffy.
Step 7: Mix in the Cookies
Gently fold in the chopped mini chocolate chip cookies and mini Oreos. Leave a few larger chunks for a fun texture.
Step 8: Assemble the Cheesecake
Pour the filling into your prepared crust. Smooth the top with a spatula or spoon.
Step 9: Chill
Refrigerate for at least 6 hours, or overnight if possible, until fully set. A longer chill makes for a cleaner slice.
Step 10: Decorate & Serve
Top with mini cookies, extra mini Oreos, chocolate chips, and googly eyes just before serving for that delightful Cookie Monster look.
Why You’ll Love This Recipe
– No baking required—great for summer or busy schedules
– Creamy and fluffy texture that melts in your mouth
– Kid-approved, adult-adored
– Playful presentation makes it a conversation starter
– Customizable and easy to decorate
Mistakes to Avoid & Solutions
1. Overmixing the Whipped Cream
Overbeating turns it grainy. Whip until peaks stand but still look silky.
2. Adding Hot Gelatin
If the gelatin is too warm, it could melt the whipped cream. Let it cool for 2–3 minutes before adding.
3. Not Chilling Long Enough
Impatience can lead to a runny center. Always chill at least 6 hours or overnight for best results.
4. Using Room-Temp Cream for Whipping
Cold cream whips faster and holds shape better. Chill your mixing bowl and beaters too.
5. Skipping the Googly Eyes
Okay, this one’s optional—but they’re the cherry on top of Cookie Monster fun.
Serving and Pairing Suggestions
Serve chilled in slices with extra mini cookies on the side.
Great for themed parties, kid birthdays, or fun potlucks.
Pair with a glass of cold milk or hot coffee.
Can be served buffet-style or as individual mini cheesecakes in jars.
For extra flair, drizzle with melted chocolate or cookie butter.
Storage and Reheating Tips
Refrigeration: Store leftovers in an airtight container in the fridge for up to 4 days.
Freezing: Freeze the cheesecake (without decorations) wrapped tightly for up to 2 months. Thaw overnight in the fridge.
Decorations: Add toppings only before serving to avoid sogginess.
Reheating: Not necessary—this dessert is best enjoyed cold.
FAQs
1. Can I make this cheesecake without gelatin?
Yes, but the texture may be softer. Substitute with agar-agar (use according to package directions) or skip entirely if you’re okay with a mousse-like consistency.
2. Can I use store-bought whipped topping instead of whipping cream?
You can. Use about 3 cups of thawed whipped topping, but note it will be slightly sweeter and less rich.
3. What if I don’t have a springform pan?
Use a pie dish or deep cake pan lined with parchment for easier lifting. You may not get perfect slices, but it’ll still taste amazing.
4. How can I make it less sweet?
Reduce the sugar to 3/4 cup, and use less sweet cookies like plain chocolate wafers or graham crackers.
5. Is this safe for toddlers?
Yes, but go easy on the mini cookies and avoid googly eyes unless they’re edible and safe for young kids.
Tips & Tricks
Use gel food coloring for richer color without thinning the batter.
Crush the cookies coarsely for texture—you want some crunchy bites.
Let the cream cheese sit out for 30 minutes before mixing for easier blending.
For neater slices, dip your knife in hot water and wipe clean between cuts.
Chill your mixing bowl and beaters before whipping cream for quicker peaks.
Recipe Variations
1. Minty Monster Cheesecake
Add 1/2 teaspoon peppermint extract to the filling.
Swap mini Oreos for mint Oreos.
Add a drop of green food coloring to the blue to create a teal “Mint Monster.”
2. Chocolate Cookie Monster
Replace 1/4 cup of cream cheese with melted chocolate.
Use chocolate whipped cream.
Sprinkle cocoa powder into the crust for deeper flavor.
3. Berry Monster Cheesecake
Fold in 3/4 cup chopped strawberries or blueberries instead of cookies.
Add a swirl of fruit jam on top before chilling.
Tint the filling a mix of blue and purple for a “blueberry monster” look.
Final Thoughts
The colors, the cookies, the cheerful eyes staring back from the plate—Cookie Monster Cheesecake is more than dessert. It’s a little burst of silliness we all need sometimes.
From my kitchen to yours, I hope this playful cheesecake finds a place in your celebrations. Maybe it becomes a birthday tradition, a weekend treat, or a fun surprise on a Tuesday night. Recipes like this remind me why I fell in love with cooking in the first place—not just for the flavors, but for the moments they create.
So go ahead. Make it blue. Make it bold. And make someone smile.

Ingredients
- For the Crust
- 24 Oreo cookies, crushed
- 5 tablespoons unsalted butter, melted
- For the Filling
- 16 oz cream cheese, softened
- 1 cup granulated sugar
- 2 teaspoons vanilla extract
- 2 cups heavy whipping cream (whipped to stiff peaks)
- 1 packet unflavored gelatin
- 1/4 cup cold water (for blooming gelatin)
- Blue food coloring (gel or liquid, to desired shade)
- 1 1/2 cups mini chocolate chip cookies, chopped
- 1 1/2 cups mini Oreos, chopped
- For Topping (Optional)
- Additional mini cookies
- Extra mini Oreos
- Chocolate chips
- Edible googly eyes
Instructions
Step 1: Prepare the Crust
Mix crushed Oreos with melted butter until well combined. Press firmly into a 9-inch springform pan and chill in the fridge.
Step 2: Whip the Cream
In a cold bowl, whip heavy cream to stiff peaks. Don’t overmix—set aside.
Step 3: Bloom the Gelatin
Sprinkle gelatin over cold water; let sit 5 minutes. Microwave 10–15 seconds until dissolved. Cool slightly.
Step 4: Make the Cheesecake Base
Beat cream cheese, sugar, and vanilla until smooth. Add cooled gelatin and mix until fully blended.
Step 5: Add the Color
Stir in blue food coloring a few drops at a time until it reaches Cookie Monster blue.
Step 6: Fold in Whipped Cream
Gently fold whipped cream into the blue mixture to keep it airy.
Step 7: Mix in the Cookies
Fold in chopped mini chocolate chip cookies and mini Oreos, leaving some larger chunks.
Step 8: Assemble the Cheesecake
Pour filling into the chilled crust and smooth the top.
Step 9: Chill
Refrigerate for at least 6 hours or overnight until set.
Step 10: Decorate & Serve
Top with mini cookies, Oreos, chocolate chips, and googly eyes just before serving.


