Pink Coconut Snowball Cake Bars were born on a rainy Saturday when three different plans collided in my kitchen. A neighbor dropped off her daughter for a playdate, my sister called to say she was stopping by with coffee, and my husband casually mentioned a charity bake table happening the next morning. The house felt loud and lived-in, the kind of afternoon where you lean into baking instead of fighting the chaos.
At the counter, one child was sneaking shredded coconut, another was fascinated by how cocoa powder darkened the bowl, and my sister kept asking if pink coconut was “actually a thing.”
I had the oven warming, music playing softly, and that quiet focus that settles in once batter starts coming together. The chocolate base baked into a soft, rich layer while laughter drifted through the kitchen.
Later that evening, when the cake bars chilled in the fridge, everyone hovered nearby waiting for the first slice. The contrast of chocolate cake, fluffy cream topping, and gently sweet coconut felt playful without being overdone.
Pink Coconut Snowball Cake Bars ended up traveling from that kitchen counter to a bake sale table and then into a stack of handwritten recipe requests tucked into my bag by the end of the day.

Short Description
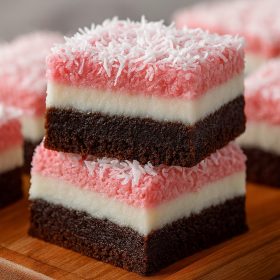
Pink Coconut Snowball Cake Bars feature a moist chocolate cake base topped with a light whipped cream frosting and finished with soft pink coconut for a chilled, eye-catching dessert that’s perfect for gatherings and celebrations.
Key Ingredients
- 1 cup all-purpose flour
- ½ cup cocoa powder
- 1 tsp baking powder
- ½ tsp baking soda
- ½ tsp salt
- ½ cup unsalted butter, softened
- 1 cup granulated sugar
- 2 large eggs
- 1 tsp vanilla extract
- ½ cup buttermilk
- ½ cup hot water
For the topping
- 1 ½ cups heavy whipping cream
- ½ cup powdered sugar
- 1 tsp vanilla extract
- 8 oz cream cheese, softened (optional for stability)
- 2 cups shredded coconut
- 2 to 3 drops pink food coloring
- 1 tbsp milk as needed
Tools Needed
- 9×13-inch baking pan
- Parchment paper
- Mixing bowls
- Electric mixer
- Whisk
- Rubber spatula
- Measuring cups and spoons
- Cooling rack
Cooking Instructions
Step 1: Prepare the Pan and Oven
Preheat the oven to 175°C (350°F). Grease and line a 9×13-inch baking pan with parchment paper, leaving an overhang for easy removal.
Step 2: Mix the Dry Ingredients
In a medium bowl, whisk together flour, cocoa powder, baking powder, baking soda, and salt until evenly combined.
Step 3: Cream the Butter and Sugar
In a separate bowl, beat the softened butter and granulated sugar until light and fluffy, about 2 to 3 minutes.
Step 4: Add Eggs and Vanilla
Beat in the eggs one at a time, then mix in the vanilla extract until smooth.
Step 5: Build the Batter
Add the dry ingredients alternately with the buttermilk, mixing gently until just combined. Stir in the hot water last to create a smooth, pourable batter.
Step 6: Bake the Cake
Pour the batter into the prepared pan and bake for 25 to 30 minutes, until a toothpick inserted in the center comes out clean. Cool completely before frosting.
Step 7: Make the Whipped Topping
Beat the cream cheese if using until smooth. Add heavy cream, powdered sugar, and vanilla, whipping until fluffy and spreadable.
Step 8: Frost the Cake
Spread the whipped topping evenly over the cooled cake base using a spatula.
Step 9: Color the Coconut
Place shredded coconut in a bowl. Add pink food coloring and mix until evenly tinted. Add a small splash of milk if needed to help distribute the color.
Step 10: Finish and Chill
Sprinkle the pink coconut evenly over the frosting and press lightly to help it adhere. Refrigerate for at least 1 hour before slicing into bars.
Why You’ll Love This Recipe
Visually striking without complicated decorating
Soft chocolate base balanced by a light topping
Perfect make-ahead dessert
Easy to slice and serve for crowds
Customizable for holidays and themed events
Served chilled for a refreshing finish
Mistakes to Avoid & Solutions
Overmixing the batter
This can make the cake dense instead of tender.
Solution: Mix only until ingredients are combined and smooth.
Frosting a warm cake
Heat will melt the whipped topping.
Solution: Allow the cake to cool completely before frosting.
Uneven coconut coloring
Dry coconut may resist food coloring.
Solution: Add a small splash of milk to help the color distribute evenly.
Skipping refrigeration time
Bars may not hold clean edges when sliced.
Solution: Chill at least 1 hour before cutting.
Using low-fat cream
The topping may not hold its shape.
Solution: Use full-fat heavy whipping cream for best texture.
Serving and Pairing Suggestions
Serve chilled on dessert platters
Pair with iced coffee or herbal tea
Cut into small squares for buffets
Ideal for baby showers and spring celebrations
Serve family-style straight from the pan
Storage and Reheating Tips
Store covered in the refrigerator for up to 4 days
Keep bars chilled until ready to serve
Do not freeze as the whipped topping may separate
Slice with a clean knife wiped between cuts
FAQs
1. Can I make these bars ahead of time?
Yes, they taste even better after chilling overnight.
2. Is the cream cheese required?
No, it’s optional but helps stabilize the topping.
3. Can I use unsweetened coconut?
Yes, the topping will be less sweet but still balanced.
4. How do I get clean slices?
Use a sharp knife and wipe it clean between cuts.
5. Can I make this gluten-free?
Yes, substitute with a 1:1 gluten-free flour blend.
Tips & Tricks
Sift cocoa powder to prevent lumps
Chill the mixing bowl before whipping cream
Press coconut gently so it sticks without sinking
Use gel food coloring for stronger color control
Line the pan for easy lifting and cutting
Recipe Variations
Raspberry Coconut Bars: Add ½ cup raspberry preserves between cake and topping for a fruity layer.
Vanilla Coconut Version: Replace cocoa powder with an additional ½ cup flour and omit hot water.
Almond Snowball Bars: Add ½ tsp almond extract to the topping and sprinkle sliced almonds over coconut.
Chocolate Coconut Crunch: Mix ¼ cup mini chocolate chips into the coconut topping.
Holiday Color Swap: Change food coloring to match seasonal themes like red or pastel blue.
Final Thoughts
Pink Coconut Snowball Cake Bars bring a sense of playfulness to the dessert table without feeling fussy. They fit naturally into moments that matter, from casual weekends to special celebrations. The layers come together easily, but each bite feels thoughtful and complete.
Easy Pink Coconut Snowball Cake Bars
Ingredients
- 1 cup all-purpose flour
- ½ cup cocoa powder
- 1 tsp baking powder
- ½ tsp baking soda
- ½ tsp salt
- ½ cup unsalted butter softened
- 1 cup granulated sugar
- 2 large eggs
- 1 tsp vanilla extract
- ½ cup buttermilk
- ½ cup hot water
For the topping
- 1 ½ cups heavy whipping cream
- ½ cup powdered sugar
- 1 tsp vanilla extract
- 8 oz cream cheese softened (optional for stability)
- 2 cups shredded coconut
- 2 to 3 drops pink food coloring
- 1 tbsp milk as needed
Instructions
- Preheat oven to 175°C (350°F), grease and line a 9×13-inch pan with parchment.
- Whisk flour, cocoa powder, baking powder, baking soda, and salt in a bowl.
- In another bowl, cream butter and sugar until fluffy.
- Beat in eggs one at a time, then mix in vanilla.
- Add dry ingredients alternately with buttermilk; stir in hot water until smooth.
- Pour batter into pan and bake for 25–30 minutes. Cool completely.
- Beat cream cheese (if using), then add heavy cream, powdered sugar, and vanilla; whip until fluffy.
- Spread whipped topping over cooled cake.
- Tint coconut with pink food coloring, adding milk if needed to blend.
- Sprinkle coconut over frosting, press lightly, and chill at least 1 hour before slicing.