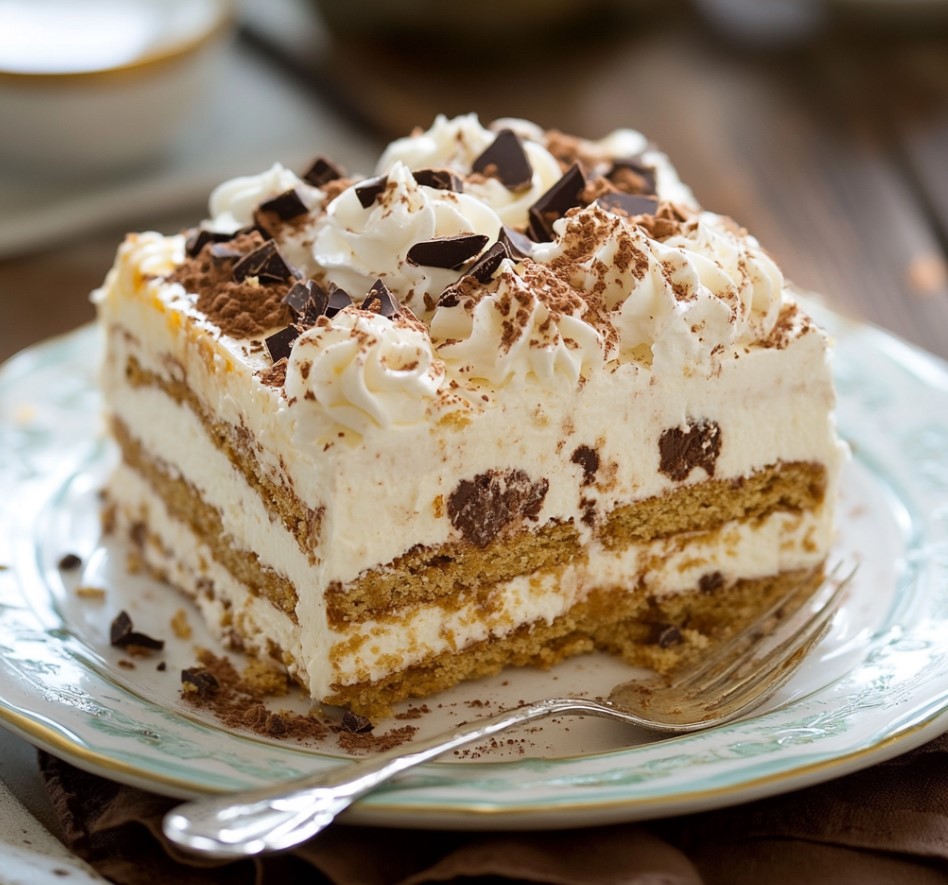
Baking has always been a gentle way to slow down time for me, and this Marie Biscuit Choc-Chip Icebox Cake is a testament to that quiet joy. On one particularly warm afternoon, while rummaging through my old recipe box, I found a handwritten note from my grandmother.
It mentioned this no-bake cake that never failed to impress guests during family gatherings. I decided to bring that memory back to life in my own kitchen. As I layered the delicate Marie biscuits with the creamy chocolate-studded filling, I could almost hear the laughter from those long-ago celebrations.
What’s beautiful about this cake is its simplicity—it’s a dessert that requires no oven and transforms in the fridge, making it perfect for those days when the kitchen needs to stay cool. Each bite offers a nostalgic crunch balanced with rich, creamy sweetness, making it a cherished treat for both the young and old at my table.
Sharing this recipe feels like passing down a small piece of history, and I hope it becomes a staple in your home just as it is in mine.

Short Description
Marie Biscuit Choc-Chip Icebox Cake is a no-bake dessert featuring layers of crunchy Marie biscuits and a luscious cream cheese and chocolate chip filling. Chilled until set, this cake offers a perfect balance of creamy texture and sweet crunch without needing an oven.
Key Ingredients
- 1 box Marie biscuits (or Graham crackers)
- 1 cup semi-sweet chocolate chips
- 8 oz cream cheese, softened
- 1 cup heavy cream (or Cool Whip for convenience)
- ½ cup powdered sugar
- 1 tsp vanilla extract
- Pinch of salt
Tools Needed
- 9×5-inch loaf pan or cake pan
- Parchment paper
- Mixing bowls
- Electric mixer or hand whisk
- Rubber spatula
- Measuring cups and spoons
Cooking Instructions
Step 1: Layer the Base
Line your loaf pan with parchment paper for easy cake removal. Crush about 6 Marie biscuits into fine crumbs and press them evenly into the bottom of the pan. The base should be firm but not overly compacted.
Step 2: Create the Chocolate Cream Layer
In a medium bowl, beat the softened cream cheese until smooth using an electric mixer or whisk. Gradually add powdered sugar and vanilla extract, mixing until fluffy.
Gently fold in the heavy cream or Cool Whip, maintaining a light, airy texture. Stir in the semi-sweet chocolate chips carefully to distribute them evenly without deflating the mixture.
Step 3: Assemble the Icebox Cake
Alternately layer crushed Marie biscuits and chocolate cream mixture in the pan. Start with a biscuit layer, followed by the cream, and repeat. Finish with a top layer of the chocolate cream and a sprinkle of crushed biscuits for texture.
Step 4: Chill and Set
Cover the cake with plastic wrap and refrigerate for at least 4–6 hours, or preferably overnight. The chilled cake will firm up, and the biscuits soften slightly to meld perfectly with the creamy filling.
Why You’ll Love This Recipe
– No baking required—perfect for hot days or busy schedules
– Quick to assemble with simple pantry ingredients
– Creamy yet crunchy texture, appealing to all ages
– Easily customizable with favorite mix-ins or toppings
– Great make-ahead dessert for gatherings or weekday treats
Mistakes to Avoid & Solutions
Overmixing the cream cheese and cream: This can deflate your mixture, resulting in a dense filling. Fold gently instead of beating vigorously after adding whipped cream or Cool Whip.
Using warm cream cheese: Make sure your cream cheese is fully softened but not melted to avoid lumps in the filling. Leave it at room temperature for about 30 minutes before mixing.
Skipping chilling time: The cake needs at least 4 hours to set; cutting it too soon will cause it to fall apart. Plan ahead for chilling overnight if possible.
Using stale biscuits: Fresh Marie biscuits or Graham crackers ensure crisp texture; stale ones will turn soggy too quickly.
Crushing biscuits too finely: Keep some texture by crushing biscuits into crumbs but not powder for better bite contrast.
Serving and Pairing Suggestions
Serve slices of this icebox cake chilled, ideally on a simple dessert plate to highlight its layers. It pairs beautifully with fresh berries or a drizzle of warm chocolate sauce for added indulgence.
For drinks, a cup of lightly brewed black tea or coffee complements the sweetness without overpowering the delicate flavors. This dessert works well in family-style gatherings or as a refreshing treat at a buffet.
Storage and Reheating Tips
Store leftovers covered tightly in the refrigerator to keep the cream fresh and the biscuits from drying out.
Consume within 3 days for best texture and flavor.
This dessert is best served cold; avoid reheating as it can ruin the texture.
If you want to prepare ahead, assemble it fully but add the final biscuit layer just before serving for extra crunch.
Freezing is not recommended as it affects the cream’s consistency.
FAQs
1. Can I substitute Cool Whip for heavy cream?
Yes, Cool Whip works well and saves time but the texture will be slightly less rich than with heavy cream.
2. What if I don’t have Marie biscuits?
Graham crackers are a great alternative. They’ll add a slightly different flavor but maintain the crispness.
3. Can I make this vegan or dairy-free?
You can try using dairy-free cream cheese and whipped topping substitutes, but the texture and flavor may differ.
4. How long can I store the cake in the fridge?
Up to 3 days is ideal for freshness and texture.
5. Can I add other mix-ins besides chocolate chips?
Absolutely! Chopped nuts, dried fruit, or even white chocolate chips can add interesting textures and flavors.
Tips & Tricks
Use room temperature cream cheese to avoid lumps. Whip the cream separately until soft peaks form before folding it in for a lighter texture.
Don’t rush the chilling step—it’s essential for setting the cake. For easier slicing, run a warm knife through the cake. If you want a less sweet version, reduce powdered sugar by a quarter cup.
Recipe Variations
For a mocha twist, add 1 tsp instant espresso powder to the cream cheese mixture. To incorporate a fruity note, fold in ½ cup finely chopped strawberries or raspberries into the filling.
For a nutty crunch, sprinkle toasted almonds between layers. Swap semi-sweet chocolate chips for white or dark chocolate to vary flavor intensity.
Each variation keeps the easy assembly but introduces exciting new tastes.
Final Thoughts
This Marie Biscuit Choc-Chip Icebox Cake is a simple pleasure that connects past and present. Its effortless assembly and no-bake nature make it accessible for anyone, whether a novice or seasoned baker. The creamy filling with chocolate chips brings a smile to anyone’s face, while the crisp biscuits add a nostalgic crunch that feels like a hug in dessert form.
This recipe is a lovely reminder that great food doesn’t need to be complicated. It’s about those little moments of joy—sharing, savoring, and creating memories around the table. I hope you find the same warmth and satisfaction in making and enjoying this cake as I have over the years. Let it be a part of your kitchen stories, bringing sweetness and comfort to every occasion.

Ingredients
- 1 box Marie biscuits (or Graham crackers)
- 1 cup semi-sweet chocolate chips
- 8 oz cream cheese, softened
- 1 cup heavy cream (or Cool Whip for convenience)
- ½ cup powdered sugar
- 1 tsp vanilla extract
- Pinch of salt
Instructions
Step 1: Layer the Base
Line a loaf pan with parchment paper. Crush 6 Marie biscuits into fine crumbs and press them evenly into the bottom, firm but not packed tight.
Step 2: Create the Chocolate Cream Layer
Beat softened cream cheese until smooth. Add powdered sugar and vanilla, mixing until fluffy. Fold in heavy cream or Cool Whip gently, then stir in chocolate chips evenly.
Step 3: Assemble the Icebox Cake
Layer crushed biscuits and chocolate cream alternately, starting and ending with cream. Top with crushed biscuits for texture.
Step 4: Chill and Set
Cover and refrigerate for 4–6 hours or overnight to let the cake firm and biscuits soften.


