It was one of those Saturday mornings when the snow hadn’t yet started, but the forecast had promised it would. At the community library’s winter storytime, a group of kids huddled on the floor listening to tales of magical creatures, while a table in the corner offered hot cocoa and treats from local bakers.
I had brought a tin of these mint chocolate chip snowball cookies, unsure if they’d hold their own next to triple-fudge brownies and glittery sugar cookies. But as soon as the librarian took a bite and called out, “Who made the green ones?”, curious heads turned and the plate slowly emptied.
Later that day, my neighbor Maya dropped off a bowl of her spicy lentil soup and said, “Those cookies should come with a warning. I ate three while shoveling the sidewalk.” Meanwhile, my teenage grandson, who rarely comments on sweets unless they’re frosted with something neon, quietly took four and asked if they had “those Andes mint vibes.”
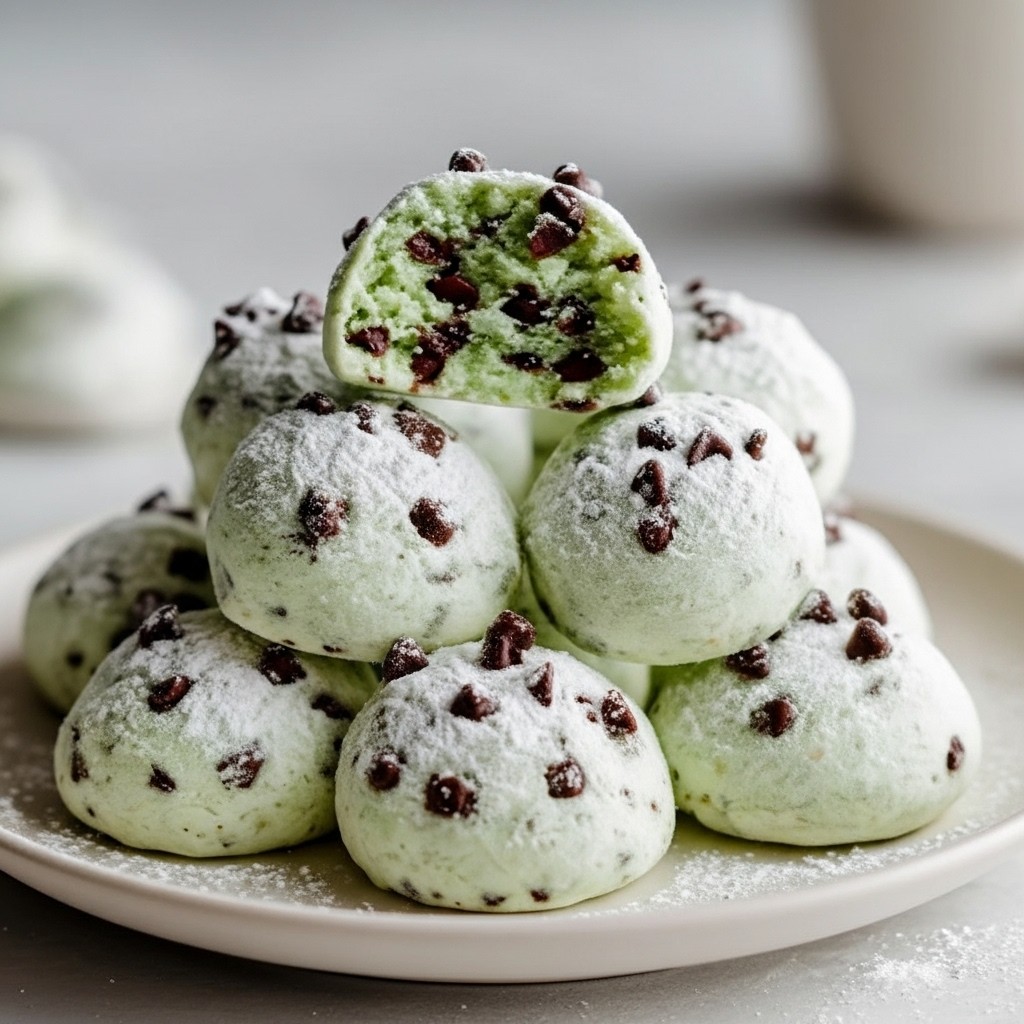
These mint chocolate chip snowball cookies bring a soft, buttery crunch with just enough mint to feel wintry, but not overpowering. They’re the kind of treat that fits right into December lunchboxes, post-sledding cocoa breaks, or a cookie swap where you want to surprise someone with something a little unexpected.
Their powdered sugar coating looks like fresh snow, and the mini chocolate chips peek through like hidden treasures. And when you chill the dough just enough, the flavor deepens and the texture holds its classic, melt-in-your-mouth charm.
Short Description
Buttery, melt-in-your-mouth Mint Chocolate Chip Snowball Cookiescoated in powdered sugar festive, easy, and bursting with refreshing mint and mini chocolate chips.
Key Ingredients
- 1 cup (2 sticks or 226g) unsalted butter, softened
- ½ cup (100g) granulated sugar
- 1 teaspoon pure vanilla extract
- 1 teaspoon peppermint extract
- 2 ¼ cups (270g) all-purpose flour
- ¼ teaspoon salt
- 1 cup (170g) mini chocolate chips
- 1 ½ cups (180g) powdered sugar, divided
- Optional: green food coloring
Tools Needed
- Electric mixer
- Mixing bowls (medium and large)
- Rubber spatula
- Plastic wrap
- Cookie scoop (1 tablespoon)
- Parchment-lined baking sheets
- Wire cooling rack
- Shallow bowls for coating
Cooking Instructions
Step 1: Prep the Oven and Pans
Preheat your oven to 350°F (175°C). Line two to three large baking sheets with parchment paper or silicone baking mats.
Step 2: Mix Dry Ingredients
In a medium bowl, whisk together the flour and salt. Set aside.
Step 3: Cream the Butter and Sugar
In a large mixing bowl, beat the softened butter on medium speed for 1 to 2 minutes until creamy. Slowly add the granulated sugar and beat for another 2 to 3 minutes until light and fluffy.
Step 4: Add Flavor
Mix in the vanilla and peppermint extracts. If desired, add a few drops of green food coloring for a festive look.
Step 5: Combine Dry with Wet
With the mixer on low, gradually add the flour mixture in three batches. Mix just until incorporated—avoid overmixing to keep the cookies tender.
Step 6: Fold in Chocolate Chips
Using a spatula, gently fold in the mini chocolate chips. The dough will be thick.
Step 7: Chill the Dough
Cover the bowl with plastic wrap and refrigerate for at least 30 minutes to 1 hour. This helps prevent spreading and improves texture.
Step 8: Form the Dough Balls
Once chilled, scoop 1 tablespoon portions and roll into smooth 1-inch balls. Place them 1 to 1 ½ inches apart on your baking sheets.
Step 9: Bake
Bake for 10 to 12 minutes, or until edges are lightly golden. The centers should remain pale and set. Do not overbake.
Step 10: Cool Slightly
Let cookies cool on the baking sheets for 5 to 10 minutes before handling.
Step 11: First Sugar Coating
Place ½ cup powdered sugar in a small shallow bowl. Roll warm (not hot) cookies gently to coat.
Step 12: Finish Cooling
Place coated cookies on a wire rack and allow them to cool completely—at least 30 to 60 minutes.
Step 13: Final Sugar Coating
Once cooled, roll the cookies again in the remaining 1 cup of powdered sugar for a thick, snowy finish.
Why You’ll Love This Recipe
Refreshing peppermint meets classic buttery cookie
Chocolate chip surprise in every bite
Festive green hue with a snow-dusted finish
Easy to make ahead and freeze
Perfect for holiday trays, swaps, and snowy afternoons
Mistakes to Avoid & Solutions
Overmixing the Dough
Mixing too long creates dense, tough cookies instead of tender bites.
Solution: Mix only until the flour disappears and everything is just combined.
Skipping the Chill Time
Warm dough spreads too much and loses shape while baking.
Solution: Chill the dough for at least 30 minutes to firm it up and enhance flavor.
Not Coating at the Right Temperature
Powdered sugar melts on hot cookies and forms a sticky glaze instead of a snowy finish.
Solution: Let cookies cool for 5–10 minutes before rolling in the first layer of sugar.
Overbaking
Too much time in the oven dries out the centers and dulls the mint flavor.
Solution: Bake until just set and the bottoms are lightly golden—centers should remain pale.
Storing Before Fully Cooled
Residual heat creates steam, ruining the sugar coating.
Solution: Allow cookies to cool completely on a rack before final coating and storage.
Serving and Pairing Suggestions
Add to a holiday cookie platter with shortbread and gingerbread
Serve with peppermint mocha or hot cocoa
Stack in a festive tin as a homemade gift
Pair with a scoop of vanilla or mint chocolate chip ice cream
Present on a cake stand for a dessert buffet
Storage and Reheating Tips
Store cooled cookies in an airtight container at room temperature for up to 5 days
For longer storage, freeze uncoated cookies for up to 2 months—add sugar coating after thawing
Do not microwave for reheating—serve at room temperature for best texture
Refresh the powdered sugar coating if storing for multiple days
FAQs
1. Can I make the dough ahead of time?
Yes! Prepare the dough up to 2 days in advance and keep it chilled until ready to bake.
2. Can I use regular chocolate chips?
Mini chips are ideal to keep the size and shape of the cookies, but chopped chocolate also works.
3. Is green food coloring necessary?
Not at all! It’s purely for visual appeal. The cookies taste the same without it.
4. My cookies spread too much. What happened?
The dough likely wasn’t chilled long enough. Aim for at least 30 minutes.
5. Can I double the recipe?
Absolutely. This recipe doubles well—just bake in batches and store extras in the freezer.
Tips & Tricks
Use a cookie scoop for uniform sizes and even baking
Add crushed peppermint candies for a little crunch
Sift your powdered sugar for a smoother finish
Chill longer if your kitchen is warm
Try a light dusting of cocoa powder mixed with the powdered sugar for a twist
Recipe Variations
White Chocolate Mint Snowballs: Replace mini chocolate chips with white chocolate chips for a sweeter, creamier profile.
Nutty Mint Snowballs: Add ½ cup finely chopped toasted pecans or walnuts with the chocolate chips for a nutty bite.
Mocha Mint Snowballs: Add 1 teaspoon instant espresso powder to the dough with the flour to deepen the chocolate flavor.
Coconut Mint Snowballs: Roll the finished cookies in a mix of powdered sugar and finely shredded coconut.
Vegan Mint Snowballs: Use plant-based butter and dairy-free chocolate chips. Skip food coloring or use vegan-safe alternatives.
Final Thoughts
There’s something almost nostalgic about baking mint chocolate chip snowball cookies in the hush of a winter kitchen. The smell of peppermint and butter drifts through the air, and the light dusting of sugar gives them that storybook feel. It’s the kind of baking that doesn’t demand perfection just a little patience, a good mixing bowl, and maybe a playlist of your favorite holiday songs humming in the background.
Even when the house is bustling with relatives or kids begging for one more before dinner, these cookies bring a quiet little joy to the room. They’re festive without being fussy, and every bite feels like the cozy calm between snowflakes. So when the season gets a little too loud, a batch of these is all it takes to bring the peace back in.
Melt-in-Your-Mouth Mint Chocolate Chip Snowball Cookies
Ingredients
- 1 cup 2 sticks or 226g unsalted butter, softened
- ½ cup 100g granulated sugar
- 1 teaspoon pure vanilla extract
- 1 teaspoon peppermint extract
- 2 ¼ cups 270g all-purpose flour
- ¼ teaspoon salt
- 1 cup 170g mini chocolate chips
- 1 ½ cups 180g powdered sugar, divided
- Optional: green food coloring
Instructions
- Preheat oven to 350°F (175°C) and line 2–3 baking sheets with parchment paper or silicone mats.
- Whisk flour and salt in a medium bowl, set aside.
- In a large bowl, beat softened butter for 1–2 minutes. Add sugar and beat 2–3 minutes until fluffy.
- Mix in vanilla and peppermint extracts, then add green food coloring if using.
- Gradually add flour mixture in 3 parts, mixing just until combined.
- Fold in mini chocolate chips with a spatula; dough will be thick.
- Cover and chill dough for 30 minutes to 1 hour.
- Scoop 1 tablespoon portions, roll into 1-inch balls, and place spaced on baking sheets.
- Bake 10–12 minutes, until edges are golden and centers are pale but set.
- Let cool on baking sheets for 5–10 minutes.
- Roll warm cookies in ½ cup powdered sugar to coat.
- Transfer to wire rack and cool completely, 30–60 minutes.
- Roll fully cooled cookies in remaining 1 cup powdered sugar for final coating.