One rainy afternoon last fall, I was organizing old recipe clippings tucked inside my mother’s faded cookbook, when I came across a butter-stained card with a scribbled note: “Cheesecake cereal bars – no baking, kid-approved.” I smiled. That card brought back a memory of a neighborhood block party when I was in my thirties. I had completely forgotten I made these treats once, using what I had on hand during a grocery strike. They were a hit back then, but somehow, I’d never made them again.
So, I rolled up my sleeves and decided to reimagine that idea using Rice Krispies and a simple cream cheese twist. I knew I wanted the fluffiness of marshmallow creme, the slight tang of softened cream cheese, and that crunch we all secretly love in childhood cereal treats.
By the time I pressed the mixture into the pan and gave it a quick taste, I realized I had recreated something wonderfully nostalgic and surprisingly fresh. I even sent a few squares next door to my new neighbor, who texted me ten minutes later asking for the recipe and said it reminded her of cheesecake on a picnic blanket. That’s when I knew I had to share it.
This recipe is sweet, crunchy, and creamy with just the right balance of texture and flavor. It’s also easy, quick, and made with ingredients you probably already have on hand. Let’s get into it.
Short Description
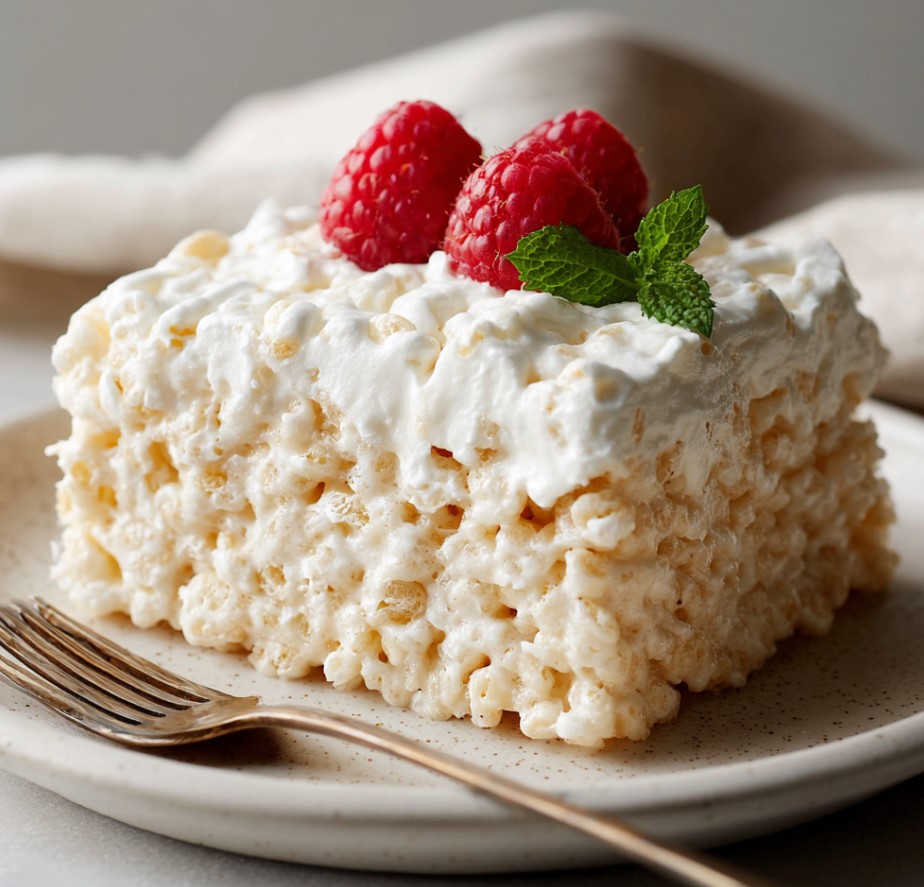
No-Bake Cheesecake Rice Krispies Treats combine marshmallow fluff, cream cheese, and crispy cereal into rich, creamy bars that are both easy and irresistibly delicious.
Key Ingredients
- 6 tablespoons (85g) unsalted butter
- 10 ounces (280g) marshmallow creme
- 1 teaspoon vanilla extract
- ½ teaspoon salt
- 3 ounces (85g) cream cheese, softened
- 5 cups Rice Krispies cereal
- Optional: Graham cracker crumbs or white chocolate chips, for topping
Tools Needed
- Medium saucepan
- Large mixing bowl
- Wooden spoon or rubber spatula
- 8×8-inch or 9×9-inch square pan
- Parchment paper
- Measuring cups and spoons
- Small offset spatula or butter knife
Cooking Instructions
Step 1: Prepare the Pan
Line your square pan with parchment paper and lightly grease it with butter or nonstick spray. This prevents sticking and makes removal easy.
Step 2: Melt the Butter
In a medium saucepan over low heat, melt the butter until fully liquid but not browned. Stir occasionally to prevent scorching.
Step 3: Add Marshmallow Creme and Cream Cheese
Add the marshmallow creme and softened cream cheese to the pan. Stir constantly until smooth and fully combined. This will take 3–5 minutes. Keep the heat low to avoid burning.
Step 4: Add Vanilla and Salt
Remove from heat. Stir in the vanilla extract and salt. This deepens the flavor and balances the sweetness.
Step 5: Combine with Cereal
Quickly pour the mixture over Rice Krispies in a large mixing bowl. Use a spatula to fold everything together gently but thoroughly until evenly coated.
Step 6: Press into the Pan
Transfer the mixture into the prepared pan. Use a buttered spatula or clean hands to press it in firmly and evenly. Work quickly—this sets fast.
Step 7: Add Optional Toppings
If using graham cracker crumbs or white chocolate chips, sprinkle over the top while still warm and gently press them in.
Step 8: Cool and Slice
Let the treats cool at room temperature for at least 30 minutes. Once set, lift from the pan and cut into squares using a sharp knife.
Why You’ll Love This Recipe
Cheesecake Vibes: Cream cheese gives that tangy, cheesecake-like richness without needing a crust or oven.
Easy to Make: Simple steps and minimal cleanup make this perfect for quick dessert needs.
Kid & Adult Favorite: Sweet, crunchy, and creamy—what’s not to love?
Versatile: Great for lunchboxes, potlucks, or midnight snacks.
No Bake Required: No oven, no problem—especially in summer or when you’re short on time.
Mistakes to Avoid & Solutions
Using cold cream cheese: It won’t melt evenly and leaves lumps.
Solution: Let the cream cheese sit at room temp for 30 minutes before using.
Overheating the marshmallow mixture: It can scorch or become rubbery.
Solution: Always use low heat and stir continuously.
Not pressing the mixture firmly into the pan: Can lead to loose, crumbly bars.
Solution: Use a buttered spatula or wax paper to press down evenly and firmly.
Skipping the parchment paper: Makes cleanup a pain.
Solution: Always line your pan—it makes lifting the bars out a breeze.
Adding toppings too late: They won’t stick.
Solution: Press them in while the mixture is still warm and soft.
Serving and Pairing Suggestions
Serve with hot coffee or a cold glass of milk.
Add fresh berries or fruit on the side for a balanced dessert.
Cut into mini bites for a dessert tray or party platter.
Pair with sparkling lemonade or iced green tea for a refreshing treat.
Present as a plated dessert with a drizzle of raspberry sauce.
Storage and Reheating Tips
Room Temperature: Store in an airtight container for up to 3 days.
Refrigerator: Keeps for 5–6 days if you prefer a firmer texture.
Freezing: Wrap individual squares tightly and freeze up to 1 month. Thaw at room temp.
Avoid Heat: Do not microwave to reheat; it will melt the marshmallow and ruin the texture.
Best Practice: Layer with parchment if stacking to prevent sticking.
FAQs
1. Can I use marshmallows instead of marshmallow creme?
Yes, you can use about 5 ½ cups mini marshmallows, but the texture may be slightly firmer.
2. What kind of cream cheese should I use?
Full-fat block cream cheese works best. Avoid whipped or spreadable versions for this recipe.
3. Can I add mix-ins like nuts or fruit?
Absolutely! Chopped walnuts, dried cranberries, or mini chocolate chips all work well—just stir them in before pressing into the pan.
4. How do I keep them from sticking to my hands when pressing?
Lightly butter your fingers or use a piece of wax paper to press the mixture down.
5. Can I double the recipe?
Yes! Just use a 9×13-inch pan and increase all ingredients accordingly.
Tips & Tricks
Butter your spatula and hands before handling the mixture to avoid stickiness.
Add a pinch of cinnamon or nutmeg for a subtle warm spice flavor.
Let kids press the mixture into the pan—it’s a fun, safe way to get them involved.
Want an extra-firm treat? Chill the bars for 20 minutes before slicing.
To keep the bars neat, clean your knife with a damp cloth between cuts.
Recipe Variations
Chocolate Swirl Version: Add ¼ cup melted white chocolate to the marshmallow mix. Swirl before pressing into the pan. Top with shaved dark chocolate.
Graham Cracker Crunch: Stir in ½ cup crushed graham crackers with the cereal and top with more for added texture and a classic cheesecake flavor.
Berry Cheesecake Bars: After pressing into the pan, dot the top with small spoonfuls of raspberry or strawberry jam and swirl gently.
Lemon Cheesecake Treats: Add 1 tablespoon fresh lemon zest and 1 teaspoon lemon juice to the marshmallow mixture for a tangy twist.
Nutty Cheesecake Bites: Mix in ¼ cup chopped pecans or almonds for added crunch and richness.
Final Thoughts
I’ve baked plenty of cheesecakes in my time, some towering and grand, others humble and rustic. But this little no-bake twist manages to capture that same satisfaction with a fraction of the work. It’s cozy, cheerful, and endlessly adaptable, one of those sweet treats that makes you smile before you’ve even had a bite.
I think that’s part of why I love it so much. It doesn’t require perfection, just a little stirring and pressing and a willingness to enjoy the process. And when a recipe brings joy without stress, that’s the kind of dish worth keeping in your back pocket. Make it your own, share it often, and always save a square for yourself at the end.
No-Bake Cheesecake Rice Krispies Treats
Print ThisIngredients
- 6 tablespoons (85g) unsalted butter
- 10 ounces (280g) marshmallow creme
- 1 teaspoon vanilla extract
- ½ teaspoon salt
- 3 ounces (85g) cream cheese, softened
- 5 cups Rice Krispies cereal
- Optional: Graham cracker crumbs or white chocolate chips, for topping
Instructions
Step 1: Prepare the Pan
Line a square pan with parchment and lightly grease.
Step 2: Melt the Butter
Melt butter in a saucepan over low heat, stirring occasionally.
Step 3: Add Marshmallow Creme and Cream Cheese
Stir in marshmallow creme and cream cheese until smooth and combined.
Step 4: Add Vanilla and Salt
Remove from heat and mix in vanilla and salt.
Step 5: Combine with Cereal
Pour over Rice Krispies and fold gently until coated.
Step 6: Press into the Pan
Press mixture evenly into the prepared pan using greased hands or a spatula.
Step 7: Add Optional Toppings
Sprinkle toppings while warm and press lightly.
Step 8: Cool and Slice
Cool for 30 minutes, then lift and slice into squares.