Last month, we threw a backyard picnic for my cousin’s birthday—a low-key gathering filled with laughter, grilled corn, cold lemonade, and barefoot kids chasing bubbles. Everyone brought a dish, but dessert was my responsibility. I knew I wanted to make something that wouldn’t melt under the sun or require knives and plates. Something fun, a bit indulgent, and easy to pass around between stories and second helpings of barbecue.
Floating around online but none that captured that warm, Southern comfort I associate with summer sweets. That’s when I thought—why not blend the creamy richness of cheesecake with the cinnamon-kissed goodness of peach cobbler? And serve it in a crisp waffle cone for that delightful handheld convenience.
That afternoon, I assembled the cones right at the patio table while my niece kept sneaking spoonfuls of the peach topping. When the first tray went out, I barely had time to snap a photo—people were grabbing them two at a time. Crumbly, creamy, fruity perfection in every bite. The kind of dessert that disappears fast, but stays in memory even longer.
Peach Cobbler Cheesecake Cones have officially earned their spot in my summer entertaining playbook.
Short Description
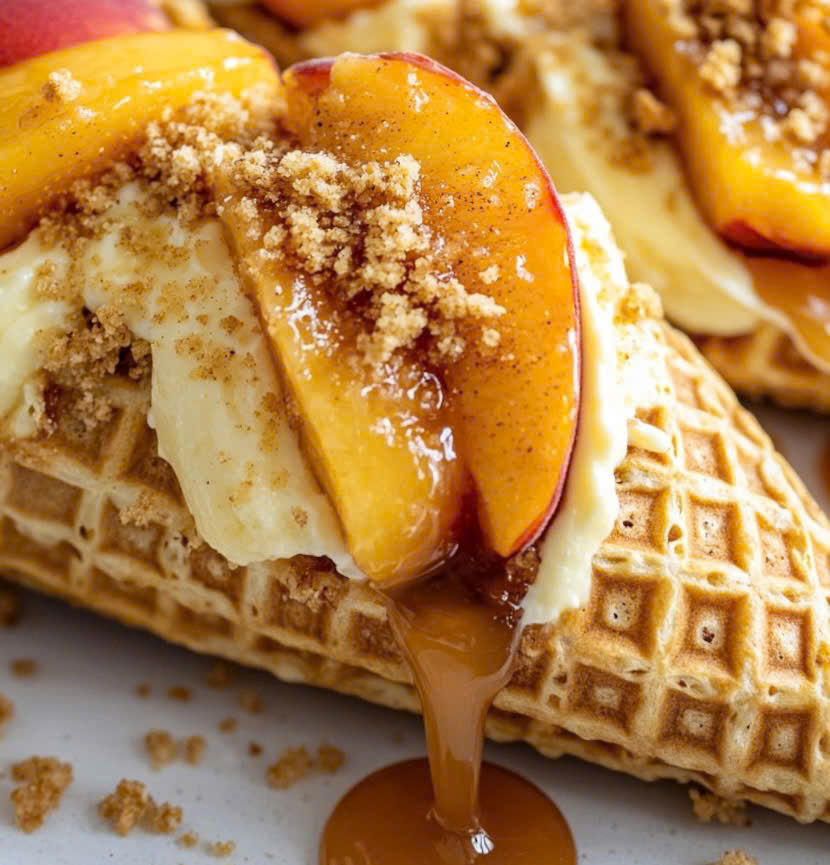
Peach Cobbler Cheesecake Cones are handheld dessert cones filled with creamy cheesecake filling, spiced peach topping, and buttery crumble, offering a perfect balance of crunch, creaminess, and fruity sweetness in every bite.
Key Ingredients
For the Cheesecake Filling:
- 2 cups cream cheese, softened
- 1 cup powdered sugar
- 1 cup whipped topping
- 1 tsp vanilla extract
For the Peach Topping:
- 2 cups diced peaches (fresh or canned, drained)
- 1/4 cup brown sugar
- 1 tsp cinnamon
- 1 tbsp lemon juice
For the Crumble Topping:
- 1/2 cup all-purpose flour
- 1/4 cup brown sugar
- 1/4 cup melted butter
- 1/2 tsp cinnamon
For the Cones:
-
6 waffle cones
Tools Needed
- Mixing bowls
- Electric hand mixer or stand mixer
- Saucepan
- Spatula
- Baking sheet
- Parchment paper
- Piping bag (or zip-top bag with corner snipped)
Cooking Instructions
Step 1: Make the Cheesecake Filling
In a large bowl, beat softened cream cheese with a mixer until smooth and lump-free. Add powdered sugar, whipped topping, and vanilla extract. Continue mixing until the texture is fluffy and creamy. Transfer to a piping bag and refrigerate for at least 30 minutes to firm up.
Step 2: Cook the Peach Topping
In a medium saucepan over medium heat, combine diced peaches, brown sugar, cinnamon, and lemon juice. Stir frequently and cook for 5–7 minutes until the peaches soften and the mixture slightly thickens. It should resemble a loose compote. Remove from heat and let cool completely.
Step 3: Bake the Crumble Topping
Preheat your oven to 350°F (175°C). In a bowl, mix flour, brown sugar, melted butter, and cinnamon until the mixture resembles coarse crumbs. Spread it evenly on a parchment-lined baking sheet and bake for 10–12 minutes until golden brown and fragrant. Let it cool until crisp.
Step 4: Assemble the Cones
Pipe the chilled cheesecake filling into each waffle cone, filling about two-thirds of the way. Add a generous spoonful of the cooled peach topping. Sprinkle crumble topping over each cone for a crunchy finish. Serve immediately or refrigerate for up to 1 hour before serving.
Why You’ll Love This Recipe
– A fun, handheld dessert that’s perfect for parties or picnics
– Combines creamy, fruity, and crunchy textures
– Easy to prep ahead and assemble quickly
– Adaptable for seasonal fruits or personal preferences
– No fork or plate needed—just grab and go!
Mistakes to Avoid & Solutions
Mistake 1: Cheesecake filling too runny
Solution: Make sure your cream cheese is softened but not warm. Refrigerate the filling after mixing for at least 30 minutes so it firms up.
Mistake 2: Peach topping is too watery
Solution: Use fresh or well-drained canned peaches. Cook until slightly thickened and let it cool completely before spooning onto the cones.
Mistake 3: Crumble topping turns soggy
Solution: Bake until golden and let it cool completely before using. Store it separately in an airtight container if assembling ahead of time.
Mistake 4: Cones getting soggy
Solution: Assemble cones just before serving. You can prepare all components in advance and build them right before guests arrive.
Mistake 5: Overfilling the cones
Solution: Fill about two-thirds of the cone with cheesecake to leave room for toppings and avoid overflow.
Serving and Pairing Suggestions
These cones are ideal for outdoor events, baby showers, potlucks, and BBQs. Serve them chilled on a tray with crushed ice underneath or arrange them upright in a cone holder.
Pair with iced peach tea, sparkling lemonade, or a crisp white wine like Riesling or Moscato.
They also make a beautiful dessert buffet centerpiece when arranged in a tiered display.
Storage and Reheating Tips
Cheesecake Filling: Store in an airtight container in the fridge for up to 3 days.
Peach Topping: Refrigerate in a sealed jar or container for up to 5 days.
Crumble Topping: Keep in a dry container at room temperature for 3–4 days.
Assembled Cones: Best eaten fresh. If storing, refrigerate for up to 1 hour before serving to avoid soggy cones.
Reheating: Not recommended for assembled cones. For leftover peach topping, gently warm in a pan if using for other desserts.
FAQs
1. Can I use frozen peaches instead of fresh or canned?
Yes, just thaw and drain them well before cooking to avoid excess moisture in the topping.
2. What’s the best whipped topping to use?
You can use any store-bought whipped topping like Cool Whip, or make your own with heavy cream and a little powdered sugar.
3. Can I make this recipe gluten-free?
Yes! Use gluten-free flour for the crumble and gluten-free waffle cones.
4. How far in advance can I prep the components?
You can make all three components (cheesecake filling, peach topping, and crumble) a day ahead. Assemble cones just before serving.
5. What if I don’t have a piping bag?
No problem—just use a zip-top bag and snip off a corner, or spoon the filling carefully into the cones.
Tips & Tricks
– Lightly toast the cones for 2–3 minutes in the oven for extra crispness before filling.
– Add a pinch of nutmeg or ginger to the peach mixture for a flavor boost.
– Use a tall glass to help hold the cones upright while assembling.
– Chill the cones for 10–15 minutes after assembling for a firmer texture when serving.
– Try brushing the inside of the cones with melted chocolate to create a barrier against moisture.
Recipe Variations
Berry Cobbler Cheesecake Cones:
Swap peaches for mixed berries like blueberries and strawberries. Add 1 tbsp cornstarch to the fruit mixture while cooking for a thicker consistency. Use lemon zest in the cheesecake filling for a citrusy twist.
Apple Pie Cheesecake Cones:
Use diced apples, brown sugar, cinnamon, and a splash of apple cider vinegar for the fruit topping. Bake the apple mixture until tender and caramelized. Pair with crushed graham crackers instead of traditional crumble.
Tropical Cheesecake Cones:
Use pineapple and mango instead of peaches. Add shredded coconut to the crumble topping and a splash of coconut extract to the cheesecake filling for a tropical flavor.
Chocolate-Peach Cheesecake Cones:
Add 2 tablespoons of cocoa powder to the cheesecake filling. Drizzle chocolate sauce over the top before serving for an indulgent finish.
Final Thoughts
Making these Peach Cobbler Cheesecake Cones was like building joy in layers—sweet, creamy, warm-spiced joy. They were the kind of treat that brought guests back to the dessert table twice, not just for the flavor but for the novelty of it. No plates, no utensils, just hands and smiles.
I find something refreshing about reimagining a comfort classic in a modern, party-friendly way. Especially one that bridges Southern tradition with a touch of whimsy. If you’re planning your next outdoor feast or just craving something beyond the usual fruit tart, give these a try.They’re simple to prep, visually delightful, and deeply satisfying—everything a summer dessert should be, in the palm of your hand.
Peach Cobbler Cheesecake Cones
Print ThisIngredients
- For the Cheesecake Filling:
- 2 cups cream cheese, softened
- 1 cup powdered sugar
- 1 cup whipped topping
- 1 tsp vanilla extract
- For the Peach Topping:
- 2 cups diced peaches (fresh or canned, drained)
- 1/4 cup brown sugar
- 1 tsp cinnamon
- 1 tbsp lemon juice
- For the Crumble Topping:
- 1/2 cup all-purpose flour
- 1/4 cup brown sugar
- 1/4 cup melted butter
- 1/2 tsp cinnamon
- For the Cones:
- 6 waffle cones
Instructions
Step 1: Make the Cheesecake Filling
Beat cream cheese until smooth, then mix in powdered sugar, whipped topping, and vanilla. Pipe into a bag and chill for 30 minutes.
Step 2: Cook the Peach Topping
Simmer diced peaches with brown sugar, cinnamon, and lemon juice until soft and slightly thickened. Let cool.
Step 3: Bake the Crumble Topping
Mix flour, brown sugar, melted butter, and cinnamon. Bake at 350°F (175°C) for 10–12 minutes until golden and crisp. Cool completely.
Step 4: Assemble the Cones
Fill waffle cones two-thirds full with cheesecake filling. Add peach topping and sprinkle with crumble. Serve immediately or chill briefly.