I paused, looked at the clock, then at the kitchen counter. No slime today, I thought. But bouncy balls? That sounded like fun. After a quick inventory of what we had on hand, I realized we could whip up a colorful batch using items already in my pantry.
We rolled up our sleeves, lined the counter with wax paper, and set up bowls of vibrant colors. He stirred while I supervised the glue, and we laughed as our fingers got stickier with each mix. And when we finally dropped the finished product on the floor and watched it bounce across the room, the joy on his face made the mess completely worth it.
A baking session or a traditional recipe, but it reminded me why I love experimenting in the kitchen. And these tie-dye bouncy balls? They’re a hands-on, colorful, joyful memory waiting to happen.
Short Description
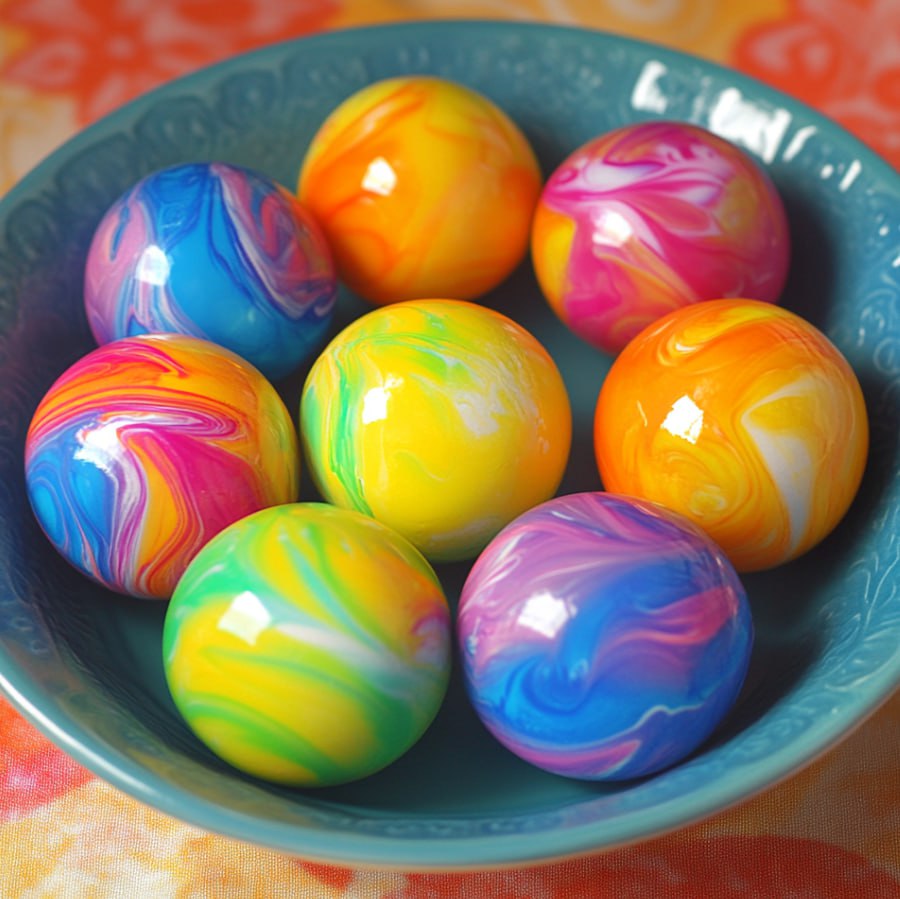
A fun, hands-on craft made with simple kitchen ingredients, these Tie-Dye Bouncy Balls are vibrant, squishy, and perfect for kids. Easy to make and bursting with color, they bounce just as well as store-bought ones—and they’re even more fun to create!
Key Ingredients
- ½ cup white school glue
- ¼ cup liquid starch
- ¼ cup water
- 1 tablespoon cornstarch
- Food coloring (assorted colors for tie-dye effect)
- ½ teaspoon baking soda
Tools Needed
- Small mixing bowls (one for each color)
- Plastic spoons or craft sticks for stirring
- Wax paper (for drying)
Cooking Instructions
Step 1: Mix the Glue and Water
In a small mixing bowl, combine ½ cup of white school glue with ¼ cup of water. Stir until the mixture is smooth and well-blended. The texture should be silky and runny.
Step 2: Add the Baking Soda
Add ½ teaspoon of baking soda to the glue mixture. Stir thoroughly. This helps stabilize the consistency and prepare it for thickening.
Step 3: Create Tie-Dye Colors
Divide the glue mixture evenly among several small bowls. Add a few drops of food coloring to each bowl to create different vibrant colors. Stir each bowl until the color is fully incorporated.
Step 4: Add Liquid Starch
Slowly pour in the liquid starch—about 1–2 tablespoons at a time—into each colored bowl. Stir consistently. The mixture will start to thicken and form a sticky, stretchy consistency.
Step 5: Incorporate Cornstarch
Once the mixture thickens, add 1 tablespoon of cornstarch to each bowl. Knead the mixture with your hands until it becomes soft and pliable. If it’s too sticky, knead in a pinch more cornstarch.
Step 6: Shape the Balls
Roll each color portion into small balls, around 1–2 inches in diameter. For a true tie-dye effect, press multiple colored portions together and gently roll them until swirled but not fully blended.
Step 7: Dry the Balls
Place the finished bouncy balls on wax paper and let them air dry for 2–3 hours. They should feel firmer to the touch once ready.
Step 8: Bounce Time!
After drying, give your creations a test bounce! They should spring right back up, colorful swirls and all.
Why You’ll Love This Recipe
– It’s a fun and creative craft you can make right in your kitchen
– No special equipment or fancy ingredients required
– Great bonding activity for kids, grandkids, or even a group playdate
– Customizable with endless color combinations
– Teaches basic science through play
Mistakes to Avoid & Solutions
Mistake 1: Bouncy ball is too sticky
This usually means there isn’t enough cornstarch or it hasn’t been kneaded long enough.
Solution: Add small pinches of cornstarch and knead until the mixture firms up.
Mistake 2: Mixture doesn’t solidify
Too much water or not enough liquid starch can cause this.
Solution: Gradually add more liquid starch while stirring. Watch for the mixture to thicken before kneading.
Mistake 3: Colors become muddy instead of swirled
Over-mixing different colors will lead to a brownish result.
Solution: Press colors together gently and roll just until a swirl effect forms.
Mistake 4: Ball flattens instead of bouncing
The texture might be too soft.
Solution: Let the ball dry longer or add a bit more baking soda next time to firm it up.
Mistake 5: Ball dries out too fast after use
Air exposure can harden the ball.
Solution: Store in an airtight container or zip-top bag to preserve its bounce.
Serving and Pairing Suggestions
– While these aren’t for eating, they’re perfect for pairing with other activities.
– Set up a craft day where kids can decorate boxes to store their balls, or pair with a mini bounce-off game.
– Hosting a birthday party? Let each child make their own and take it home as a personalized party favor.
– You can also use them as a reward activity after a day of baking cookies or learning about colors.
Storage and Reheating Tips
Store in airtight containers: This keeps them soft and bouncy longer.
Avoid refrigeration: It can harden or crack the texture.
If the ball flattens: Gently reshape and knead it again to restore elasticity.
For longer life: Wrap individually in plastic wrap before placing in a sealed container.
Discard after a week or so: These aren’t meant to last forever, especially once they lose bounce.
FAQs
1. Can I use clear glue instead of white glue?
Yes, but the colors may appear more transparent and the consistency might be slightly less dense.
2. Is this safe for young kids?
Yes—with supervision. These bouncy balls are non-toxic but not edible. Always monitor kids during crafting.
3. How long do the bouncy balls last?
Typically 3–5 days if stored well. After that, they may start to dry out or lose bounce.
4. Can I skip the food coloring?
Sure! The balls will just be a cloudy white color. For natural dyes, beet juice or turmeric can be tested but may affect texture.
5. Can I bake them to speed up drying?
No, heating may cause the balls to crack or deform. Letting them air dry is best.
Tips & Tricks
– Try swirling three colors for a rainbow effect without blending them completely.
– Knead thoroughly for a smooth, elastic texture that holds shape better.
– Use gloves if you want to avoid dye-stained hands.
– Add glitter or tiny beads for extra sparkle—just make sure they’re mixed in well.
– If using for a party, prep a few color sets in advance so kids can mix and match.
Recipe Variations
1. Glitter Bouncy Balls
– Add ½ teaspoon of glitter to each color bowl after adding the food coloring.
– Stir gently to distribute the glitter. Proceed with the regular recipe.
2. Essential Oil Scented Balls
– Add 1 drop of essential oil (like lavender or peppermint) to the mixture after Step 2.
– Stir before adding food coloring. This adds a relaxing scent but be cautious with sensitive skin.
3. Neon Glow Balls
– Use neon or glow-in-the-dark food coloring for a super vibrant result.
– Blacklight play? These glow balls will be the star.
4. Miniature Bouncy Balls
– Use a smaller scoop and roll ½-inch balls for mini versions—great for marble-style games.
– Let them dry slightly less time for a softer bounce.
Final Thoughts
Creating these tie-dye bouncy balls reminded me that not every kitchen experiment needs to end in a meal. The best creations are the ones you can throw across the room and laugh about as they bounce into the hallway.
The laughter, the surprise of colors blending, and the excitement of that first bounce across the room—all of it turned an ordinary day into something unforgettable.
Tie-Dye Bouncy Balls
Print ThisIngredients
- ½ cup white school glue
- ¼ cup liquid starch
- ¼ cup water
- 1 tablespoon cornstarch
- Food coloring (assorted colors for tie-dye effect)
- ½ teaspoon baking soda
Instructions
Mix Glue and Water: Combine ½ cup white school glue with ¼ cup water in a bowl. Stir until smooth and silky.
Add Baking Soda: Mix in ½ teaspoon baking soda to stabilize the mixture.
Create Tie-Dye Colors: Divide the mixture into separate bowls and add different food coloring to each. Stir well.
Add Liquid Starch: Gradually add 1–2 tablespoons of liquid starch to each bowl, stirring until it thickens.
Add Cornstarch: Knead in 1 tablespoon cornstarch to each bowl until the texture is soft and stretchy. Add more cornstarch if sticky.
Shape the Balls: Roll each color into 1–2 inch balls. Combine multiple colors for a tie-dye swirl effect.
Let Them Dry: Place balls on wax paper and let them dry for 2–3 hours until firm.
Bounce Time: Once dry, bounce and enjoy your colorful creations!