Italian Easter Cookies mark a gentle pause in our family calendar, arriving with dyed eggs, folded linens, and the quiet glow of Easter morning. Before the sun is fully up, the kitchen begins to warm, coffee brews in the corner, and lemon zest perfumes the air.
My granddaughter always notices the scent first, curious and smiling, while familiar voices and small greetings drift in and out of the room. Those early hours feel unhurried, shaped by simple tasks and shared anticipation.
Italian Easter Cookies often take form while the table is still unfinished, dough rolled into knots as stories pass between generations. My sister once aimed for perfect symmetry, while I leaned toward shapes that felt more relaxed and personal.
One year, my grandson focused intently on twisting each cookie as church bells echoed faintly outside, turning baking into a quiet moment of togetherness. The cookies bake slowly, giving the house time to fill with warmth and conversation.
Italian Easter Cookies remain part of our celebration because they suit the day so naturally. Arranged beside fruit and coffee cups, they are meant to be reached for throughout the morning. Their soft crumb and light lemon glaze match the calm tone of Easter, offering something gentle rather than grand. Each platter reflects care, familiarity, and the steady return of faces gathered around the same table.
Short Description
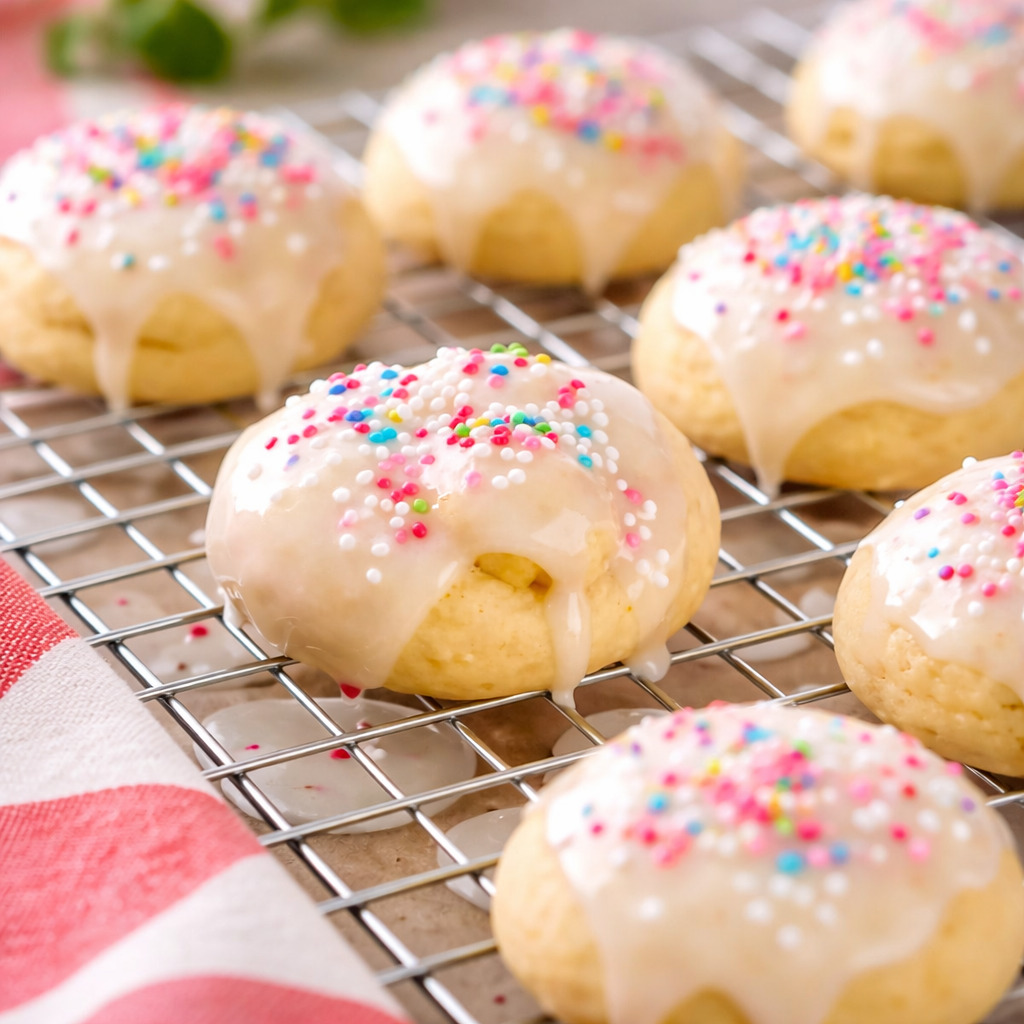
Italian Easter Cookies are lightly sweet, soft-baked cookies flavored with fresh lemon zest and finished with a simple lemon glaze. Traditionally shaped into knots or rings, they are a classic Easter dessert meant for sharing with family.
Key Ingredients
- 1½ cups plus 2 tablespoons all purpose flour
- 3¼ tablespoons granulated sugar
- 1 teaspoon baking powder
- 1 pinch salt
- Zest of 1 lemon
- 1 large egg
- ¼ cup butter, melted and cooled
- 4 tablespoons milk (2%)
For the Lemon Glaze
- 1½ to 2 cups powdered sugar, sifted
- 1 tablespoon lemon juice
- 1 tablespoon milk
Tools Needed
- Mixing bowls
- Whisk
- Fork
- Baking sheet
- Parchment paper
- Cooling rack
- Small bowl for glaze
Cooking Instructions
Step 1: Prepare the Oven and Baking Sheet
Preheat the oven to 300°F (150°C). Line a large baking sheet with parchment paper and set it aside. The low oven temperature helps keep the cookies soft rather than crisp.
Step 2: Mix the Dry Ingredients
In a large bowl, whisk together the flour, granulated sugar, baking powder, salt, and lemon zest. The zest should be evenly distributed so the lemon flavor carries through every cookie.
Step 3: Combine the Dough
Make a well in the center of the dry mixture. Add the egg, melted butter, and milk. Use a fork to gently combine until the mixture is mostly brought together.
Step 4: Knead the Dough
Transfer the dough to a lightly floured surface and knead gently for about 1 to 2 minutes until smooth. The dough should feel soft but not sticky. If it sticks to your hands, add flour one tablespoon at a time.
Step 5: Shape the Cookies
Pinch off small pieces of dough and roll them into thin ropes measuring about 5 to 6 inches long. Form each rope into a knot or small circle and place on the prepared baking sheet, leaving space between cookies.
Step 6: Bake
Bake for 15 to 18 minutes, until the cookies are lightly golden but still pale. They should remain soft to the touch.
Step 7: Cool and Glaze
Allow cookies to cool completely on a rack. In a small bowl, mix powdered sugar, lemon juice, and milk until smooth. Adjust thickness with small amounts of milk. Spoon glaze over cooled cookies and let set.
Why You’ll Love This Recipe
Lightly sweet with fresh lemon flavor
Soft texture that stays tender for days
Simple ingredients found in most kitchens
Perfect for make-ahead holiday baking
Traditional recipe that suits all ages
Mistakes to Avoid & Solutions
Overworking the Dough
Too much kneading can make the cookies dense and tough.
Solution: Knead only until the dough is smooth and holds together.
Dough Too Sticky
High humidity can cause the dough to feel overly wet and difficult to handle.
Solution: Add flour one tablespoon at a time until manageable.
Overbaking
Baking too long dries out the cookies, even if they look lightly colored.
Solution: Remove from the oven once lightly golden.
Glazing Warm Cookies
Glaze will slide off if applied before the cookies cool.
Solution: Wait until the cookies are completely cooled before glazing.
Serving and Pairing Suggestions
Serve on an Easter dessert platter
Pair with coffee, tea, or warm milk
Arrange alongside fresh fruit
Offer as a light dessert after Easter lunch
Storage and Reheating Tips
Store in an airtight container at room temperature for up to 4 days
Refrigerate glazed cookies for up to 6 days
Bring to room temperature before serving
Avoid reheating to preserve glaze texture
FAQs
1. Can Italian Easter Cookies be made ahead of time?
Yes. They store well and can be baked up to three days before serving.
2. Can I freeze these cookies?
Un-glazed cookies freeze well for up to two months. Glaze after thawing.
3. Can I use unsalted butter?
Yes. Add ¼ teaspoon salt if using unsalted butter.
4. Why are my cookies spreading too much?
The dough may be too warm. Chill for 15 minutes before shaping.
5. Can the glaze be skipped?
Yes. A light dusting of powdered sugar works beautifully.
Tips & Tricks
Roll thinner ropes for more delicate cookies
Use fresh lemon zest for brighter flavor
Let glaze set completely before stacking
Keep dough covered while shaping
Recipe Variations
Orange Easter Cookies: Replace lemon zest with orange zest and swap lemon juice for orange juice in the glaze for a sweeter citrus profile.
Vanilla Almond Cookies: Add ½ teaspoon almond extract to the dough and use vanilla glaze for a bakery-style flavor.
Sprinkle-Topped Cookies: Add pastel sprinkles over wet glaze for festive Easter presentation.
Final Thoughts
Italian Easter Cookies continue to hold meaning in our home because they fit so naturally into the rhythm of the holiday. They are shaped slowly, baked gently, and shared generously, allowing space for conversation and quiet moments around the kitchen table. The lemon scent, the soft crumb, and the familiar knots reflect a kind of celebration rooted in care rather than excess.
As seasons pass and tables change, Italian Easter Cookies remain a constant presence. They travel easily from kitchen to gathering, carrying the feeling of home wherever they land. Sharing them feels less like serving dessert and more like passing along a small piece of tradition.

Traditional Italian Easter Cookies
Ingredients
- 1½ cups plus 2 tablespoons all purpose flour
- 3¼ tablespoons granulated sugar
- 1 teaspoon baking powder
- 1 pinch salt
- Zest of 1 lemon
- 1 large egg
- ¼ cup butter melted and cooled
- 4 tablespoons milk 2%
For the Lemon Glaze
- 1½ to 2 cups powdered sugar sifted
- 1 tablespoon lemon juice
- 1 tablespoon milk
Instructions
- Preheat the oven to 300°F (150°C) and line a baking sheet with parchment paper.
- Whisk together the flour, sugar, baking powder, salt, and lemon zest.
- Add the egg, melted butter, and milk, mixing gently until combined.
- Knead briefly until smooth and soft.
- Roll into thin 5–6 inch ropes and shape into knots or rings.
- Bake for 15–18 minutes until lightly golden and soft.
- Cool completely, then drizzle with lemon glaze.