Some afternoons, the kitchen pulls me in like a cozy old chair by the fire. On one of those slower days last fall, I was sorting through an old recipe tin that once belonged to my mother-in-law. It’s filled with brittle index cards, dog-eared at the corners and smudged with chocolate fingerprints. That’s when I stumbled upon a handwritten note that simply read, “Chocolate. Coconut. Milk. Trust me.”
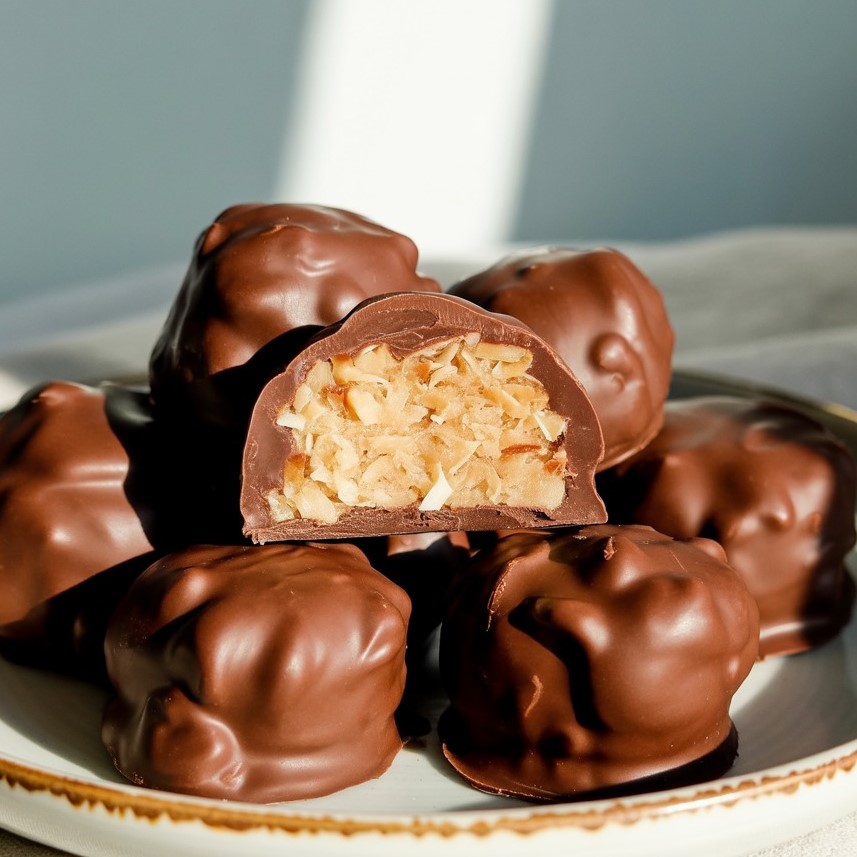
I knew right away it was her shortcut version of the classic Mounds Bar—a candy she loved to sneak into our movie nights. So I gave it a go, tweaking the measurements a bit to fit today’s pantry staples and preferences. What I ended up with was pure magic: chewy, coconut-packed bars wrapped in a smooth chocolate shell. No candy thermometer, no fancy molds. Just three ingredients and a little patience.
Now, I make these often—sometimes with my granddaughter when she visits. They’re simple enough for her little hands to help with and impressive enough to gift in a ribbon-tied box. Plus, they taste just like the real thing (maybe better), especially when you use good-quality chocolate.
If you love recipes that are unfussy but full of soul, this one might just become your new favorite. Let’s get you started.
Short Description
These homemade Mounds Bars use just three ingredients—coconut, sweetened condensed milk, and chocolate—to create chewy, chocolate-covered bites of nostalgic candy-shop bliss.
Key Ingredients
- 2 cups unsweetened shredded coconut (use sweetened if you prefer a richer, sweeter bar)
- ½ cup sweetened condensed milk
- 1½ cups chocolate chips or melting wafers (dark, semi-sweet, or milk chocolate—your choice)
Tools Needed
- Mixing bowl
- Spoon or spatula
- Baking tray
- Parchment paper
- Microwave-safe bowl or double boiler
- Fork or dipping tool
Cooking Instructions
Step 1: Mix It Up
Combine the shredded coconut and sweetened condensed milk in a large bowl. Stir until everything is fully combined and thick. It’ll be sticky—that’s a good thing! This texture gives the bars their signature chewiness.
Step 2: Shape the Bars
Scoop out small portions (about 1–2 tablespoons) and roll them into compact logs or bars. You can also shape them into small balls if you’d like bite-sized treats. Wetting your fingers lightly with water will help prevent sticking. Place each shaped bar on a parchment-lined tray.
Step 3: Chill
Slide the tray into the freezer for 20–30 minutes. This helps firm them up and makes them easier to dip in chocolate later without falling apart.
Step 4: Melt the Chocolate
While the bars are chilling, melt your chocolate:
Microwave Method: Heat in 30-second bursts, stirring between each, until smooth.
Double Boiler Method: Place chocolate in a heatproof bowl over simmering water. Stir gently until melted and glossy.
Step 5: Dip and Set
Once the bars are chilled and firm, dip them one by one into the melted chocolate. Use a fork or dipping tool to lift each bar out, letting the excess chocolate drip off. Return them to the parchment-lined tray.
Let them sit at room temperature until the chocolate sets, or speed things up with 10–15 minutes in the fridge.
Step 6: Store and Enjoy!
Once the chocolate has fully hardened, transfer the bars to an airtight container. They’ll keep in the fridge for up to 1 week or in the freezer for a month—if they last that long!
Why You’ll Love This Recipe
– Only 3 simple ingredients
– No baking required
– Naturally gluten-free
– Customizable with different chocolates
– Freezer-friendly for make-ahead treats
– Kid-friendly (both to make and eat!)
Mistakes to Avoid & Solutions
Too sticky to shape?
The mixture might be too warm. Pop it in the fridge for 10 minutes before shaping.
Bars fall apart in chocolate?
They weren’t chilled long enough. Be sure to freeze for at least 20–30 minutes.
Chocolate coating is too thick or clumpy?
Thin it with 1 teaspoon of coconut oil while melting.
Chocolate won’t stick?
Bars may be too moist on the surface. Pat them gently with a paper towel before dipping.
Chocolate blooms (white streaks) after setting?
This happens if chocolate cools too quickly or unevenly. Let them set at room temperature before refrigerating.
Serving and Pairing Suggestions
– Serve on a dessert platter with fresh fruit or almond clusters.
– Pair with coffee, spiced chai, or coconut milk hot chocolate.
– Wrap individually and place in gift boxes or jars for holidays and birthdays.
– Arrange in mini cupcake liners for bake sales or buffet-style events.
Storage and Reheating Tips
To Store:
Place in an airtight container lined with parchment between layers. Keep in the fridge for 7 days or freeze for up to 1 month.
To Reheat (if frozen):
Let thaw in the fridge for a few hours or at room temperature for about 30 minutes. Do not microwave, or the chocolate may melt unevenly.
FAQs
1. Can I use sweetened coconut instead of unsweetened?
Yes! It will make the bars sweeter and slightly moister. Just reduce the condensed milk slightly if the mixture becomes too wet.
2. Which chocolate is best for dipping?
Dark chocolate is traditional, but semi-sweet and milk chocolate work beautifully too. Use high-quality chips or melting wafers for a smoother coating.
3. Can I make these vegan?
Yes. Use sweetened condensed coconut milk and dairy-free chocolate chips to keep it plant-based.
4. Do I need to temper the chocolate?
Not for this recipe. Since they’re stored cold, tempering isn’t necessary unless you want a glossy finish that holds at room temperature.
5. Can I double the recipe?
Absolutely. Just ensure you chill the bars in a single layer, or freeze in batches to prevent sticking.
Tips & Tricks
– Add a pinch of sea salt over the top before the chocolate sets for a sweet-salty twist.
– Try shaping the bars in silicone candy molds for a polished finish.
– Use a cooling rack over a tray when dipping for cleaner bottoms.
– Line your tray with parchment or wax paper to avoid sticking.
– If gifting, wrap each bar in wax paper and tie with twine for a rustic look.
Recipe Variations
Almond Joy Style: Press a whole almond into the top of each coconut bar before chilling. Dip in milk chocolate instead of dark.
Chocolate-Dipped Coconut Balls: Roll the mixture into 1-inch balls instead of bars for party-ready bites. Dip and chill as usual.
Mocha Coconut Bites: Add 1 teaspoon espresso powder to the coconut mixture and dip in dark chocolate for a coffee-flavored twist.
Orange-Coconut Bars: Add ½ teaspoon orange zest to the coconut mixture for a citrusy note that pairs well with dark chocolate.
Toasted Coconut Crunch: Toast ½ cup of the coconut before mixing for added depth and texture.
Final Thoughts
Recipes like this remind me why I fell in love with the kitchen in the first place. There’s something quietly joyful about transforming just three humble ingredients into treats that bring smiles and second helpings. This one’s a keeper—not because it’s complicated or fussy, but because it’s easy, nostalgic, and endlessly flexible. I’ve made these for family movie nights, church bake sales, and as sweet little surprises for my neighbors.
Whether you’re an experienced home baker or just dipping your toes into the world of sweets, this one is nearly foolproof—and wholly satisfying. The beauty is in the simplicity, the flavor, and of course, the love baked (or chilled!) into every bite.
3-Ingredient Mounds Bars
Print ThisIngredients
- 2 cups unsweetened shredded coconut (use sweetened if you prefer a richer, sweeter bar)
- ½ cup sweetened condensed milk
- 1½ cups chocolate chips or melting wafers (dark, semi-sweet, or milk chocolate—your choice)
Instructions
Step 1: Mix
Combine coconut and condensed milk in a bowl. Stir until thick and sticky.
Step 2: Shape
Scoop 1–2 tablespoons of mixture and form into bars or balls. Place on a parchment-lined tray.
Step 3: Chill
Freeze for 20–30 minutes until firm.
Step 4: Melt Chocolate
Microwave chocolate in 30-second bursts or melt over a double boiler until smooth.
Step 5: Dip & Set
Dip chilled bars in melted chocolate. Let excess drip off, then place back on the tray. Set at room temp or chill 10–15 minutes.
Step 6: Store
Keep in an airtight container in the fridge for up to 1 week or freeze for up to 1 month.