One late summer evening, as the cicadas hummed outside and the sunset spilled a soft orange glow across our porch, I found myself experimenting with something I hadn’t planned on. My youngest granddaughter, Lily, had stayed over after school, and she’s at that wonderful age where she wants to “help Grandma cook” even if it means spilling cheese everywhere.
My husband had been working out in the yard all afternoon, and by the time he came in, he was craving something hearty yet fun—something a little different from our usual weeknight dinners.
I opened the pantry, saw a stack of tortillas, and thought of how much the kids love grilled cheese sandwiches. That’s when the idea of blending the two hit me—something playful enough for Lily and filling enough for my husband. I remember the smell of seasoned beef sizzling in the pan and Lily’s giggles as she sprinkled cheese like fairy dust over everything.
It turned into a spontaneous family dinner, the kind where no one checks their phone and everyone fights over the crispiest burrito. When we finally sat down, the first bite brought a crunch from the cheesy crust, followed by tender beef, gooey cheese, and just a bit of creamy sauce. It felt like a celebration on an ordinary evening. That meal reminded me that sometimes the best dishes aren’t planned; they’re discovered by opening the fridge and letting your cravings guide you.
Short Description
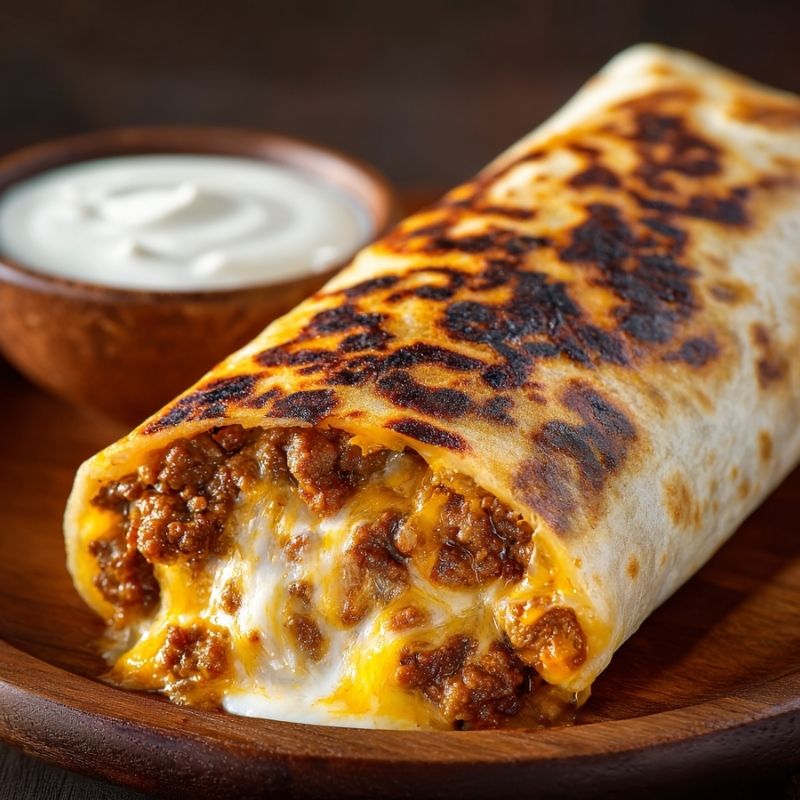
This Golden Grilled Cheese Burrito combines the best of both worlds: a cheesy, crispy grilled exterior with a hearty taco-style filling inside. Packed with seasoned beef, rice, beans, and a melty cheese blend, it’s a comforting meal that’s perfect for busy weeknights, family dinners, or even game day.
Key Ingredients
For the Beef Filling:
- 1 lb (450 g) ground beef (80/20 for flavor)
- 1 packet taco seasoning (or 2 tablespoons homemade taco spice mix)
- ¼ cup water
- ½ teaspoon garlic powder
- ½ teaspoon onion powder
- Salt and pepper to taste
Cheese Blend:
- 1 cup shredded cheddar cheese
- 1 cup shredded Monterey Jack cheese
- ½ cup shredded mozzarella cheese
For the Burritos:
- 4 large flour tortillas (10–12 inches, burrito-sized)
- 1 cup cooked Mexican rice (optional but recommended)
- ½ cup sour cream or chipotle mayo
- ½ cup nacho cheese or queso (optional for indulgence)
- ½ cup crushed tortilla chips (for texture)
- ½ cup refried beans or black beans (optional)
For Grilling:
- 2 tablespoons butter
- ½ cup extra cheese for the outer grilled cheese crust (cheddar and mozzarella work well)
Tools Needed
- Large nonstick skillet or griddle
- Wooden spoon
- Mixing bowls
- Spatula
- Measuring cups and spoons
Cooking Instructions
Step 1: Cook the Ground Beef
Heat a large skillet over medium heat. Add ground beef and cook until browned, breaking it up with a wooden spoon. Drain excess fat, then stir in taco seasoning, garlic powder, onion powder, and water. Let simmer for 5–7 minutes until the liquid is mostly absorbed. Taste and adjust seasoning. Set aside.
Step 2: Prep the Fillings
Prepare the Mexican rice if you haven’t already, or use leftovers. Warm the beans, and mix together the three cheeses in a bowl. Have sauces like sour cream, chipotle mayo, or queso ready for layering.
Step 3: Assemble the Burritos
Lay a large tortilla flat on your work surface. Spread 1–2 tablespoons of sour cream (or chipotle mayo) down the center. Add a layer of rice, followed by a scoop of beef.
Top with shredded cheese, crushed tortilla chips, and beans if desired. Drizzle with nacho cheese or extra sauce. Fold the sides in and roll up tightly into a burrito. Repeat with remaining tortillas.
Step 4: Grill the Burritos – The Cheesy Crust
Heat a nonstick skillet or griddle over medium heat. Lightly butter one side of each burrito. Sprinkle a thin layer of shredded cheese directly on the skillet, about the size of the burrito.
Place the burrito seam-side down on the cheese and press gently. Cook for 2–3 minutes until the cheese forms a golden, crispy crust. Flip and toast the other side, adding more cheese if you like.
Step 5: Serve Warm
Once both sides are golden brown and crispy, remove from the skillet and let cool slightly before slicing or serving whole.
Troubleshooting Tip: If the burrito starts to unroll while grilling, place it seam-side down first and press gently with a spatula to help it stay intact.
Why You’ll Love This Recipe
Crispy & Cheesy: The grilled cheese crust adds a crunch that elevates an ordinary burrito.
Family-Friendly: Kids love the melty cheese and adults enjoy the hearty filling.
Customizable: Easy to swap in chicken, beans, or even sautéed veggies.
One-Pan Convenience: Simple cleanup with minimal dishes.
Crowd-Pleaser: Great for family dinners, casual get-togethers, or weekend treats.
Mistakes to Avoid & Solutions
Overfilling the Burrito: Too much filling makes rolling difficult and causes tearing. Use moderate portions and pack gently.
Skipping the Cheese Layer in the Pan: This layer is what creates the signature crispy crust—don’t skip it!
Cooking on High Heat: High heat can burn the cheese before it melts properly. Medium heat works best for an even golden crust.
Not Sealing the Burrito Tightly: A loose burrito will leak filling. Always fold the sides in first and then roll tightly.
Using Cold Ingredients: Warm rice, beans, and beef to help the cheese melt evenly and keep the burrito hot throughout.
Serving and Pairing Suggestions
Serve hot with extra sour cream, salsa, or guacamole on the side.
Pair with a simple green salad or roasted corn for a balanced meal.
For parties, slice burritos into halves or thirds and serve as handheld bites.
A cold sparkling limeade or chilled iced tea complements the rich flavors perfectly.
Storage and Reheating Tips
Refrigeration: Store cooled burritos in an airtight container for up to 3 days.
Freezing: Wrap each burrito tightly in foil and freeze for up to 2 months.
Reheating: For the best texture, reheat in a skillet over medium heat until warm and crispy, or use an oven at 350°F for 10–12 minutes. Avoid microwaving, as it softens the crispy cheese layer.
FAQs
1. Can I make these ahead of time?
Yes! Assemble and refrigerate or freeze them before grilling. Add the grilled cheese crust just before serving for the freshest crunch.
2. What tortillas work best?
Use large, soft flour tortillas around 10–12 inches for easy folding. Smaller ones may not hold the filling well.
3. Can I make this vegetarian?
Absolutely. Swap the beef for sautéed mushrooms, grilled bell peppers, or seasoned black beans.
4. How do I keep the burrito from falling apart?
Roll tightly, grill seam-side down first, and avoid overstuffing.
5. Is there a healthier version?
Try lean ground turkey, whole-wheat tortillas, light cheese, and add more veggies to lighten it up.
Tips & Tricks
Toast the tortillas lightly before assembling to add a bit of structure.
Mix the cheeses ahead of time for faster assembly.
Add a few crushed tortilla chips inside for an irresistible crunch.
If using rice, season it with lime juice and cilantro for extra flavor.
Keep a spatula handy to gently press the burrito while grilling to ensure even melting.
Recipe Variations
Spicy Kick: Add chopped jalapeños or use pepper jack cheese for heat.
Breakfast Burrito Twist: Swap beef for scrambled eggs, breakfast sausage, and hash browns.
Veggie Lover’s Version: Add grilled zucchini, bell peppers, and mushrooms instead of beef.
BBQ Beef Burrito: Toss the beef with a smoky barbecue sauce instead of taco seasoning for a sweet-savory flavor.
Buffalo Chicken Burrito: Use shredded cooked chicken with buffalo sauce, blue cheese crumbles, and a drizzle of ranch dressing.
Final Thoughts
As I cleared the table that night, I couldn’t help but smile at the crumbs and cheese flakes left behind—evidence of a good meal shared. Cooking has always been my way of bringing people together, and this recipe reminded me that sometimes a dish doesn’t need to be fancy to be memorable. The grilled cheese burrito is playful and satisfying, perfect for when you want to surprise your loved ones with something a little indulgent.
I find that these kinds of recipes—the ones that spark laughter and keep the family lingering at the table—make the best memories. They’re versatile enough to adapt to whatever ingredients you have on hand and always deliver a sense of warmth. I hope your kitchen fills with the same laughter and aromas mine did, and that your family finds as much joy in this recipe as we did.
Grilled Cheese Burrito
Ingredients
For the Beef Filling:
- 1 lb 450 g ground beef (80/20 for flavor)
- 1 packet taco seasoning or 2 tablespoons homemade taco spice mix
- ¼ cup water
- ½ teaspoon garlic powder
- ½ teaspoon onion powder
- Salt and pepper to taste
Cheese Blend:
- 1 cup shredded cheddar cheese
- 1 cup shredded Monterey Jack cheese
- ½ cup shredded mozzarella cheese
For the Burritos:
- 4 large flour tortillas 10–12 inches, burrito-sized
- 1 cup cooked Mexican rice optional but recommended
- ½ cup sour cream or chipotle mayo
- ½ cup nacho cheese or queso optional for indulgence
- ½ cup crushed tortilla chips for texture
- ½ cup refried beans or black beans optional
For Grilling:
- 2 tablespoons butter
- ½ cup extra cheese for the outer grilled cheese crust cheddar and mozzarella work well
Instructions
- Cook the ground beef in a skillet over medium heat until browned, breaking it up with a spoon. Drain excess fat, stir in taco seasoning, garlic powder, onion powder, and water, then simmer 5–7 minutes until the liquid is mostly absorbed.
- Prepare the rice, warm the beans, and mix the cheeses. Have sour cream, chipotle mayo, or queso ready.
- Lay a tortilla flat and spread sour cream or chipotle mayo down the center. Layer with rice, beef, shredded cheese, crushed chips, and beans if desired.
- Drizzle with nacho cheese or sauce, fold the sides, and roll tightly. Repeat with remaining tortillas.
- Heat a skillet over medium, butter one side of each burrito, and sprinkle shredded cheese directly on the pan.
- Place burrito seam-side down on the cheese and press gently. Cook 2–3 minutes until the crust turns golden and crispy. Flip and toast the other side.
- Serve warm once both sides are crispy and golden.