The first snow had just started to fall when my granddaughter June burst through the kitchen door, cheeks flushed pink, clutching a green scarf she’d tried to knit herself. She asked if we could “bake something minty and magical” to celebrate her first winter break. I had just restocked my baking pantry for the holidays and remembered these Chocolate Mint Thumbprint Cookies—a treat that delivers rich cocoa flavor with a silky mint center that practically sparkles. As we baked, her older cousin Liam joined in, trying to outdo her cookie shapes while humming Christmas songs louder than the radio.
That day, even our neighbor Mr. Watkins dropped by, lured in by the scent of melting chocolate and vanilla. He claimed he was returning a snow shovel, but left with a tin of cookies and a smile that melted years off his face.
As we drizzled the final chocolate swirl over the glossy mint centers, the kitchen felt like a snow globe warm, sweet, and filled with laughter. No phones, no screens—just cocoa dust on noses and spoons licked clean. These cookies made it to every tin I gave out that year, and not a single one returned uneaten.
Moments like that layers of peppermint, giggles, and soft footsteps on hardwood floors are baked into every batch of these Chocolate Mint Thumbprint Cookies. Whether you’re baking with little ones, for a cookie exchange, or just because you need something joyful with your tea, this is a winter memory in every bite.

Short Description
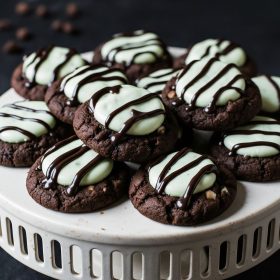
Chocolate Mint Thumbprint Cookies are soft, fudgy cocoa cookies filled with a silky white chocolate mint fudge center, then topped with a glossy drizzle of chocolate almond bark. Perfect for holidays and gifting.
Key Ingredients
- 1 cup butter, room temperature
- 2 cups white sugar
- 2 eggs
- 2 teaspoons vanilla extract
- 3 cups all-purpose flour
- 1 cup unsweetened cocoa powder
- ½ teaspoon salt
- ½ teaspoon baking soda
- ½ teaspoon baking powder
- 2 ounces chocolate almond bark
For the Mint Fudge Center
- 1 ½ cups white chocolate chips
- ½ of 14 oz can sweetened condensed milk
- ½ teaspoon mint extract
- Green food coloring
Tools Needed
- Stand mixer or hand mixer
- Mixing bowls
- Baking sheets
- Parchment paper
- Wooden spoon or spatula
- Saucepan
- Wire cooling rack
Cooking Instructions
Step 1: Prepare the Dough
In a large mixing bowl, cream together the butter and sugar until light and fluffy. Mix in the eggs one at a time, then add vanilla. Add cocoa powder, salt, baking soda, baking powder, and flour. Mix until a smooth dough forms. If sticky, chill for 15 minutes.
Step 2: Shape and Bake
Roll dough into 1-inch balls and place on a parchment-lined baking sheet. Use your thumb or a small spoon to press a well into each center. Bake at 350°F (175°C) for 12 minutes. If the indent disappears, gently press again while still warm. Cool on the baking sheet for 2 minutes, then transfer to a wire rack.
Step 3: Make the Mint Fudge
In a saucepan over medium heat, stir white chocolate chips and sweetened condensed milk until melted and smooth. Add mint extract and a few drops of green food coloring. Mix well, then spoon into the center of each cooled cookie.
Step 4: Finish with Chocolate Drizzle
Melt chocolate almond bark according to package directions. Drizzle over cookies using a spoon or piping bag. Let set at room temperature before serving or storing.
Why You’ll Love This Recipe
Rich cocoa flavor with a refreshing mint center
Stunning green color and glossy chocolate finish
Great for cookie exchanges, holiday platters, or gifting
Kid-friendly activity with easy steps
Freezes well and stores beautifully
Mistakes to Avoid & Solutions
Overbaking the cookies
The cookies will dry out quickly if left too long in the oven.
Solution: Set a timer for 12 minutes and check doneness; they should look just set and slightly puffed.
Losing the thumbprint indent
The well may rise during baking.
Solution: Use the back of a spoon to gently press down immediately after baking while cookies are still soft.
Mint fudge separating
Overheating can cause the white chocolate to seize.
Solution: Stir continuously on low to medium heat until just melted and smooth.
Runny chocolate drizzle
If too hot or thin, the drizzle won’t hold shape.
Solution: Let the melted almond bark cool for 1–2 minutes before drizzling for a neater design.
Serving and Pairing Suggestions
Serve on a holiday cookie tray with shortbread and peppermint bark
Pair with a cup of hot cocoa or mint tea
Gift in tins with tissue paper for a festive touch
Great addition to a dessert charcuterie board
Stack on a cake stand for holiday parties
Storage and Reheating Tips
Store cookies in an airtight container at room temperature for up to 5 days
For longer storage, freeze in layers between parchment in a sealed container
Let frozen cookies thaw at room temp for 20–30 minutes
Avoid reheating—these cookies are best enjoyed at room temperature
FAQs
1. Can I use peppermint extract instead of mint?
Yes, peppermint extract works, though it has a sharper flavor than mint. Use slightly less to start.
2. Can I freeze the dough ahead of time?
Absolutely. Roll into balls and freeze on a tray. Once frozen, transfer to a freezer bag. Bake directly from frozen, adding 1–2 minutes.
3. What’s the best way to get clean thumbprints?
Use the back of a rounded measuring spoon or your thumb wrapped in plastic wrap for smooth indents.
4. Can I skip the food coloring?
Yes, the green color is just for visual appeal. The mint flavor will still shine without it.
5. Do I need to temper the chocolate bark?
No need. Almond bark sets up quickly and smoothly on its own without tempering.
Tips & Tricks
Chill dough if too soft to roll cleanly
Use gloves or damp hands when shaping to prevent sticking
Let cookies cool completely before adding mint filling
Add a drop of peppermint oil for stronger minty punch
Decorate with crushed candy cane bits for extra flair
Recipe Variations
Chocolate Raspberry Thumbprints:
Swap mint extract for raspberry extract and use red food coloring in the fudge. Garnish with a freeze-dried raspberry on top.
Mocha Mint Thumbprints:
Add 1 teaspoon espresso powder to the dough. This deepens the cocoa notes and pairs beautifully with mint.
Dark Chocolate Orange:
Replace mint extract with orange extract in the fudge and add orange zest to the cookie dough.
Peanut Butter Mint Fusion:
Add ¼ cup peanut butter to the dough and drizzle with melted peanut butter chips instead of chocolate bark.
Final Thoughts
June swirled the green fudge into each cookie with exaggerated care, then proudly lined them up like little soldiers. Each swirl carried her energy, her joy, and the spark of a new baker finding her rhythm. The cookies didn’t need to be perfect they just needed to be hers, made with laughter and sticky fingers.
Chocolate Mint Thumbprint Cookies bring more than sweetness to the table. They draw people close, fill chilly afternoons with purpose, and turn flour-dusted counters into shared memories. On a snow-covered day, when silence wraps the house and oven warmth feels like a gift, this recipe has a way of making everything feel just right.
Easy Chocolate Mint Thumbprint Cookies
Ingredients
- 1 cup butter room temperature
- 2 cups white sugar
- 2 eggs
- 2 teaspoons vanilla extract
- 3 cups all-purpose flour
- 1 cup unsweetened cocoa powder
- ½ teaspoon salt
- ½ teaspoon baking soda
- ½ teaspoon baking powder
- 2 ounces chocolate almond bark
- For the Mint Fudge Center**
- 1 ½ cups white chocolate chips
- ½ of 14 oz can sweetened condensed milk
- ½ teaspoon mint extract
- Green food coloring
Instructions
- Cream butter and sugar until fluffy, add eggs one at a time, then vanilla. Mix in cocoa, salt, baking soda, baking powder, and flour until smooth. Chill dough 15 mins if sticky.
- Roll into balls, place on lined tray, press centers. Bake at 350°F (175°C) for 12 mins. Press centers again if needed. Cool 2 mins, then transfer to rack.
- Melt white chocolate chips with condensed milk, stir in mint extract and green coloring. Spoon into cookie centers.
- Melt almond bark, drizzle over cookies. Let set before serving or storing.