I still remember the afternoon I first tested this recipe, not in a polished kitchen, but outside, apron on, and a tiny charcoal grill hissing away beside me. My son had brought over a crate of yellow onions from his garden, proudly boasting their sweetness.
The thing is, I’ve never liked wasting food, especially fresh homegrown produce. So there I stood, browsing old notebooks and recipe cards, hoping something would spark inspiration. Then I noticed a scribbled note in the margin of an old meatloaf recipe: “Try stuffing into onions?”
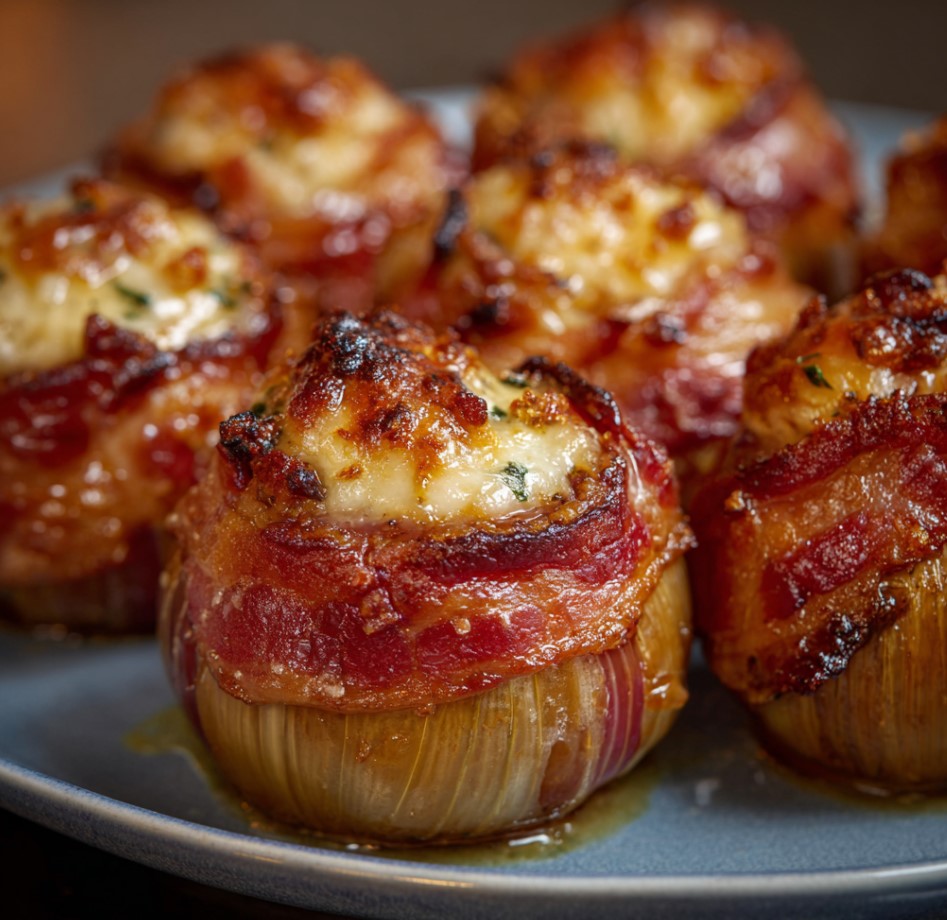
A spark lit. I thought why not wrap those stuffed onions in bacon and bake them low and slow? After a few tweaks and one near grease fire, Bacon Cheddar Onion Bombs were born. That day, the backyard filled with the scent of sizzling bacon, sweet onions, and gooey cheese. And when I finally sliced into one, the look on my grandkids’ faces said it all.
Crispy, juicy, smoky, cheesy, it was everything in one bite. What started as a “let’s see how this turns out” moment became one of our favorite family cookout staples. Now, whenever someone brings over too many onions (or when I’m just in the mood for something comforting), this is what I make.
Short Description
Juicy meatballs stuffed with cheddar, wrapped in onion halves, and snugly covered in bacon. Baked or grilled until golden, smoky, and irresistibly cheesy.
Key Ingredients
- 4 large yellow or sweet onions
- 1 lb ground beef
- 1 cup shredded cheddar or cheese cubes
- ½ cup breadcrumbs
- 1 egg
- ¼ cup whole milk
- 1 tsp garlic powder
- 1 tsp onion powder
- 1 tbsp Worcestershire sauce
- Salt and pepper to taste
- 12–16 slices of bacon
- Optional: BBQ sauce or glaze
Tools Needed
- Sharp knife
- Mixing bowl
- Spoon or scoop
- Baking rack and foil-lined tray (for oven method)
- Toothpicks
- Grill (for outdoor option)
- Basting brush (for glaze)
- Meat thermometer
Cooking Instructions
Step 1: Prep the Onions
Cut both ends off each onion and peel the outer skin. Carefully separate the outer two thick layers to create onion “cups.” Set aside.
Step 2: Make the Filling
In a mixing bowl, combine ground beef, cheddar, breadcrumbs, egg, milk, Worcestershire, garlic powder, onion powder, salt, and pepper. Mix just until combined—don’t overwork it.
Step 3: Shape the Bombs
Scoop the meat mixture into golf ball-sized portions. Sandwich each one between two matching onion halves, forming a sealed sphere.
Step 4: Wrap with Bacon
Wrap each bomb with 3 to 4 strips of bacon, covering it completely. Secure with toothpicks if needed.
Step 5: Oven Method
Preheat oven to 375°F. Place onion bombs on a rack over a foil-lined tray. Bake for 40 to 50 minutes or until internal temp reaches 160°F. For crispier bacon, broil for 2–3 minutes at the end.
Step 6: Grill Method
Set grill to indirect heat at 275°F. Cook bombs for 1.5 to 2 hours with the lid closed. Brush with BBQ sauce during the last 15 minutes, if using.
Step 7: Rest and Serve
Let bombs rest for 5 minutes before serving. This helps lock in the juices and makes slicing easier.
Why You’ll Love This Recipe
Flavor Explosion: Smoky bacon, sweet onion, cheesy beef—every bite is packed with bold flavor.
Hearty and Satisfying: A full meal in one tidy, delicious package.
Grill or Bake: Works beautifully in the oven or out on the grill.
Family Favorite: Loved by both kids and adults; makes for a fun dinner or party snack.
Meal Prep Friendly: Assemble ahead and cook when ready.
Mistakes to Avoid & Solutions
Onion layers too thin or tear easily
Solution: Use only the thick outer layers and peel slowly under running water if needed.
Filling falling apart
Solution: Chill the meat mixture for 15 minutes before shaping. Helps firm up the meatballs.
Bacon slipping or unraveling
Solution: Use toothpicks and make sure the bacon slightly overlaps as you wrap.
Overcooked or dry meat
Solution: Don’t overbake; remove once internal temp hits 160°F and let it rest.
Undercooked bacon
Solution: Broil for 2–3 minutes at the end of baking or crank up grill heat briefly with lid open.
Serving and Pairing Suggestions
Serve with baked potatoes, roasted veggies, or a fresh green salad.
Make it part of a game-day spread with sliders and nachos.
Great with iced tea, lemonade, or a hoppy craft beer.
Serve plated for dinner or slice them up family-style on a platter.
For brunch, pair with scrambled eggs and toast for a hearty twist.
Storage and Reheating Tips
Refrigeration: Store in an airtight container up to 4 days.
Freezing: Freeze fully cooked bombs up to 2 months. Wrap individually in foil and store in freezer bags.
Reheat in Oven: Bake at 350°F for 10–15 minutes or until warmed through.
Microwave Caution: Reheat on medium power to avoid tough bacon.
Grill Reheat: Wrap in foil and reheat on low heat until warmed through.
FAQs
1. Can I use different cheese inside the bombs?
Yes! Mozzarella, pepper jack, or gouda all work well.
2. What’s the best type of bacon to use?
Standard-cut works best. Thick-cut may take longer to crisp.
3. Can I make these ahead of time?
Absolutely. Assemble the bombs a day in advance and keep them refrigerated until ready to cook.
4. Can I use ground turkey instead of beef?
Yes, but add a bit more seasoning and don’t overcook—it’s leaner and dries out faster.
5. Do I need to par-cook the bacon first?
Not necessary if using the oven or grilling slowly. Just broil or grill hotter at the end if you want crispier edges.
Tips & Tricks
For even cooking, place bombs on a rack to allow airflow underneath.
Use cheese cubes instead of shredded cheese for gooey pockets inside.
Let your onions come to room temp before separating—they’re more flexible.
Try brushing on glaze or sauce only in the final 15 minutes to avoid burning.
Save onion centers for soup or stir-fry—nothing wasted!
Recipe Variations
Spicy Kick: Add chopped jalapeños to the meat mixture and use pepper jack cheese.
BBQ Bombs: Mix 2 tablespoons of BBQ sauce into the beef and glaze with more sauce before serving.
Breakfast Style: Swap ground beef for breakfast sausage, use shredded hash browns in place of breadcrumbs, and fill with cheddar.
Keto Friendly: Skip breadcrumbs and use almond flour or crushed pork rinds instead.
Tex-Mex Twist: Add taco seasoning and shredded Mexican blend cheese, and top with salsa after baking.
Final Thoughts
Honestly, the first time I made these bacon-wrapped wonders, I felt like a mad scientist, stuffing meat inside onions, wrapping them like a gift in bacon, and hoping for magic. And magic is exactly what came out of that oven. Each bomb slices open like a savory surprise, cheese melting into seasoned beef, hugged by sweet onion and crisp bacon.
I’ve made these for birthday cookouts, chilly Sunday dinners, and even just because I needed a little joy on a Wednesday. Every time, they vanish. So if you’re in the mood to impress without fuss, this is your golden ticket. It’s bold, it’s messy, it’s unforgettable and it just might become your new go-to showstopper.
Bacon Cheddar Onion Bombs Recipe
Print ThisIngredients
- 4 large yellow or sweet onions
- 1 lb ground beef
- 1 cup shredded cheddar or cheese cubes
- ½ cup breadcrumbs
- 1 egg
- ¼ cup whole milk
- 1 tsp garlic powder
- 1 tsp onion powder
- 1 tbsp Worcestershire sauce
- Salt and pepper to taste
- 12–16 slices of bacon
- Optional: BBQ sauce or glaze
Instructions
Step 1: Prep the Onions
Trim ends, peel, and separate the outer two thick layers of each onion to form cups.
Step 2: Make the Filling
Mix ground beef, cheese, breadcrumbs, egg, milk, Worcestershire, garlic and onion powders, salt, and pepper until just combined.
Step 3: Shape the Bombs
Form meat into golf ball-sized portions and sandwich between two onion halves.
Step 4: Wrap with Bacon
Wrap each bomb in 3–4 bacon slices and secure with toothpicks.
Step 5: Oven Method
Bake at 375°F on a rack for 40–50 minutes. Broil 2–3 minutes to crisp bacon.
Step 6: Grill Method
Cook over indirect heat at 275°F for 1.5–2 hours. Brush with BBQ sauce in last 15 minutes if using.
Step 7: Rest and Serve
Let rest for 5 minutes before serving.