It was one of those Fridays when the week had stretched a little too long, and I needed a no-bake win. I had a bunch of ripe bananas on the counter, a pantry that always seems to have vanilla wafers (my kids are obsessed), and a craving for something cool, creamy, and nostalgic.
Banana pudding lush came to mind, but I didn’t want to layer a traditional trifle. I wanted something sliceable, something I could cover, chill, and sneak bites of without anyone noticing—oops.
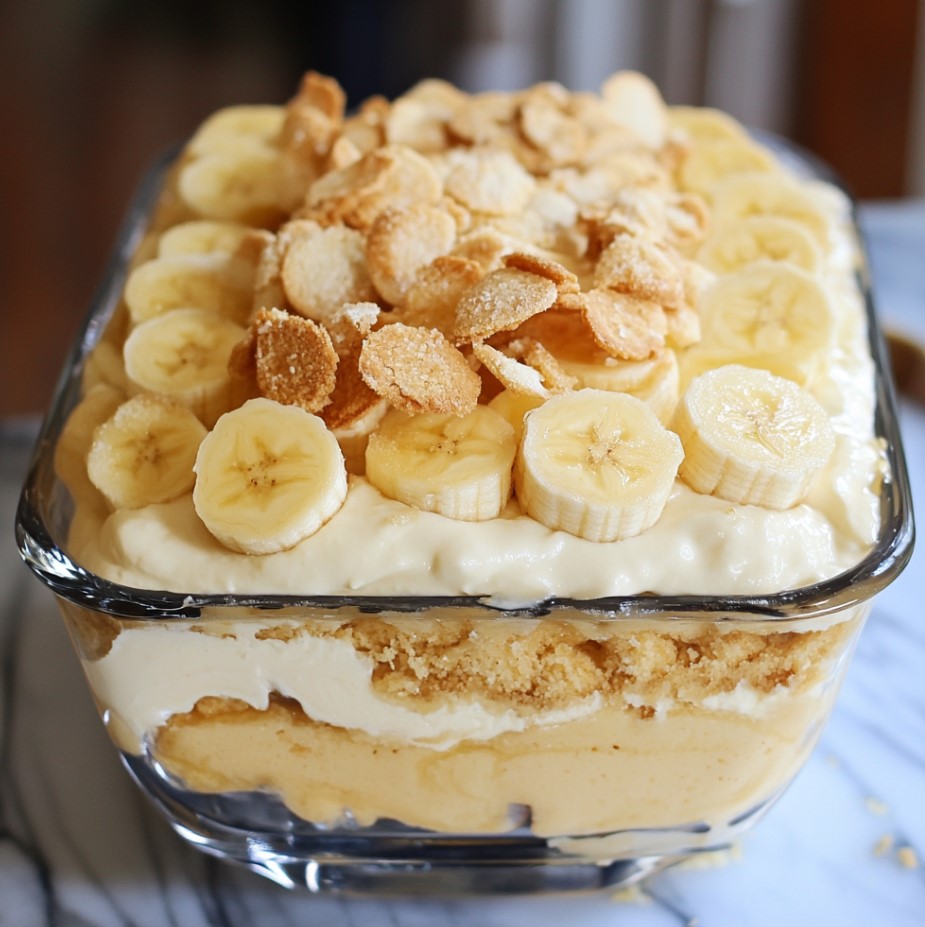
This Banana Pudding Lush was born from that little craving-meets-convenience moment. It’s rich, fluffy, banana-forward, and ridiculously simple to put together. My husband took one bite and said, “This is like banana pudding and cheesecake had a baby.” That’s exactly what I was going for. It’s comforting, layered just right, and perfect for family dinners, potlucks, or when your teens raid the fridge at midnight.
No baking, no fuss, and barely any dishes. And I’ll be honest—when my daughter asked for a second slice before dinner, I didn’t argue. That’s how good it is.
Short Description
This Banana Pudding Lush is a no-bake, creamy layered dessert with a crunchy vanilla wafer crust, smooth cream cheese filling, fluffy whipped topping, and rich banana pudding. Perfect for parties or casual family nights.
Key Ingredients
For the crust:
- 1 box vanilla wafers, crushed (about 2½ cups crumbs)
- ½ cup melted butter
For the layers:
- 8 oz cream cheese, softened
- 1 cup powdered sugar
- 1 (8 oz) tub whipped topping (Cool Whip), divided
- 2 (3.4 oz) boxes instant banana pudding mix
- 3 cups cold milk
For the topping:
- 2 ripe bananas, sliced
- Crushed vanilla wafers
Tools Needed
- 9×13-inch glass dish
- Mixing bowls
- Hand mixer or stand mixer
- Spatula
- Whisk
- Measuring cups
Cooking Instructions
Step 1: Prepare the Crust
In a bowl, mix crushed vanilla wafers and melted butter until the texture resembles wet sand. Press evenly into the bottom of a 9×13-inch glass dish. Place in the fridge to chill for 15 minutes while you prep the filling.
Step 2: Make the Cream Cheese Layer
In a mixing bowl, beat softened cream cheese and powdered sugar until smooth and fluffy. Fold in half of the whipped topping using a spatula—this helps keep the layer airy and light.
Step 3: Spread the Cream Cheese Mixture
Evenly spread the cream cheese mixture over the chilled crust. Use an offset spatula or the back of a spoon to smooth it out.
Step 4: Add a Layer of Whipped Topping
Spread a generous layer of the remaining whipped topping over the cream cheese base.
Step 5: Prepare the Banana Pudding
In a separate bowl, whisk together the instant banana pudding mix and cold milk for about 2 minutes until thick. Let it sit for another minute or so, then spread evenly over the whipped topping layer.
Step 6: Garnish and Chill
Sprinkle a layer of crushed vanilla wafers on top for texture. Add banana slices around the edges and scatter more crushed wafers in the center. Cover the dish and refrigerate for at least 4 hours—or overnight—for the best texture and flavor.
Why You’ll Love This Recipe
No baking required—easy and oven-free
Family-friendly—kids and adults both love it
Prep ahead—perfect for making the night before
Crowd-pleasing—great for potlucks, parties, or Sunday dinners
Comforting & nostalgic—classic flavors in a new form
Textural contrast—creamy pudding and a buttery crust
Budget-friendly ingredients—mostly pantry staples
Mistakes to Avoid & Solutions
Mistake 1: Runny pudding layer
Solution: Make sure to use cold milk and whisk for the full 2 minutes. Let it thicken before spreading.
Mistake 2: Soggy crust
Solution: Don’t skip chilling the crust. It helps solidify the butter and keeps the base firm.
Mistake 3: Bananas browning too fast
Solution: Add banana slices just before serving or dip them in lemon juice to slow browning.
Mistake 4: Whipped topping deflates
Solution: Fold gently and don’t overmix. Heavy mixing will flatten it.
Mistake 5: Layers mixing together
Solution: Chill each layer if needed before adding the next. Always spread gently with a spatula.
Serving and Pairing Suggestions
This dessert shines on its own but can be even better with the right pairings:
Serve it chilled—straight from the fridge, especially in warmer months.
Perfect for buffets—easy to cut and plate or scoop from a pan.
Pair with coffee or iced tea—balances out the sweetness.
Add a dollop of whipped cream or a caramel drizzle for extra indulgence.
For brunch: serve alongside mini quiches or fruit salad for a sweet contrast.
Storage and Reheating Tips
Refrigerate leftovers in an airtight container for up to 4 days.
Do not freeze—pudding and whipped topping can separate after thawing.
Keep bananas fresh by storing without garnish and adding fresh slices before serving.
Re-chill after serving—this dessert is best kept cold to maintain its structure.
FAQs
1. Can I make Banana Pudding Lush ahead of time?
Yes! It’s actually better the next day. Make it the night before and let it chill overnight.
2. Can I use homemade whipped cream instead of Cool Whip?
Absolutely! Use about 3 cups of stabilized whipped cream to maintain texture.
3. What can I use instead of banana pudding mix?
You can use vanilla pudding and add a teaspoon of banana extract, but it won’t have the same depth.
4. How do I keep the crust from sticking to the pan?
Line the dish with parchment paper or lightly spray with nonstick spray before pressing in the crust.
5. Can I add real banana slices into the pudding layer?
You can, but they may brown over time. If adding them, do so just before serving for the best look and taste.
Tips & Tricks
Crush the wafers in a zip-top bag with a rolling pin—quick and no mess.
Use a glass dish so you can admire the pretty layers.
If your bananas are a bit overripe, mash and mix some into the pudding for added flavor.
Chill overnight for the cleanest slices.
Keep a few whole vanilla wafers for garnish to give it that classic banana pudding look.
Recipe Variations
1. Chocolate-Banana Lush:
Swap one box of banana pudding mix for chocolate. You’ll get a layered chocolate-banana flavor that tastes like a fancy banana split.
2. Peanut Butter Banana Lush:
Add ½ cup peanut butter to the cream cheese layer before folding in whipped topping. It adds a salty-sweet balance that’s delicious.
3. Gluten-Free Version:
Use gluten-free vanilla wafers for the crust—same process, same flavor, just allergy-friendly.
4. Tropical Twist:
Swap banana pudding with coconut cream pudding and top with pineapple chunks and toasted coconut.
5. Mini Banana Lush Cups:
Assemble layers in individual cups or mason jars for personal servings—great for parties or potlucks.
Final Thoughts
This Banana Pudding Lush is perfect mix of creamy, sweet, and a little crunchy—the kind of thing you can throw together on a weeknight and still feel proud of. It always disappears at gatherings, and honestly, I’ve caught myself sneaking forkfuls straight from the fridge more times than I care to admit.
You don’t need fancy ingredients or a lot of time, just a few pantry staples and a love for old-school desserts. It’s humble but unforgettable—comfort food in dessert form. If you’re looking for something that feels like a warm hug but comes together in minutes, this is it. Go ahead and save yourself a corner piece before everyone digs in—you’ll thank me later.
Banana Pudding Lush
Print ThisIngredients
- For the crust:
- 1 box vanilla wafers, crushed (about 2½ cups crumbs)
- ½ cup melted butter
- For the layers:
- 8 oz cream cheese, softened
- 1 cup powdered sugar
- 1 (8 oz) tub whipped topping (Cool Whip), divided
- 2 (3.4 oz) boxes instant banana pudding mix
- 3 cups cold milk
- For the topping:
- 2 ripe bananas, sliced
- Crushed vanilla wafers
Instructions
Step 1: Prepare the Crust
Mix crushed vanilla wafers and melted butter until combined. Press into a 9×13-inch dish and chill for 15 minutes.
Step 2: Make the Cream Cheese Layer
Beat cream cheese with powdered sugar until smooth. Gently fold in half of the whipped topping.
Step 3: Spread the Cream Cheese Mixture
Spread the cream cheese mixture evenly over the chilled crust.
Step 4: Add Whipped Topping
Layer with the remaining whipped topping and smooth the surface.
Step 5: Prepare the Pudding
Whisk banana pudding mix with cold milk for 2 minutes. Let thicken, then spread over the whipped topping.
Step 6: Garnish and Chill
Top with crushed wafers and banana slices. Cover and refrigerate for 4+ hours or overnight.