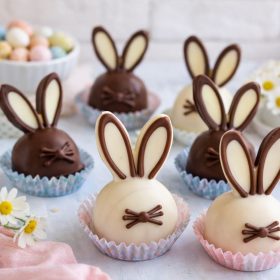
Bunny-Shaped Chocolate Truffles made their first appearance at our neighborhood’s Easter craft swap, where tables were lined with pastel egg soaps, tiny painted rocks, and the unmistakable scent of melted chocolate drifting from the refreshment corner.
Mia, who runs the daycare down the street, had brought a tray of them for the kids—each one decorated with tiny piped ears and dotted with sugar eyes. They disappeared in under ten minutes, and the adults were sneaking extras into napkins.
A few days later, I made my own batch for a spring tea at my sister’s house. Between flower arranging and prepping sandwiches, my niece helped me roll the filling and draw on bunny faces using melted white chocolate.
We laughed through half the decorating, trying to get the ears to match and realizing perfection didn’t matter as much as the joy of the process. These truffles brought smiles before they were even served.
There’s something undeniably cheerful about Bunny-Shaped Chocolate Truffles. They’re rich and creamy inside, coated in silky chocolate, and just whimsical enough to make you pause before eating. But not for long.

Short Description
Bunny-Shaped Chocolate Truffles are creamy, bite-sized treats filled with rich ganache and decorated like sweet Easter bunnies. Perfect for spring parties, gifting, or playful holiday desserts.
Key Ingredients
For the Truffle Filling:
- 8 oz (225g) high-quality milk or dark chocolate, chopped
- ½ cup heavy cream
- 2 tbsp unsalted butter, softened
- 1 tsp vanilla extract (optional)
- Pinch of salt
For the Bunny Coating and Decoration:
- 12 oz (340g) milk or dark chocolate, melted (for dipping)
- ¼ cup white chocolate, melted (for piping details)
- Edible decorations: colored sprinkles, sugar eyes, mini chocolate chips (optional)
Tools Needed
- Heatproof bowl
- Saucepan
- Spatula
- Melon baller or spoon
- Parchment-lined baking sheet
- Piping bags or zip-top bags
- Small decorating tips (optional)
Cooking Instructions
Step 1: Make the Truffle Filling
Place the chopped chocolate in a heatproof bowl. In a small saucepan, bring the heavy cream to a gentle simmer. Pour the hot cream over the chocolate and let sit for 2–3 minutes. Stir until smooth, then add butter, vanilla, and salt. Mix until fully combined. Cool slightly, then refrigerate for 1 hour or until firm.
Step 2: Shape the Truffles
Scoop the chilled truffle mixture using a melon baller or small spoon. Roll into smooth balls, then gently press one side to form a slight oval for the bunny’s head. Chill again for 20 minutes to hold shape.
Step 3: Coat in Chocolate
Dip each truffle in melted chocolate, letting excess drip off. Place them on a parchment-lined tray. Allow to set at room temperature or speed up by refrigerating for 10–15 minutes.
Step 4: Decorate the Bunnies
Melt white chocolate and use a piping bag to draw ears and facial features. Add sugar eyes, mini chocolate chip noses, or pastel sprinkles. Let decorations set completely before serving.
Step 5: Store and Serve
Keep truffles in an airtight container in the refrigerator for up to 1 week. Bring to room temperature just before serving for best texture.
Why You’ll Love This Recipe
Creamy, rich, chocolate ganache centers
Whimsical bunny shapes perfect for spring holidays
No baking required
Fun decorating project for kids and adults
Customizable with your favorite chocolate and toppings
Great make-ahead option for entertaining or gifting
Mistakes to Avoid & Solutions
Overheating the chocolate
This can cause the chocolate to seize.
Solution: Always melt slowly over low heat or use a double boiler. Stir frequently.
Skipping the chilling step
Warm filling won’t shape properly.
Solution: Chill the truffle mixture until firm before shaping.
Using thin coating chocolate
Truffles won’t hold their form.
Solution: Use good quality chocolate or add a bit of coconut oil to thicken melted chocolate.
Rushing the decorations
Warm truffles can melt piped designs.
Solution: Let truffles cool completely before decorating with white chocolate.
Storing uncovered
Truffles can absorb odors or dry out.
Solution: Store in an airtight container in the fridge.
Serving and Pairing Suggestions
Serve on a pastel platter with edible flowers
Gift in mini treat boxes or clear bags tied with ribbon
Pair with hot chocolate, coffee, or berry tea
Add to a dessert charcuterie board for Easter brunch
Use as place card treats at spring gatherings
Storage and Reheating Tips
Store in a sealed container in the refrigerator for up to 7 days
Let sit at room temperature for 15 minutes before serving
Do not microwave or freeze, as texture may change
Store decorations separately if adding delicate candy details later
Avoid storing near strong-smelling foods like onions or garlic
FAQs
1. Can I use white chocolate for the truffle base?
Yes, but reduce the cream slightly to keep the texture firm.
2. How do I get smooth truffle balls?
Warm your hands slightly and roll quickly. Chilling before rolling also helps.
3. Can I add flavorings to the filling?
Yes. Orange zest, espresso powder, or peppermint extract are great additions.
4. Are these truffles freezer-friendly?
It’s best to refrigerate only. Freezing can alter the ganache texture and cause condensation.
5. Can I make these without piping tools?
Absolutely. Use a small plastic bag with the tip snipped for easy decorating.
Tips & Tricks
Chill your hands with cold water before rolling to avoid melting the mixture
Use gloves for cleaner shaping and less mess
Add a touch of sea salt on top for sweet-salty contrast
Make truffles smaller for bite-sized party portions
Create bunny ears with almond slivers for an all-edible option
Recipe Variations
Peanut Butter Bunny Truffles
Replace half the chocolate with peanut butter chips and reduce cream to ⅓ cup.
Mint Chocolate Bunny Truffles
Add ½ tsp peppermint extract to the ganache and sprinkle crushed mint candies on top.
Dark Chocolate Raspberry Truffles
Use dark chocolate and stir in 2 tsp raspberry preserves before chilling.
Vegan Bunny Truffles
Use dairy-free chocolate, coconut cream instead of heavy cream, and plant-based butter.
Hazelnut Crunch Truffles
Roll the truffle centers in crushed hazelnuts before dipping for texture and flavor.
Final Thoughts
Making Bunny-Shaped Chocolate Truffles brought unexpected delight to a rainy afternoon, especially with curious little hands at the table and the smell of warm chocolate lingering through the kitchen. There’s a kind of quiet fun in watching a tray slowly fill with tiny chocolate bunnies, each with its own personality, from tilted ears to sprinkle freckles.
These truffles add charm to any Easter celebration, but they also carry the kind of ease that makes them feel doable even on an ordinary day. They’re playful and rich, sweet and satisfying, and the perfect reminder that joy often comes in the smallest bites.
Bunny-Shaped Chocolate Truffles
Ingredients
For the Truffle Filling:
- 8 oz 225g high-quality milk or dark chocolate, chopped
- ½ cup heavy cream
- 2 tbsp unsalted butter softened
- 1 tsp vanilla extract optional
- Pinch of salt
For the Bunny Coating and Decoration:
- 12 oz 340g milk or dark chocolate, melted (for dipping)
- ¼ cup white chocolate melted (for piping details)
- Edible decorations: colored sprinkles sugar eyes, mini chocolate chips (optional)
Instructions
- Heat cream to a simmer, pour over chopped chocolate, stir smooth with butter, vanilla, and salt, then chill until firm.
- Scoop and roll chilled mixture into balls, gently shape into ovals, and chill again to set.
- Dip each truffle in melted chocolate, let excess drip off, and set on parchment until firm.
- Pipe bunny ears and faces with melted white chocolate, add decorations, and let set completely.
- Store truffles airtight in the fridge up to 1 week and bring to room temperature before serving.