A few summers ago, I was volunteering at a small-town carnival fundraiser—a tradition the community has kept alive for decades. It was one of those sticky July afternoons, the kind where the breeze carries the scent of popcorn, fried dough, and spun sugar.
A little girl in line for face painting stood next to me holding a puff of cotton candy bigger than her head. Her cheeks were smudged pink, her fingers blue, and she giggled as the sugar melted on her tongue. I told her she looked like a cake in motion, and she smiled wide like I’d handed her a trophy.
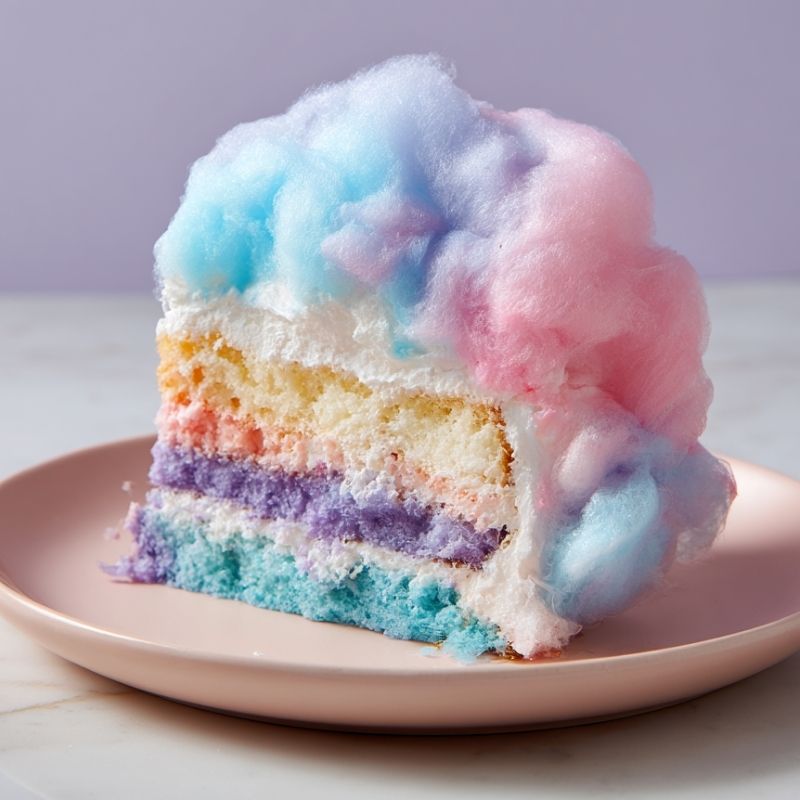
That evening, after packing up streamers and folding tables, I couldn’t get the image out of my mind cotton candy, that sugary fluff, translated into a proper layer cake. Back in my kitchen, with my apron tied and windows open, I started tinkering. I wanted the cake to feel just as joyful as that little carnival moment: soft pastels, airy texture, and that unmistakable cotton candy flavor. Over a few weekends and several batches, I finally landed on it.
This is the kind of cake you bring to a backyard birthday or serve at a gender reveal. It’s playful but grown-up enough for anyone who appreciates a well-balanced bite. Underneath the swirl of colors and frosting is a sturdy, fluffy vanilla base kissed with that nostalgic sweetness. The kind of dessert that turns grown-ups into kids again—if just for a slice.
Short Description
A whimsical, pastel-colored layer cake flavored with cotton candy and topped with a dreamy buttercream—perfect for celebrations, birthdays, or just bringing joy to the table.
Key Ingredients
For the Cake:
- 2 ¼ cups all-purpose flour
- 2 ¼ teaspoons baking powder
- ¾ teaspoon salt
- ¾ cup unsalted butter, at room temperature
- 1 ½ cups granulated sugar
- 3 large eggs, at room temperature
- 1 ½ teaspoons cotton candy flavoring
- 1 cup whole milk, at room temperature
- Pink, blue, purple, and yellow food coloring
For the Cotton Candy Buttercream:
- 1 cup unsalted butter, at room temperature
- 4 cups powdered sugar
- ½ teaspoon cotton candy flavoring
- 2–3 tablespoons milk or heavy cream (adjust for consistency)
- Food coloring (optional, for decorative swirls or ombre frosting)
Tools Needed
- Stand or hand mixer
- Mixing bowls (at least 3)
- Measuring cups & spoons
- 8-inch round cake pans (2 or 3 depending on your layer preference)
- Parchment paper
- Cooling rack
- Offset spatula or cake smoother
- Skewer or butter knife (for swirling batter)
Cooking Instructions
Step 1: Preheat the Oven
Set your oven to 350°F (175°C). Grease and line the bottoms of your cake pans with parchment paper for easy removal.
Step 2: Mix the Dry Ingredients
In a medium bowl, whisk together the flour, baking powder, and salt. Set aside.
Step 3: Cream Butter and Sugar
In a large mixing bowl, beat the softened butter and sugar on medium speed until pale and fluffy, this should take about 3–4 minutes. Don’t rush it; this step adds crucial air to the batter.
Step 4: Add Eggs and Flavoring
Add the eggs one at a time, mixing well after each addition. Stir in the cotton candy flavoring until fully blended.
Step 5: Combine Wet and Dry
With the mixer on low speed, alternate adding the dry flour mixture and milk in three additions, beginning and ending with the flour. Mix just until no streaks remain. Overmixing can toughen the cake.
Step 6: Divide and Color the Batter
Split the batter evenly into four bowls. Tint each one with a different pastel color: pink, blue, purple, and yellow. A few drops go a long way—aim for soft tones.
Step 7: Swirl and Bake
Spoon dollops of each colored batter randomly into the prepared pans. Use a skewer or knife to swirl them gently—don’t overdo it. Bake for 30–35 minutes or until a toothpick comes out clean from the center.
Step 8: Cool Completely
Let cakes cool in pans for 10 minutes before turning out onto a wire rack. Cool fully before frosting—no shortcuts here, or your buttercream will slide.
Step 9: Make the Buttercream
Beat butter on high until creamy. Add powdered sugar gradually, then the cotton candy flavoring. Add milk or cream one tablespoon at a time until smooth and spreadable. If desired, tint a portion with food coloring for decorative swirls or ombré effects.
Step 10: Assemble and Decorate
Layer the cooled cakes with buttercream in between. Apply a thin crumb coat, chill for 15 minutes, then frost with the remaining buttercream. Use an offset spatula for clean sides or go wild with color swirls and sprinkles.
Why You’ll Love This Recipe
Playful and Whimsical: The pastel colors and fun flavor bring out everyone’s inner child.
Light but Rich: Fluffy texture paired with creamy buttercream hits the perfect balance.
Surprisingly Easy: Simple steps and everyday ingredients make it accessible for home bakers.
Customizable: Change the colors or even the shape—layer, sheet, or cupcake versions work just as well.
A Real Showstopper: Ideal for birthdays, baby showers, or just making any regular day special.
Mistakes to Avoid & Solutions
Overmixing the Batter: This can make the cake dense. Mix just until combined once the flour is added.
Using Cold Ingredients: Make sure eggs, milk, and butter are at room temperature for a smooth batter.
Skipping the Crumb Coat: A thin first layer locks in crumbs and keeps the final coat clean. Don’t skip this step.
Adding Too Much Color: Use gel or concentrated liquid food coloring sparingly to avoid an artificial taste or overly bright hues.
Underbaking or Overbaking: Start checking at 30 minutes. A toothpick should come out with moist crumbs, not wet batter.
Serving and Pairing Suggestions
Serve slices with a glass of cold milk, a vanilla latte, or fruit-infused iced tea.
Add fresh strawberries or blueberries on the side for a color contrast and bright flavor.
Make it a centerpiece at a birthday, baby shower, or whimsical afternoon tea.
Pair with vanilla or cotton candy ice cream for extra sweetness.
Works beautifully in a buffet-style dessert table or as individual mini cakes for events.
Storage and Reheating Tips
Store: Keep in an airtight container at room temperature for up to 2 days or in the fridge for 5 days.
Freeze: Wrap unfrosted cake layers in plastic and foil. Freeze up to 2 months.
Reheat: Bring to room temperature before serving. Frosting may sweat if not allowed to warm slowly.
Leftover Buttercream: Can be stored in the fridge for 1 week or frozen for 2 months. Let it come to room temperature and rewhip before using.
FAQs
1. Can I use store-bought cotton candy instead of flavoring?
Not recommended. Store-bought cotton candy melts quickly and won’t flavor the cake. The extract is essential.
2. What if I can’t find cotton candy flavoring?
You can substitute with a mix of raspberry and vanilla extracts for a similar profile, though it won’t be exact.
3. Can I make this into cupcakes?
Yes! Divide batter into liners and bake at 350°F for 18–20 minutes. Perfect for kids’ parties.
4. How do I get a clean slice with such soft cake and frosting?
Chill the cake for 30 minutes before slicing, then use a sharp, clean knife dipped in warm water.
5. Is this cake too sweet?
Despite the name, the flavoring is subtle. The buttercream is sweet but balanced. You can reduce sugar slightly in the frosting if needed.
Tips & Tricks
Use gel food coloring for stronger hues without thinning the batter.
Always sift powdered sugar for a smoother buttercream texture.
Chill the cake layers before frosting to reduce crumbs and improve structure.
Pipe rosettes or decorate with edible glitter for a festive finish.
Don’t swirl the batter too much—it should look like watercolor, not a muddy mix.
Recipe Variations
Mini Cotton Candy Cakes: Use 4-inch mini pans and layer smaller cakes for individual servings. Reduce baking time to 20–25 minutes.
Strawberry Swirl Version: Replace ½ cup of milk with strawberry puree and add freeze-dried strawberry powder to the buttercream for a fruity twist.
Vegan Option: Use plant-based butter, almond milk, and egg replacer. Use vegan-friendly food coloring and frosting ingredients.
Cotton Candy Cheesecake Fusion: Bake a simple no-bake cheesecake layer, then stack it with cotton candy cake layers and buttercream for a hybrid dessert.
Surprise Inside: Hide mini cotton candy or candy pearls in the center layer for a fun reveal when sliced.
Final Thoughts
I ended up baking this cake again last month when my niece turned nine. She’d invited her whole class for an outdoor birthday picnic, complete with handmade crowns and glitter face stickers.
Her eyes lit up when she saw the cake—pastel swirls, sugar sparkle, and all. Watching the kids whisper over their favorite colors before picking their slices made every minute in the kitchen worthwhile.
As I packed up the last crumbs and wiped down the table, I thought about how recipes like this aren’t just about taste. They’re about color, joy, memory. The kind of thing that shows up in photos years later and makes someone say, “Remember that cake?” I hope this cotton candy cake brings your own table that same kind of magic—simple, sweet, and shared.
Cotton Candy Cake
Print ThisIngredients
- For the Cake:
- 2 ¼ cups all-purpose flour
- 2 ¼ teaspoons baking powder
- ¾ teaspoon salt
- ¾ cup unsalted butter, at room temperature
- 1 ½ cups granulated sugar
- 3 large eggs, at room temperature
- 1 ½ teaspoons cotton candy flavoring
- 1 cup whole milk, at room temperature
- Pink, blue, purple, and yellow food coloring
- For the Cotton Candy Buttercream:
- 1 cup unsalted butter, at room temperature
- 4 cups powdered sugar
- ½ teaspoon cotton candy flavoring
- 2–3 tablespoons milk or heavy cream (adjust for consistency)
- Food coloring (optional, for decorative swirls or ombre frosting)
Instructions
Step 1: Preheat Oven
Set oven to 350°F (175°C). Grease and line cake pans with parchment paper.
Step 2: Mix Dry Ingredients
Whisk flour, baking powder, and salt in a bowl. Set aside.
Step 3: Cream Butter & Sugar
Beat butter and sugar until pale and fluffy, 3–4 minutes.
Step 4: Add Eggs & Flavor
Add eggs one at a time, mixing well. Stir in cotton candy flavoring.
Step 5: Combine with Milk
Alternate adding flour mixture and milk, starting and ending with flour. Mix just until combined.
Step 6: Color Batter
Divide batter into four bowls. Tint each with a pastel shade—pink, blue, purple, yellow.
Step 7: Swirl & Bake
Drop spoonfuls of batter into pans, swirl gently. Bake 30–35 minutes or until a toothpick comes out clean.
Step 8: Cool Cakes
Cool in pans 10 minutes, then transfer to wire racks. Let cool completely.
Step 9: Make Buttercream
Beat butter until creamy. Add powdered sugar, flavoring, and milk until smooth. Tint if desired.
Step 10: Assemble & Decorate
Layer cakes with frosting. Apply crumb coat, chill, then finish with buttercream. Add swirls or sprinkles to finish.