A few Halloweens ago, I was helping at our community center where the children’s costume parade ended with a potluck. I had promised to bring something festive, but I didn’t want to make anything fussy or overly complicated. I remembered how my students used to light up whenever I brought in a simple pudding treat during class parties, so I decided to reinvent that idea with a playful Halloween twist.
By the time I set out the little cups with cookie “dirt” and gummy worms wriggling out of the top, there was a crowd of curious little goblins, princesses, and superheroes pointing and giggling. One boy even whispered to his friend, “It looks like real dirt!” and they both dove in, spoons first.
Now, whenever October rolls around, my grandchildren ask for these cups by name. They’ve become part of our Halloween tradition, almost as much as carving pumpkins. What I love most is that they are no-bake, quick to assemble, and always a crowd-pleaser for both kids and adults.
These cups capture the fun spirit of Halloween without taking all day in the kitchen. You can make them ahead, decorate them in countless ways, and let your creativity run wild. They’re playful, sweet, and just a little spooky—exactly what Halloween should be.
Short Description
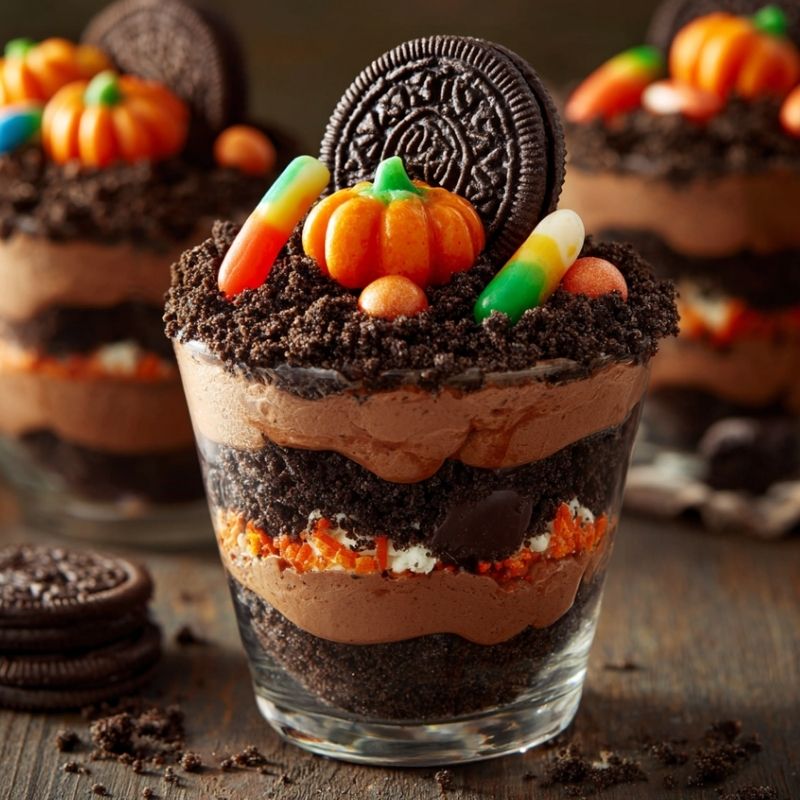
Halloween Graveyard Dirt Cups are layered chocolate pudding and cookie crumb desserts, decorated with candy “tombstones” and gummy worms for a spooky, fun treat perfect for parties and family gatherings.
Key Ingredients
- 1 (14-ounce) package Oreo cookies, crushed into crumbs
- 2 (3.9-ounce) boxes instant chocolate pudding mix
- 4 cups cold milk
- 1 (8-ounce) tub whipped topping (Cool Whip), thawed
- 8 Milano cookies (or similar oval cookies)
- Black gel icing or edible marker (for writing “RIP”)
- Gummy worms, candy pumpkins, or candy bones for decoration
Tools Needed
- Mixing bowls
- Whisk
- Spatula
- Measuring cups
- Food processor or rolling pin (for crushing cookies)
- Clear serving cups or jars
- Small piping bag or edible marker for cookie writing
Cooking Instructions
Step 1: Prepare the Pudding
In a large mixing bowl, whisk together the chocolate pudding mix and cold milk until it thickens, about 2 minutes. The texture should be smooth and creamy.
Step 2: Fold in Whipped Topping
Using a spatula, gently fold the whipped topping into the pudding. The mixture should become light and fluffy.
Step 3: Layer the Cups
Spoon crushed Oreos into the bottom of each clear cup to form the first “dirt” layer. Add a layer of the pudding mixture. Repeat until the cups are nearly full, ending with a final layer of Oreo crumbs on top.
Step 4: Make the Tombstones
Write “RIP” or other spooky words on Milano cookies with black gel icing or an edible marker. Let them sit a few minutes to set. Insert one into each cup like a tombstone.
Step 5: Decorate
Place gummy worms so they peek out from the “dirt.” Add candy pumpkins or bones to make the graveyard scene come alive.
Step 6: Chill and Serve
Refrigerate the cups for at least 30 minutes to set. Serve chilled with spoons.
Why You’ll Love This Recipe
Kid-Friendly Fun: Perfect for little hands to help decorate.
No-Bake: Easy and quick, requiring no oven.
Customizable: Change decorations to match your Halloween theme.
Make-Ahead Friendly: Can be prepared hours before serving.
Party-Perfect: Individually portioned, so they’re great for buffets or school parties.
Mistakes to Avoid & Solutions
Cookies too chunky: If the Oreos aren’t finely crushed, the “dirt” looks clumpy. Use a food processor or a rolling pin to crush them evenly.
Runny pudding: Not whisking long enough can leave the pudding watery. Whisk at least 2 minutes until it thickens.
Overmixing whipped topping: Stir gently to keep the filling light. Overmixing makes it dense.
Tombstones falling over: If the Milano cookies won’t stay upright, press them deeper into the pudding layer.
Decorations sliding off: Add gummy worms and candies right before serving if the cups sit out a long time.
Serving and Pairing Suggestions
Serve these cups at Halloween parties, kids’ sleepovers, or classroom events.
Pair with apple cider, hot cocoa, or pumpkin spice lattes for a festive treat.
Serve on a platter with fake spiderwebs and plastic spiders for added spookiness.
Use as part of a dessert buffet alongside caramel apples and popcorn balls.
Storage and Reheating Tips
Store covered in the refrigerator for up to 2 days.
Do not freeze, as the pudding and whipped topping texture will suffer.
Add gummy candies close to serving to keep them fresh.
If cups look dry on top, sprinkle a fresh layer of Oreo crumbs before serving.
FAQs
1. Can I make these cups a day ahead?
Yes, prepare and chill them the night before. Just add the candy decorations before serving.
2. What can I use instead of Oreo cookies?
Any chocolate sandwich cookies will work, though Oreos give the most authentic “dirt” look.
3. Can I use homemade pudding instead of instant?
Absolutely. Just ensure it’s fully cooled and thickened before layering.
4. Do I need clear cups?
Clear cups give the best visual effect, but small bowls or jars will also work.
5. How do I make them healthier?
Use sugar-free pudding, reduced-fat whipped topping, and organic cookies for a lighter version.
Tips & Tricks
Chill the pudding mixture for 10 minutes before layering to help it set quickly.
Use resealable bags for crushing cookies—less mess than a rolling pin.
Let kids decorate their own cups for extra fun.
Write different messages on the tombstones like “Boo” or “Spooky.”
Sprinkle a little cocoa powder over the top for a richer “soil” look.
Recipe Variations
Pumpkin Graveyard Cups: Swap chocolate pudding for pumpkin spice pudding and use ginger snap crumbs instead of Oreos.
Minty Graveyard Cups: Add a few drops of peppermint extract to the pudding and decorate with green gummy worms.
Peanut Butter Version: Mix ½ cup peanut butter into the pudding for a nutty twist and garnish with Reese’s Pieces.
Gluten-Free Option: Use gluten-free chocolate cookies and gluten-free pudding mix.
Adult-Friendly Cups: Add a splash of coffee liqueur to the pudding layer for a grown-up version.
Final Thoughts
These Graveyard Dirt Cups can get everyone at the table smiling, no matter their age on Halloween day. I love seeing my grandkids eagerly press gummy worms into the dirt or carefully write “RIP” on tombstones. It becomes less about the food itself and more about the shared experience.
That’s the heart of cooking for me: creating memories, laughter, and just a little bit of magic in the process. If you’re looking for a treat that’s festive, forgiving, and fun, these cups are a wonderful choice. They capture Halloween in every spoonful—creamy, crunchy, chocolatey, and perfectly spooky.

Halloween Graveyard Dirt Cups
Ingredients
- 1 14-ounce package Oreo cookies, crushed into crumbs
- 2 3.9-ounce boxes instant chocolate pudding mix
- 4 cups cold milk
- 1 8-ounce tub whipped topping (Cool Whip), thawed
- 8 Milano cookies or similar oval cookies
- Black gel icing or edible marker for writing “RIP”
- Gummy worms candy pumpkins, or candy bones for decoration
Instructions
- In a mixing bowl, whisk pudding mix with cold milk until thick and creamy, about 2 minutes.
- Fold in whipped topping until light and fluffy.
- Layer crushed Oreos in clear cups, followed by pudding, repeating until nearly full and finishing with Oreo crumbs on top.
- Write “RIP” on Milano cookies with gel icing, let set, and place one in each cup as a tombstone.
- Add gummy worms, candy pumpkins, or bones for decoration. Chill at least 30 minutes before serving.