One Halloween a few years back, our family gathered at my daughter’s house for pumpkin carving, and the kitchen was alive with chatter, laughter, and sticky fingers from too much candy sneaking. I brought along a new treat I had been experimenting with: candy corn fudge.
My grandchildren’s eyes widened when they saw the colorful layers, and I could almost hear their excitement before they even tasted it. When I cut the first square and passed it to my grandson, he took one bite, grinned, and declared it “better than the candy bag.” That moment sealed it as a new tradition in our family.
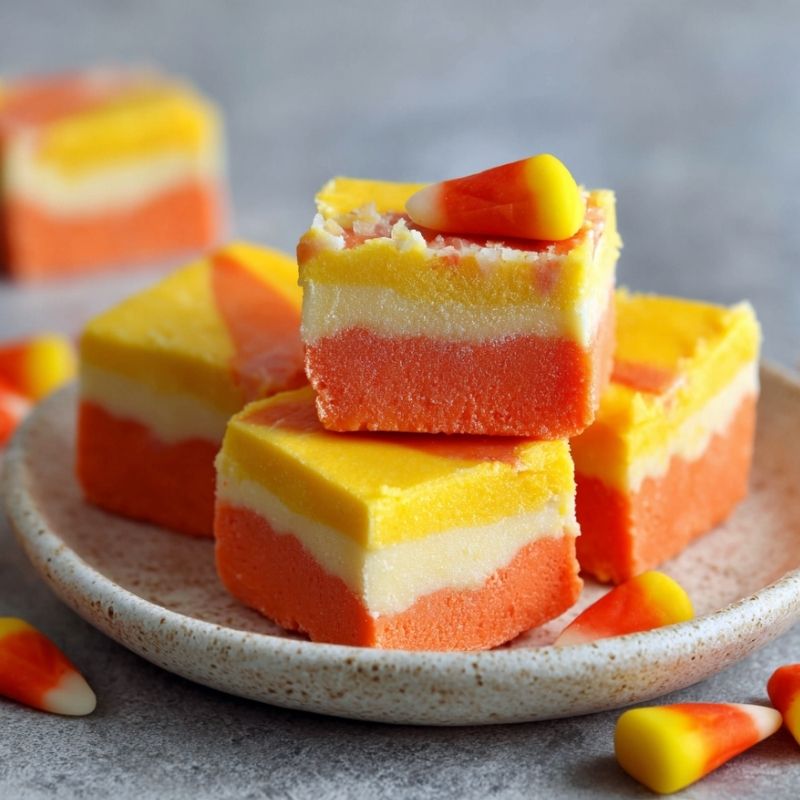
What I love most about this fudge is how it turns something simple—white chocolate, condensed milk, and a bit of coloring—into something that looks like it took hours. It’s sweet, creamy, and cheerful, and it looks just like those little triangles of candy corn we all know. Every year since, I’ve made it part of our Halloween spread, right next to the cider and caramel apples.
The best part is that it doesn’t just delight the little ones. The adults love how nostalgic it feels, reminding us of when we used to swap candy on the front porch after trick-or-treating. This fudge has become my little gift to both the past and the present, wrapped up in a square of sweetness.
Short Description
Candy corn fudge is a colorful, layered Halloween treat made with white chocolate, sweetened condensed milk, and candy corn. It’s creamy, festive, and easy to make ahead for parties or family gatherings.
Key Ingredients
- 3 cups white chocolate chips
- 1 (14-ounce) can sweetened condensed milk
- 1 teaspoon vanilla extract
- Food coloring (yellow and orange)
- 1 cup candy corn
Tools Needed
- 8×8-inch baking pan
- Aluminum foil
- Cooking spray
- Medium saucepan
- Mixing bowls (3)
- Rubber spatula
- Sharp knife
Cooking Instructions
Step 1: Prepare the pan
Line an 8×8-inch baking pan with foil and lightly coat it with cooking spray. This makes removal and slicing easier later.
Step 2: Melt the base
In a medium saucepan over low heat, melt the white chocolate chips with the sweetened condensed milk. Stir constantly until smooth and silky. Remove from heat and stir in the vanilla extract.
Step 3: Divide and color
Split the mixture evenly into three bowls. Leave the first bowl white. Add a few drops of yellow food coloring to the second, and orange to the third. Stir until the colors are vibrant and even.
Step 4: Create the layers
Pour the yellow mixture into the prepared pan and spread evenly with a spatula. Allow it to cool for a few minutes, then gently spread the orange mixture on top, followed by the white layer.
Step 5: Add candy corn and set
Press candy corn pieces into the top while still soft. Refrigerate for 1–2 hours, or until fully set.
Step 6: Slice and serve
Lift the fudge out using the foil, then cut into squares with a sharp knife. Serve chilled for the neatest pieces.
Tip: If the fudge feels too soft when slicing, pop it back in the fridge for another 30 minutes.
Why You’ll Love This Recipe
Festive and Fun: The tri-color layers mimic real candy corn for a perfect Halloween look.
Quick and Easy: Only a few ingredients and no baking required.
Family-Friendly: Kids can help with layering and pressing in the candy corn.
Make-Ahead: Sets beautifully in the fridge and can be prepared a day or two in advance.
Sweet Nostalgia: Combines the flavors of white chocolate with the charm of a classic seasonal candy.
Mistakes to Avoid & Solutions
Overheating the chocolate: White chocolate burns easily. Keep the heat low and stir constantly.
Uneven layers: If one layer spreads into the next, let the first layer cool slightly before adding the next.
Too soft to slice: Be patient and refrigerate long enough—at least an hour, but two is better.
Colors too pale: Don’t be afraid to add a few extra drops of food coloring until you get the bright, candy-corn look.
Candy corn falling off: Press them in while the fudge is still soft so they stick firmly.
Serving and Pairing Suggestions
Serve on a Halloween dessert tray alongside caramel apples and pumpkin cookies.
Pair with warm apple cider or hot chocolate for a cozy treat.
Cut into bite-sized squares for a party platter or wrap individually in cellophane as party favors.
Present family-style on a big tray for kids to grab after trick-or-treating.
Storage and Reheating Tips
Store in an airtight container in the refrigerator for up to 1 week.
For longer storage, freeze the fudge in a sealed container for up to 2 months. Thaw in the refrigerator before serving.
Fudge doesn’t need reheating, but if it becomes too firm in the fridge, let it sit at room temperature for 10 minutes before slicing.
FAQs
1. Can I use milk or dark chocolate instead of white?
Not for this recipe, it won’t give the candy corn colors. Stick with white chocolate for the layered effect.
2. Do I need a candy thermometer?
No, this recipe is simple and doesn’t require precise temperature monitoring.
3. Can I use gel food coloring instead of liquid?
Yes, gel works well and often gives more vibrant color with less product.
4. Is this safe to make with kids?
Yes! Just handle the melting step yourself and let kids help with stirring colors, layering, and adding candy corn.
5. Can I double the recipe?
Absolutely, use a 9×13-inch pan instead of 8×8 and increase chilling time by an extra 30 minutes.
Tips & Tricks
For clean edges, dip your knife in hot water and wipe between slices.
Use parchment paper instead of foil if you prefer—it also makes lifting out the fudge easy.
Chill each layer for 5–10 minutes before adding the next if you want very sharp lines.
Try pressing candy corn into each square after cutting for an extra festive touch.
Add a sprinkle of Halloween sprinkles for more color and texture.
Recipe Variations
Peanut Butter Candy Corn Fudge: Replace ½ cup of white chocolate with peanut butter chips for a nutty twist.
Pumpkin Spice Fudge: Stir 1 teaspoon pumpkin spice into the orange layer for autumn flavor.
Nutty Crunch Fudge: Mix chopped peanuts or almonds into the top layer for texture.
Marbled Version: Instead of neat layers, swirl the colors together for a fun tie-dye effect.
Candy Swap: Replace candy corn with Reese’s Pieces or mini M&Ms for a colorful alternative.
Final Thoughts
Candy corn fudge isn’t complicated or fussy, but its colors and sweetness light up a table instantly. I love seeing children marvel at the layers, and I love watching the adults sneak “just one more piece.” It feels like a celebration of both the holiday and the joy of sharing food.
This is the kind of recipe that turns an ordinary evening into something memorable, a square of happiness passed from hand to hand. Whether you’re making it for a school party, family gathering, or just because you want something cheerful in your fridge, it’s bound to become a little tradition of your own.

Festive Candy Corn Fudge
Ingredients
- 3 cups white chocolate chips
- 1 14-ounce can sweetened condensed milk
- 1 teaspoon vanilla extract
- Food coloring yellow and orange
- 1 cup candy corn
Instructions
- Line an 8×8-inch pan with foil and coat with cooking spray.
- Melt white chocolate chips and sweetened condensed milk in a saucepan over low heat, stirring until smooth. Remove from heat and stir in vanilla.
- Divide into three bowls: leave one white, tint one yellow, and one orange.
- Spread the yellow mixture into the pan, let it cool slightly, then layer the orange and white mixtures on top.
- Press candy corn into the surface while soft, then refrigerate 1–2 hours until firm.
- Lift from the pan, cut into squares, and serve chilled.