Halloween night has always been one of my favorite times to gather the grandkids in the kitchen. Instead of just waiting around for trick-or-treaters, we like to make a few spooky treats of our own.
A few years ago, during a sleepover at our house, the power flickered out from a windy October storm. With candles glowing and laughter echoing through the rooms, we decided to make something fun and festive together. That’s when Frankenstein Marshmallow Pops were born in our family kitchen.
The kids loved dipping marshmallows into green candy melts by candlelight, their little hands sticky and faces glowing with pride. My husband joked that our kitchen smelled like a candy shop that had been taken over by monsters, and we all agreed it was the perfect kind of chaos. Ever since, these Frankenstein pops have become a tradition—something silly and sweet to do together that doesn’t take much effort but brings out plenty of giggles.
Now, whenever Halloween rolls around, I look forward to setting up the ingredients on the counter and letting everyone decorate their own little “Frankenstein.” These are easy enough for children to handle yet fun for adults to personalize. They’re whimsical, tasty, and, most importantly, they spark joy.
Short Description
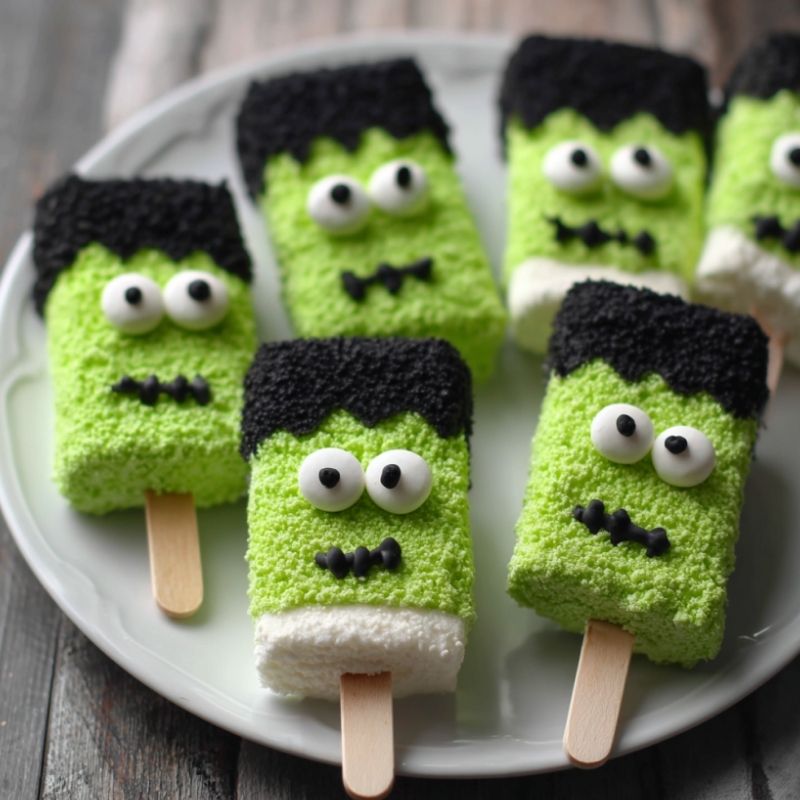
Frankenstein Marshmallow Pops are fun Halloween treats made from marshmallows dipped in green candy coating and decorated with sprinkles, candy eyes, and icing for spooky faces. Quick, simple, and kid-friendly, they’re perfect for parties, school events, or cozy nights in.
Key Ingredients
- 12 large marshmallows
- 12 lollipop sticks or pretzel sticks
- 1 cup green candy melts
- ½ cup mini chocolate chips
- ¼ cup chocolate sprinkles
- ¼ cup black decorating gel or icing pen
- ¼ cup white decorating gel or icing pen
Tools Needed
- Microwave-safe bowl
- Parchment-lined baking sheet
- Lollipop sticks or pretzel sticks
- Toothpicks for detailing
- Small spoons or offset spatula
Cooking Instructions
Step 1: Insert the sticks
Push a lollipop stick or pretzel stick firmly into the center of each marshmallow. Make sure it’s secure but doesn’t poke out the top.
Step 2: Melt the candy coating
Place green candy melts in a microwave-safe bowl. Heat in 20–30 second bursts, stirring in between, until fully smooth and glossy. If the coating seems too thick, add ½ teaspoon of coconut oil or shortening.
Step 3: Dip the marshmallows
Hold each marshmallow by the stick and dip it into the melted green coating. Swirl gently to cover all sides. Let the extra drip off back into the bowl. Place the coated marshmallows upright on a parchment-lined baking sheet.
Step 4: Add eyes and hair
While the coating is still soft, press two mini chocolate chips or candy eyes onto each marshmallow. Sprinkle chocolate sprinkles along the top to form “hair.” Press gently so they stick.
Step 5: Draw features
Once the coating has set slightly, use black decorating gel to draw a mouth and stitches. Add small white lines or details with white gel for extra character. Let them rest until fully firm, about 15 minutes at room temperature.
Step 6: Serve and enjoy
Arrange the pops on a tray or stick them into a foam block for a playful display.
Why You’ll Love This Recipe
Fun and Festive: A perfect project for kids and adults to decorate together.
Quick to Make: Just a handful of ingredients and under 30 minutes.
No Baking Required: All you need is a microwave and a little imagination.
Customizable: Change colors, expressions, or toppings to suit your style.
Perfect for Parties: Eye-catching, easy-to-hold treats that double as décor.
Mistakes to Avoid & Solutions
Candy coating too thick: Add a teaspoon of shortening or coconut oil to thin it out.
Eyes sliding off: Make sure to press them gently but firmly while the coating is still soft.
Sprinkles falling: Sprinkle quickly before the coating sets to ensure they stick.
Gel smudging: Wait until the candy coating is fully dry before decorating with gel.
Marshmallows leaning: Place them upright in a block of styrofoam to keep them straight as they dry.
Serving and Pairing Suggestions
Display on a Halloween dessert table as edible decorations.
Serve with hot chocolate for a cozy movie night.
Pair with apple cider for a fall-themed party spread.
Wrap individually in clear cellophane bags for school treats.
Add them to a candy buffet alongside cookies and cupcakes.
Storage and Reheating Tips
Store at room temperature in an airtight container for up to 3 days.
Keep them upright to avoid smudging decorations.
Avoid refrigerating, as moisture can cause the coating to weep.
No reheating required, but if the coating softens, let them sit in a cool room to firm back up.
FAQs
1. Can I use white chocolate instead of candy melts?
Yes, but tint it with oil-based food coloring (gel coloring may cause it to seize).
2. Can I make these ahead of time?
Absolutely, prepare them the night before and store in an airtight container.
3. What if I don’t have lollipop sticks?
Pretzel sticks work just as well and add a salty crunch.
4. Can I freeze Frankenstein pops?
Freezing is not recommended, as marshmallows lose their texture once thawed.
5. How can I make these allergen-friendly?
Use gluten-free pretzel sticks, dairy-free candy melts, and allergen-safe sprinkles.
Tips & Tricks
Use a foam block or cardboard box with holes poked in it to hold pops upright.
Chill the marshmallows briefly before dipping to help the coating stick better.
Try toothpicks for small details when decorating faces.
Add a dab of coating under the eyes to act like “glue.”
Let kids design their own unique monster faces for extra fun.
Recipe Variations
Vampire Pops: Use red candy melts instead of green and draw fangs with white gel.
Pumpkin Pops: Dip in orange candy melts, add a green sprinkle “stem” on top, and draw jack-o’-lantern faces.
Mummy Pops: Use white candy melts and drizzle extra lines for wrapping, adding candy eyes.
Ghost Pops: Keep marshmallows white, dip in melted white chocolate, and decorate with black gel eyes.
Monster Party Mix: Make a variety of Frankensteins, mummies, and pumpkins for a whole spooky lineup.
Final Thoughts
These Frankenstein Marshmallow Pops are more than just a recipe to me—they’re a sweet reminder of the simple joy found in the kitchen, even when the lights go out. I think of sticky fingers, lopsided smiles drawn in gel, and the sound of children proudly showing off their creations. They prove that sometimes the best holiday traditions are the ones that come together by chance.
Halloween is full of costumes and candy, but what stays in my heart are the moments when we slow down and make something together. These little Frankensteins may look silly, but they carry with them the laughter, the warmth, and the memories of family gathered close. And that, to me, is the real treat.

Frankenstein Marshmallow Pops
Ingredients
- 12 large marshmallows
- 12 lollipop sticks or pretzel sticks
- 1 cup green candy melts
- ½ cup mini chocolate chips
- ¼ cup chocolate sprinkles
- ¼ cup black decorating gel or icing pen
- ¼ cup white decorating gel or icing pen
Instructions
- Insert a lollipop or pretzel stick into each marshmallow, making sure it’s secure but not poking through the top.
- Melt green candy melts in a microwave-safe bowl in 20–30 second bursts, stirring until smooth. If too thick, add ½ teaspoon coconut oil or shortening.
- Dip marshmallows into the coating, letting the excess drip off, and place them on a parchment-lined sheet.
- While still soft, press on two mini chocolate chips or candy eyes and sprinkle chocolate sprinkles on top for hair.
- Once the coating begins to set, draw mouths and stitches with black gel and add white gel for extra detail.
- Let firm about 15 minutes, then arrange on a tray or stand them upright for serving.