Easter Brownies always seem to arrive right when the house starts buzzing with spring energy. One year, the kitchen was crowded with cousins dyeing eggs at the table, pastel colors dripping onto paper towels, while my sister quietly asked if there would be “something chocolate” once all the decorating was done.
At the same time, my neighbor dropped off a basket of tulips and stayed to chat, leaning against the counter as the oven warmed up. Someone else suggested turning the brownies into shapes instead of squares, and suddenly the plan shifted from simple baking to a full decorating afternoon.
While the brownies baked, the room filled with that unmistakable chocolate aroma that makes everyone wander back into the kitchen. Candy melts were spread across the counter like art supplies, and frosting bags waited to be filled.
A few hands focused carefully on bunny ears piped onto wax paper, while others argued over carrot colors and glitter spray. It was messy in the best way, with laughter mixing into every step.
Easter Brownies fit right into moments like this. They’re familiar enough to feel comforting, yet playful enough to invite creativity. Once sliced, decorated, and arranged, they looked less like a pan of brownies and more like a dessert centerpiece meant to be shared slowly, even if they never last very long.

Short Description
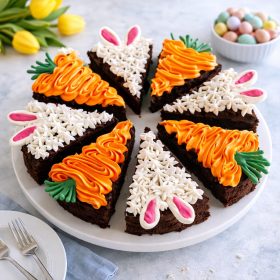
Easter Brownies are rich chocolate brownies decorated with bunny and carrot designs using frosting and candy melts, making them a festive and fun dessert perfect for spring celebrations.
Key Ingredients
- 2 boxes brownie mix or a double batch of homemade brownies
- White candy melts
- Pink candy melts
- Green candy melts
- Coconut oil
- Edible silver glitter spray
- 1 to 2 jars white frosting
- Orange food coloring
- Icing bags
- Frosting tips (large star 1M for carrots and 2D for bunnies)
Tools Needed
- 9 inch springform pan
- Mixing bowls
- Whisk or electric mixer
- Saucepan or microwave safe bowl for candy melts
- Wax paper
- Toothpick
- Cooling rack
- Cutting board
- Knife
Cooking Instructions
Step 1: Bake the Brownies
Preheat the oven according to the brownie mix instructions. Spray a 9 inch springform pan with oil. Prepare both brownie mixes together and pour batter into the pan. Bake as directed until a toothpick inserted comes out clean. Let brownies cool completely.
Step 2: Prepare Candy Decorations
While brownies bake, melt white, pink, and green candy melts separately with a small amount of coconut oil according to package directions. Transfer each color to a sandwich bag and snip a small corner.
Step 3: Make Bunny Ears and Carrot Leaves
On wax paper, pipe bunny ear shapes using white candy melts. Fill centers with pink candy melts and smooth with a toothpick. Let harden, then lightly spray with edible silver glitter. Pipe carrot leaves using green candy melts and let set.
Step 4: Cut and Color Frosting
Once brownies are cool, remove from the pan and cut into 8 triangles. Tint part of the white frosting with orange food coloring. Transfer orange and white frostings into separate icing bags fitted with decorating tips.
Step 5: Decorate and Serve
Decorate some brownie triangles with white frosting and candy bunny ears. Decorate others with orange frosting and green candy leaves to resemble carrots. Serve immediately or display until ready to enjoy.
Why You’ll Love This Recipe
Uses simple brownie mix or homemade brownies
Decorative and festive without complex baking
Great for kids and group decorating
Flexible design options
Perfect for Easter dessert tables
Combines rich chocolate with playful presentation
Mistakes to Avoid & Solutions
Brownies sticking to the pan
This can ruin clean slices.
Solution: Use spray oil generously and allow brownies to cool fully before removing.
Candy melts too thick
They can be hard to pipe smoothly.
Solution: Add a small amount of coconut oil and stir until fluid.
Decorations breaking
Candy shapes may snap if handled too soon.
Solution: Let candy decorations fully harden before lifting from wax paper.
Overcrowding decorations
The designs can lose clarity.
Solution: Keep decorations simple and spaced evenly.
Warm brownies melting frosting
This causes frosting to slide.
Solution: Decorate only after brownies are completely cool.
Serving and Pairing Suggestions
Serve as the main Easter dessert
Pair with fresh berries or fruit salad
Enjoy with coffee, milk, or hot chocolate
Arrange on a platter as a dessert centerpiece
Serve individually on small plates for gatherings
Storage and Reheating Tips
Store brownies in an airtight container at room temperature for up to 2 days
Refrigerate if using cream based frosting
Remove candy decorations before stacking
Bring to room temperature before serving
Avoid reheating to preserve frosting details
FAQs
1. Can I use homemade brownies instead of a mix?
Yes, any sturdy brownie recipe works well for cutting and decorating.
2. Do I need a springform pan?
It helps with clean removal, but a lined square pan can also be used.
3. Can I skip the glitter spray?
Yes, it is optional and purely decorative.
4. How far ahead can I decorate these brownies?
They can be decorated up to 24 hours in advance.
5. Are these suitable for kids to help make?
Yes, especially the decorating steps, which are very kid friendly.
Tips & Tricks
Let candy melts cool slightly before piping for better control
Use toothpicks for fine details
Keep frosting bags upright in cups between uses
Chill candy decorations briefly if your kitchen is warm
Wipe the knife clean between cuts for sharp edges
Recipe Variations
Mini Easter Brownies
Bake brownies in a mini muffin pan and decorate tops with small candy shapes.
Pastel Drizzle Brownies
Drizzle melted pastel candy melts over plain brownies instead of shaping decorations.
Coconut Nest Brownies
Top brownies with shredded coconut tinted green and add candy eggs.
Gluten Free Easter Brownies
Use a gluten free brownie mix and follow the same decorating steps.
Chocolate Overload Version
Add chocolate chips to the brownie batter and drizzle with extra melted chocolate before decorating.
Final Thoughts
Easter Brownies always seem to pull people together, even those who claim they’re just stopping by for a minute. The decorating process turns into a shared moment, full of small decisions and quiet laughter, with chocolate smudges as proof it happened. Each brownie ends up slightly different, which somehow makes them better.
When the table finally clears and only crumbs remain, these brownies leave behind more than just dessert. They carry the feeling of a relaxed afternoon, a creative pause in the middle of a busy holiday. Simple ingredients, a bit of color, and a little time together are sometimes all it takes to make something memorable.
Frosted Easter Brownies
Ingredients
- 2 boxes brownie mix or a double batch of homemade brownies
- White candy melts
- Pink candy melts
- Green candy melts
- Coconut oil
- Edible silver glitter spray
- 1 to 2 jars white frosting
- Orange food coloring
- Icing bags
- Frosting tips large star 1M for carrots and 2D for bunnies
Instructions
- Bake brownies in a greased 9-inch springform pan according to package directions and let cool completely.
- Melt white, pink, and green candy melts with a little coconut oil and transfer each to a small bag.
- Pipe bunny ears and carrot leaves on wax paper, add details, let harden, and lightly spray with glitter.
- Cut cooled brownies into 8 triangles and tint part of the white frosting orange, then place frostings in piping bags.
- Decorate brownies with bunny or carrot designs and serve or display as desired.