The church hall had that familiar hum of voices, the kind that carries easily across folding tables and paper tablecloths. It was a spring fundraiser, and everyone had brought something to share. I had just set down a tray of deviled eggs when a little boy—no more than seven—stood nearby, staring at a plate of decorated candies.
He leaned closer, studying each one as if they were tiny works of art. “Did someone make these?” he asked, pointing at a row of peanut butter eggs with delicate flowers piped on top.
His grandmother, an old friend of mine, smiled and nudged him forward. “Go on, ask her,” she said, and before I could say anything, he was standing right in front of me, eyes wide and hopeful.
That moment stayed with me long after the event ended. Not because of the candy itself, but because of the quiet curiosity behind it. The next afternoon, I decided to try making a batch at home—not for a holiday, not for a crowd, but simply to see if I could recreate that sense of wonder.
My kitchen was calm, sunlight stretching across the counter as I mixed the filling. It reminded me of simpler recipes my mother used to make—ones that didn’t require much, just a bit of patience and steady hands.
When I finished shaping and decorating the eggs, I set them aside to firm up. My husband wandered in, took one look, and raised an eyebrow. “Those look too pretty to eat,” he said. I handed him one anyway.
He didn’t say much after that—just nodded slowly, which in our house is the highest form of praise.

Short Description
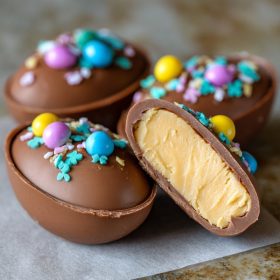
These creamy peanut butter eggs feature a smooth, sweet filling wrapped in a rich chocolate shell, finished with simple decorative touches for a homemade treat that feels special without being complicated.
Key Ingredients
- 6 tablespoons unsalted butter, softened
- ½ cup creamy peanut butter
- ¼ cup marshmallow cream
- ½ teaspoon vanilla extract
- Pinch of salt
- 2 cups powdered sugar
For the Chocolate Coating & Decoration
- ¾ cup dark chocolate melting wafers
- ¼ cup white chocolate melting wafers
- Green gel food coloring
- Edible candy flower decorations
Tools Needed
- Mixing bowl
- Electric mixer or hand mixer
- Rubber spatula
- Egg-shaped candy mold
- Small paintbrush (food-safe)
- Microwave-safe bowls
- Ziplock bags
- Refrigerator
Cooking Instructions
Step 1: Prepare the Peanut Butter Filling
Beat the butter, peanut butter, marshmallow cream, vanilla, and salt until smooth and creamy.
The mixture should look soft and well blended with no lumps.
Step 2: Add the Sugar
Slowly mix in the powdered sugar until a soft dough forms.
If the dough feels too sticky, add a little more powdered sugar, one tablespoon at a time.
Step 3: Melt the Chocolate
Melt the dark chocolate wafers according to package directions, stirring until smooth.
Be careful not to overheat, as chocolate can seize and become grainy.
Step 4: Coat the Mold
Spoon a small amount of melted chocolate into each mold cavity and use a brush to coat the sides evenly.
Refrigerate for a few minutes until firm, then repeat for a second layer to ensure a sturdy shell.
Step 5: Fill the Eggs
Spoon the peanut butter mixture into each mold, leaving a small space at the top.
Press gently so the filling settles without air pockets.
Step 6: Seal with Chocolate
Cover the filling with more melted chocolate, smoothing the tops.
Refrigerate again until fully set.
Step 7: Remove from Mold
Once firm, gently remove the eggs from the mold.
If they stick, let them sit at room temperature for a minute before trying again.
Step 8: Decorate with White Chocolate
Melt the white chocolate and spoon it into a ziplock bag. Cut a small corner and pipe names or simple lines on top.
Step 9: Add Color and Flowers
Mix green food coloring into remaining white chocolate. Use a small amount to attach candy flowers, holding briefly until set.
Step 10: Finish the Details
Pipe small leaf shapes around the flowers using the green chocolate. Let everything set completely before serving.
Why You’ll Love This Recipe
Creamy and Rich: Smooth peanut butter filling paired with a firm chocolate shell
No Baking Required: Perfect for warm days or quick treats
Simple Ingredients: Pantry staples come together beautifully
Fun to Decorate: Great for holidays or family activities
Make-Ahead Friendly: Holds well for gatherings and gifts
Mistakes to Avoid & Solutions
Chocolate Too Thick or Clumpy
Overheating can ruin the texture. Melt in short intervals and stir often.
Shell Too Thin
A single layer may crack. Always apply two layers for strength.
Filling Too Soft
Add extra powdered sugar gradually until it holds shape.
Difficulty Removing from Mold
Let the chocolate fully set before removing, or chill slightly longer.
Uneven Decoration
Practice piping on parchment first if needed for steadier control.
Serving and Pairing Suggestions
Serve chilled or at room temperature on a dessert tray
Pair with coffee or tea for a balanced sweetness
Add to holiday baskets or gift boxes
Arrange on a platter for gatherings
Serve alongside fresh fruit for contrast
Storage and Reheating Tips
Refrigerator: Store in an airtight container for up to 1 week
Freezer: Freeze for up to 2 months; thaw in the fridge overnight
Room Temperature: Keep out for short periods only to maintain shape
Serving After Storage: Let sit 10–15 minutes before eating for best texture
FAQs
1. Can I make these without a mold?
Yes, shape the filling by hand into eggs and dip in chocolate.
2. Can I use milk chocolate instead?
Absolutely, it will create a sweeter flavor.
3. Why is my chocolate cracking?
The shell may be too thin or cooled too quickly.
4. Can I skip the decorations?
Yes, they taste just as good without them.
5. How do I get smooth chocolate coating?
Stir gently and avoid overheating during melting.
Tips & Tricks
Use gel coloring for stronger color without thinning chocolate
Chill briefly between steps to keep layers neat
Keep hands cool when handling filling
Use a small brush for clean edges in molds
Work in small batches to prevent chocolate from setting too quickly
Recipe Variations
Classic Hand-Shaped Peanut Butter Eggs
Skip the mold. Roll the filling into egg shapes, chill for 20 minutes, then dip fully in melted chocolate.
Result: rustic, homemade look with a thicker coating.
Crunchy Peanut Butter Version
Replace creamy peanut butter with crunchy peanut butter.
Adds texture and a slightly nutty bite.
Dark Chocolate Lovers Version
Use only dark chocolate for coating and skip white chocolate decoration.
Creates a deeper, less sweet flavor.
Natural Color Version
Skip food coloring and decorate with crushed nuts or coconut flakes.
A more subtle, homemade appearance.
Final Thoughts
A few days after that fundraiser, I wrapped a small box of these eggs and dropped them off at my friend’s house. The same little boy opened the door, and his face lit up before I even said a word. He carefully lifted the lid, studying each piece just as he had before.
This time, he didn’t ask where they came from. He simply picked one up and held it like it mattered.
Moments like that settle quietly in the heart. Not loud or grand, just steady and meaningful.
These peanut butter eggs carry that same feeling. They don’t require special skill or expensive ingredients, only a bit of time and attention.
And sometimes, that’s enough to turn something simple into something remembered.
Peanut Butter Eggs
Ingredients
- 6 tablespoons unsalted butter softened
- ½ cup creamy peanut butter
- ¼ cup marshmallow cream
- ½ teaspoon vanilla extract
- Pinch of salt
- 2 cups powdered sugar
For the Chocolate Coating & Decoration
- ¾ cup dark chocolate melting wafers
- ¼ cup white chocolate melting wafers
- Green gel food coloring
- Edible candy flower decorations
Instructions
- Beat the butter, peanut butter, marshmallow cream, vanilla, and salt until smooth and creamy, with no lumps.
- Slowly mix in the powdered sugar until a soft dough forms. If it feels too sticky, add more powdered sugar one tablespoon at a time.
- Melt the dark chocolate wafers according to package directions, stirring until smooth and careful not to overheat.
- Spoon a small amount of melted chocolate into each mold and use a brush to coat the sides evenly. Chill for a few minutes until firm, then repeat for a second layer.
- Fill each mold with the peanut butter mixture, leaving a little space at the top. Press gently to remove air pockets.
- Cover the filling with more melted chocolate, smoothing the tops, then refrigerate until fully set.
- Gently remove the eggs from the mold. If they stick, let them sit at room temperature briefly before trying again.
- Melt the white chocolate, place it in a ziplock bag, and pipe simple designs or names on top.
- Mix green food coloring into the remaining white chocolate and use a small amount to attach candy flowers, holding them in place for a few seconds.
- Pipe small leaf details around the flowers using the green chocolate and let everything set completely before serving.