On a crisp October morning a few years ago, I volunteered at our small-town library’s children’s reading hour. The theme that week was “Spooky Tales and Treats,” and I wanted to bring something playful that wouldn’t frighten the little ones. I remember standing in my kitchen before sunrise, still in my robe, staring at a box of plain donuts on the counter.
I’d promised to make something special but had completely forgotten to plan ahead. My husband, always the problem-solver, suggested decorating them with what we had—some leftover red icing from a birthday cake, candy eyes from the pantry, and a packet of black sprinkles that had been sitting there since last Christmas. That morning, the first batch of “Vampire Donuts” was born.
The children were delighted. Some giggled and pretended the donuts were biting back, while others carefully picked off the candy eyes before eating. The librarians even asked for the recipe so they could share it at their Halloween bake sale. Ever since, these donuts have been a tradition in my kitchen every October. They’re not just fun to look at; they’re simple enough to make with kids by your side, and they spark the kind of laughter that sticks in your memory long after the icing has been licked off.
I often make them now with my youngest granddaughter, who’s taken to adding her own twist by sprinkling edible glitter on top. For me, it’s not just about the donuts, it’s about seeing a child’s face light up as they transform an ordinary pastry into a mischievous little monster. That spark of joy is exactly why I love cooking and baking: the kitchen becomes a place of stories, memories, and magic, even if the recipe only calls for three ingredients.

Short Description
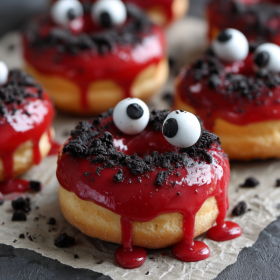
These Vampire Donuts are a festive Halloween treat that’s as fun to decorate as it is to eat. With just a few simple toppings, you can transform plain donuts into playful, spooky characters perfect for parties, bake sales, or a lighthearted family project.
Key Ingredients
- 10 plain donuts (store-bought or homemade, fully cooled if baked at home)
- Red icing (enough for drizzling or spreading)
- Black sprinkles
- Candy eyes
Tools Needed
- Small offset spatula or spoon for spreading icing
- Piping bag or squeeze bottle for precise drizzle (optional)
- Baking sheet lined with parchment paper for decorating
- Small bowls for sprinkles and candy eyes
Cooking Instructions
Step 1: Prepare the donuts
If using store-bought donuts, place them on a parchment-lined tray for easy cleanup. For homemade donuts, make sure they’ve cooled completely to prevent the icing from melting off.
Step 2: Add the “blood”
Drizzle or spread red icing over each donut, letting it drip slightly down the sides for a dramatic “bloody” effect. Use a piping bag for neat lines or a spoon for a more natural look.
Step 3: Decorate the faces
Gently press two candy eyes onto each donut before the icing sets so they stick well. Sprinkle black sprinkles around the eyes or along the icing to create textured, shadowy details.
Step 4: Set and serve
Allow the icing to set for about 10–15 minutes. Transfer the donuts to a serving platter and enjoy right away, or cover lightly if serving later the same day.
Troubleshooting Tip:
If the icing is too runny and won’t stay in place, stir in 1–2 tablespoons of powdered sugar until it thickens enough to hold its shape.
Why You’ll Love This Recipe
Quick and Fun: Ready in minutes and easy enough for kids to help decorate.
Perfectly Festive: The bright red icing and candy eyes create a spooky-cute effect that stands out on any dessert table.
Versatile: Works equally well with store-bought donuts or your favorite homemade recipe.
Kid-Friendly: No complicated steps, just simple decorating that sparks creativity.
Crowd-Pleaser: A hit at school events, Halloween parties, or as a weekend family activity.
Mistakes to Avoid & Solutions
Using warm donuts: If your donuts aren’t fully cooled, the icing will slide right off. Let them rest for at least 30 minutes after baking.
Too much icing at once: Overloading the donuts can make them soggy. Start with a thin layer and add more if needed.
Eyes falling off: Press the candy eyes in while the icing is still soft so they adhere properly.
Clumpy sprinkles: To avoid clumps, sprinkle lightly from a height rather than pouring straight from the container.
Not letting the icing set: Patience is key—wait the full 10–15 minutes for icing to firm up before moving or stacking.
Serving and Pairing Suggestions
Arrange them on a tiered dessert stand for a striking party centerpiece.
Serve alongside warm apple cider, hot chocolate, or spiced chai for cozy fall vibes.
Pair with savory finger foods like mini sliders or veggie cups to balance the sweetness at parties.
Pack individual donuts in clear treat bags tied with orange or black ribbon for a festive gift.
Storage and Reheating Tips
Room temperature: Store decorated donuts in a single layer in an airtight container for up to 2 days.
Avoid refrigeration: The moisture in the fridge can make them soggy and dull the icing’s color.
Freezing: Plain donuts (undecorated) can be frozen for up to 2 months. Thaw at room temperature, then decorate fresh.
Reheating: If you like your donuts slightly warm, gently heat undecorated donuts in the microwave for 10–12 seconds, then decorate after they cool.
FAQs
1. Can I use chocolate donuts instead of plain?
Yes, chocolate donuts give the “vampire” effect an even moodier look and taste delicious with red icing.
2. What kind of icing works best?
A simple powdered sugar icing tinted with red gel food coloring or store-bought red frosting both work well.
3. Can I make these donuts a day ahead?
You can make the donuts ahead but decorate them the same day you plan to serve for the best texture and appearance.
4. How do I keep the candy eyes from melting?
Avoid exposing them to direct sunlight or heat. Store finished donuts in a cool, dry spot.
5. Are there healthier icing alternatives?
You can use a yogurt-based glaze or a thin fruit purée glaze for a lighter option, though it may not hold its shape as well as regular icing.
Tips & Tricks
Chill the donuts in the fridge for 10 minutes before icing if your kitchen is warm—this helps the icing set quickly.
For extra flair, use red gel to draw “fang marks” near the eyes.
A toothpick dipped in black icing can be used to add little eyebrows or spooky grins.
Let kids decorate their own donuts—it’s a fun activity that also saves you time.
If you’re short on time, buy pre-iced donuts and just add the eyes and sprinkles.
Recipe Variations
Pumpkin Spice Donuts: Swap the plain donuts for pumpkin-flavored ones to add autumn warmth.
Gluten-Free Version: Use gluten-free donuts and make sure your sprinkles and eyes are certified gluten-free.
Vampire Jelly Donuts: Fill plain donuts with raspberry or strawberry jam before decorating for a “bloody bite” surprise inside.
White Chocolate Web Donuts: Drizzle white chocolate over the red icing to create spiderweb designs.
Mini Donuts: Make or buy mini donuts and serve them on skewers for easy party snacking.
Final Thoughts
Each donut carries a little bit of personality, and decorating them feels more like a craft project than a kitchen chore. I love seeing friends and family point out their favorite faces on the platter, each one claiming a donut that seems to be “looking” at them. These donuts bring a sense of playfulness to the table, proving that food doesn’t have to be complicated to be memorable.
What makes this recipe so special to me is how it opens the door for others to join in—kids stirring the icing, grandparents arranging the platter, even neighbors stopping by for a quick laugh and a bite. When I see a batch of these donuts disappear within minutes, I know they’ve done their job: not just feeding people, but creating an atmosphere of shared fun and celebration.
If you ever find yourself pressed for time yet wanting something festive, these donuts will rise to the occasion. And the best part is, no two donuts ever look the same, which makes every batch unique. For me, that imperfection is where the real charm lies.
Vampire Donuts
Ingredients
- 10 plain donuts store-bought or homemade, fully cooled if baked at home
- Red icing enough for drizzling or spreading
- Black sprinkles
- Candy eyes
Instructions
- Place store-bought donuts on a parchment-lined tray, or let homemade ones cool completely first.
- Drizzle or spread red icing over each donut, letting it drip slightly down the sides for a “bloody” effect.
- Press two candy eyes onto each donut before the icing sets, then scatter black sprinkles around the eyes or over the icing for spooky texture.
- Let the icing set for 10–15 minutes, then arrange the donuts on a platter to serve right away or cover lightly if saving for later.