I was rummaging through a box of old cookbooks in the attic when I found a tattered recipe card that my daughter scribbled on years ago. It had frosting smudges and tiny stickers of black cats and crescent moons stuck to the edges.
I remember that year vividly—our church hosted a small harvest fair, and I was asked to bake something fun for the children’s table. I decided on witch hat cupcakes, and my daughter helped me pipe the frosting while sitting cross-legged on the kitchen counter, her tiny hands covered in sprinkles.
Now, decades later, those cupcakes have become a cherished tradition in my family. Every October, my grandchildren come over in their costumes—some superheroes, some witches—and we spend the afternoon transforming plain chocolate cupcakes into whimsical hats. The smell of chocolate cake baking always fills the house with warmth, and the laughter of little ones sneaking sprinkles reminds me why I love baking so much.
What makes these cupcakes so delightful is how playful and simple they are. Even if you’re not an experienced baker, you’ll find this recipe forgiving. It’s more about the joy of decorating together than perfection. I like to set out bowls of frosting and sprinkles at the kitchen table so everyone, no matter their age, can decorate their own “hat.” That moment, seeing each person’s creativity shine through, is my favorite part of the season.
These Witch Hat Cupcakes aren’t just a sweet treat; they’re a little piece of family history for me—one that I’m so happy to share with you.

Short Description
These whimsical Witch Hat Cupcakes are moist chocolate cupcakes topped with colorful frosting and crowned with a sugar cone “hat,” perfect for adding magic to Halloween parties or family gatherings.
Key Ingredients
- 1 box chocolate cake mix (plus ingredients listed on the box)
- 10 mini chocolate sugar cones
- Green frosting for decorating
- Purple frosting for decorating
- Halloween sprinkles for garnish
Tools Needed
- 12-cup muffin tin
- Cupcake liners
- Mixing bowls
- Hand mixer or whisk
- Piping bags with round or star tips
- Cooling rack
Cooking Instructions
Step 1: Preheat the oven
Set the oven to the temperature directed on your cake mix box, usually around 350°F (175°C). Line a muffin tin with cupcake liners.
Step 2: Prepare the batter
Follow the instructions on the cake mix box. Stir the batter until smooth and lump-free. Divide it evenly among the lined muffin cups, filling each about ⅔ full.
Step 3: Bake the cupcakes
Bake according to package instructions, typically 18–22 minutes, until a toothpick inserted in the center comes out clean. Transfer to a cooling rack and let cool completely before decorating.
Step 4: Frost the cupcakes
Pipe a generous swirl of green or purple frosting on top of each cooled cupcake. The frosting should be tall enough to support the cone.
Step 5: Add the hats
Place a mini chocolate sugar cone upside down onto each frosting swirl to create the “hat.” Press gently so it stays upright.
Step 6: Decorate
Add a thin ring of contrasting frosting around the base of the cone and finish with Halloween sprinkles for a festive touch.
Troubleshooting tip:
If your frosting is too soft and the cones won’t stand, refrigerate the frosted cupcakes for 10–15 minutes before adding the cones.
Why You’ll Love This Recipe
Fun for All Ages: Decorating the hats makes this a delightful activity for kids and adults alike.
Quick and Easy: Using cake mix saves time, leaving more room for creativity with the frosting and decorations.
Festive & Eye-Catching: These cupcakes bring a burst of color and whimsy to any Halloween dessert table.
Customizable: Switch up the frosting colors or add candy buckles for unique designs.
Perfect Make-Ahead Treat: Cupcakes stay moist and delicious even when prepared a day in advance.
Mistakes to Avoid & Solutions
Cupcakes sinking in the middle: Avoid overmixing the batter. Stir until just combined to keep them light and fluffy.
Hats tipping over: Make sure cupcakes are fully cooled before decorating, and keep frosting slightly firm. Chill briefly if needed.
Frosting sliding off: If your kitchen is warm, store decorated cupcakes in a cool spot or refrigerate for a few minutes to firm up the frosting.
Uneven baking: Rotate the muffin tin halfway through the bake time to ensure even heat distribution.
Dry cupcakes: Measure liquids carefully and don’t overbake. Check for doneness a minute or two before the recommended time.
Serving and Pairing Suggestions
Arrange cupcakes on a black or orange platter for a festive display at parties.
Pair with apple cider, hot chocolate, or spiced chai for cozy autumn vibes.
Serve alongside savory snacks like cheese platters or mini meatballs for a well-rounded Halloween spread.
For a themed dessert table, pair with caramel apples or ghost-shaped cookies.
Storage and Reheating Tips
Store cupcakes in an airtight container at room temperature for up to 2 days or refrigerate for up to 4 days.
To keep frosting from hardening in the fridge, let cupcakes sit at room temperature for 20–30 minutes before serving.
Freeze unfrosted cupcakes for up to 1 month. Thaw at room temperature, then decorate before serving.
Avoid microwaving frosted cupcakes, as it can cause the frosting to melt or slide off.
FAQs
1. Can I use homemade cake batter instead of a box mix?
Absolutely! A simple chocolate cupcake recipe works beautifully.
2. What if I can’t find mini chocolate sugar cones?
Regular-sized cones can be trimmed slightly at the base, or use plain cones dipped in melted chocolate.
3. How do I make the frosting colors more vibrant?
Use gel food coloring instead of liquid food dye to achieve bright, bold colors without thinning the frosting.
4. Can these cupcakes be made gluten-free?
Yes, use a gluten-free cake mix and ensure all decorations are certified gluten-free.
5. Can I prepare them ahead of time for a party?
Bake cupcakes the day before, store them in an airtight container, and decorate on the day of serving for the freshest look.
Tips & Tricks
Use a piping bag with a large round or star tip for neat frosting swirls.
To create a more dramatic “witchy” look, drizzle the cones with melted chocolate and let them harden before placing them on the cupcakes.
For extra flavor, add a teaspoon of cinnamon or espresso powder to the cake batter.
If making with kids, set up a decorating station with bowls of candy eyes, sprinkles, and edible glitter.
Chill the cones briefly after decorating to keep them crisp and upright.
Recipe Variations
Candy Buckle Hats: Add a candy belt buckle made from a small square of fondant or a slice of candy bar around the base of each hat.
Spiced Cupcakes: Replace the chocolate cake mix with a spiced cake mix and use orange frosting for a classic fall vibe.
Haunted Forest Theme: Use dark green frosting and top with crushed chocolate cookies for a “forest floor” effect beneath the hats.
Mini Marshmallow Brims: Add a circle of mini marshmallows around the base of the cone before pressing it into the frosting for a fluffy hat brim.
Mint Chocolate Twist: Use mint-flavored frosting for a refreshing, slightly spooky green hue.
Final Thoughts
Baking these Witch Hat Cupcakes has become a treasured seasonal ritual, not just because they look festive, but because they spark laughter and creativity. I find so much joy in watching kids proudly show off their decorated hats, even when their frosting swirls wobble or sprinkles spill everywhere.
I believe recipes like this carry more than flavors; they hold memories. My grandchildren now ask for these cupcakes by name, and even the older kids who pretend to be too cool for sprinkles secretly love helping out. I encourage you to try these cupcakes at least once—not for perfection, but for the smiles and stories they inspire.
So if you’re searching for a dessert that’s as delightful to make as it is to eat, these Witch Hat Cupcakes deserve a spot on your Halloween table. Don’t be afraid to let your imagination run wild with colors, shapes, and decorations. After all, the fun of this recipe lies in the little imperfections that make each hat unique.
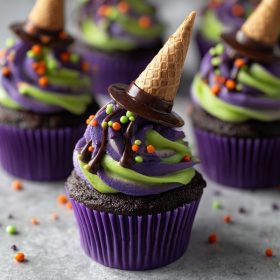
Witch Hat Cupcakes
Ingredients
- 1 box chocolate cake mix plus ingredients listed on the box
- 10 mini chocolate sugar cones
- Green frosting for decorating
- Purple frosting for decorating
- Halloween sprinkles for garnish
Instructions
- Preheat the oven to the temperature on the cake mix box, usually 350°F (175°C), and line a muffin tin with cupcake liners.
- Prepare the batter as instructed on the box, stirring until smooth and lump-free.
- Fill the liners about ⅔ full and bake for 18–22 minutes, or until a toothpick inserted in the center comes out clean.
- Cool the cupcakes completely on a rack.
- Pipe a tall swirl of green or purple frosting on each cupcake to support the cone.
- Gently press a mini chocolate sugar cone upside down into the frosting to form the witch’s hat.
- Add a thin ring of contrasting frosting around the base of each cone and finish with Halloween sprinkles for a festive touch.