On a rainy Saturday not long ago, my kitchen smelled of melted chocolate and toasted cereal, and suddenly, I was carried back to afternoons when my own children were little. They would perch on stools, elbows on the counter, waiting with wide eyes for me to finish stirring a gooey pot of marshmallows and peanut butter.
These treats were always our compromise: simple enough to whip up quickly, yet indulgent enough to feel special. Now, it’s my grandchildren who come running in when they hear me clattering muffin tins onto the counter.
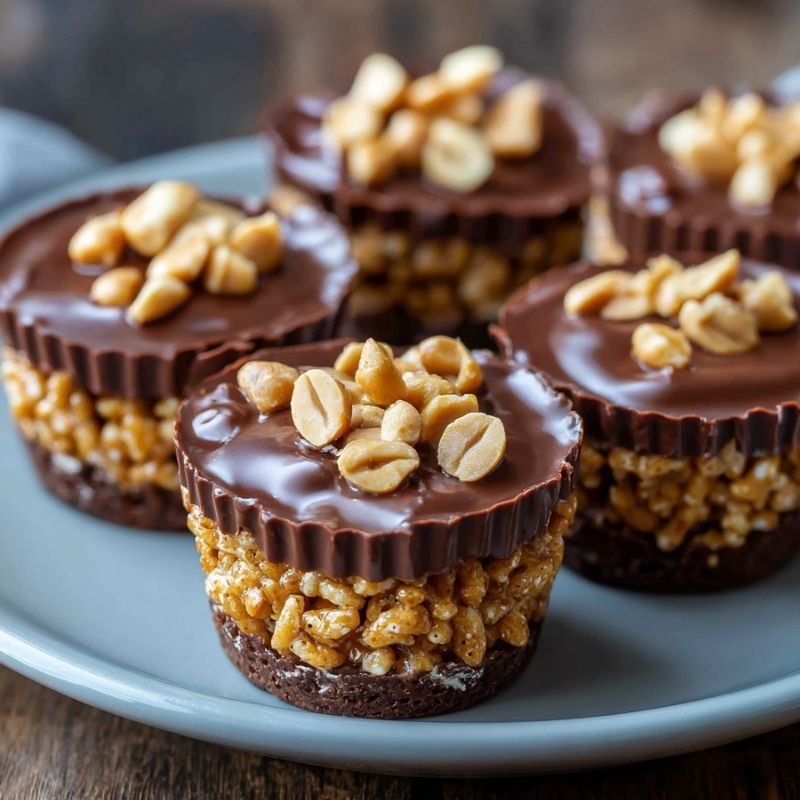
What makes this recipe extra special is its playful combination of textures. The Rice Krispies give that nostalgic crunch, while the peanut butter adds creaminess and depth. Then comes the crowning layer of silky melted chocolate, the part where everyone sneaks a finger swipe if I turn my back for too long.
A recipe like this carries laughter, sticky fingers, and little voices saying, “Is it ready yet?” I can’t think of a better reason to make them again and again.

Short Description
Chocolate Peanut Butter Rice Krispie cups are no-bake treats layered with crunchy cereal, creamy peanut butter, gooey marshmallows, and a smooth chocolate topping. They’re quick to prepare, kid-friendly, and perfect for both everyday snacking and special occasions.
Key Ingredients
- 3 cups Rice Krispies cereal
- 1 cup creamy peanut butter
- ½ cup unsalted butter
- 1 cup mini marshmallows
- 1 cup chocolate chips
- ½ tsp vanilla extract (optional)
- Pinch of sea salt (optional)
Tools Needed
- Medium saucepan
- Mixing bowl
- Wooden spoon or spatula
- Muffin tin with paper liners
- Microwave-safe bowl (for melting chocolate)
Cooking Instructions
Step 1: Melt the base
In a medium saucepan over low heat, melt butter and marshmallows together, stirring constantly until smooth and glossy.
Step 2: Add peanut butter
Stir in peanut butter (and vanilla if using) until creamy and well blended. The mixture should be silky and slightly thick.
Step 3: Mix with cereal
Pour Rice Krispies into a large mixing bowl. Scrape the peanut butter mixture over the top and fold gently until every piece of cereal is coated.
Step 4: Shape the cups
Line a muffin tin with paper liners. Spoon the mixture evenly into each cup, pressing gently with the back of a spoon to create a flat surface.
Step 5: Add chocolate layer
In a microwave-safe bowl, melt chocolate chips in 20-second intervals, stirring in between, until smooth. Spread a spoonful of melted chocolate over each cup. Sprinkle lightly with sea salt if desired.
Step 6: Set and serve
Let the cups cool at room temperature for about 20 minutes, or refrigerate for a quicker set. Once firm, peel away the liners and serve.
Tip: If your chocolate hardens unevenly, let the cups sit out for 5 minutes before serving—they’ll soften slightly for the perfect bite.
Why You’ll Love This Recipe
Perfect Flavor Duo: Chocolate and peanut butter are a timeless pairing.
Crunch Meets Creaminess: The cereal’s crisp texture balances the rich layers.
Quick and Easy: No baking required, just a few simple steps.
Family Friendly: Kids love to help press the mixture into the cups.
Make Ahead Treat: Keeps well for days, making it a handy sweet snack.
Mistakes to Avoid & Solutions
Pressing too hard: Overpacking the mixture makes the cups dense and tough. Solution: Use gentle pressure when shaping.
Overheating chocolate: Burnt chocolate turns grainy. Solution: Melt slowly in intervals, stirring often.
Skipping liners: Without liners, the cups may stick. Solution: Always use parchment or paper liners for easy release.
Not mixing quickly: The cereal can clump if you wait too long. Solution: Have everything ready and fold immediately.
Using natural peanut butter: Its oil can separate and make the cups greasy. Solution: Stick with creamy, no-stir peanut butter.
Serving and Pairing Suggestions
Arrange on a dessert platter for parties.
Pair with a glass of cold milk or a cup of hot coffee.
Serve alongside fresh fruit for balance.
Stack in a jar or tin for edible gifts.
Make them mini-sized for bite-sized treats at gatherings.
Storage and Reheating Tips
Store in an airtight container at room temperature for up to 3 days.
Refrigerate for up to 1 week if you prefer a firmer texture.
Freeze in layers separated by parchment paper for up to 1 month. Thaw at room temperature before eating.
Do not microwave to reheat—chocolate may separate. Simply let them sit at room temp if chilled.
FAQs
1. Can I use chunky peanut butter?
Yes, but the texture will be a little less smooth and more rustic.
2. Do I have to use marshmallows?
They help bind the mixture. If you skip them, use extra peanut butter and a bit of honey as a substitute.
3. Can I make these in a pan instead of muffin cups?
Absolutely. Press the mixture into a greased 8×8-inch pan, top with chocolate, and slice into squares.
4. What kind of chocolate works best?
Semi-sweet is classic, but milk chocolate makes it sweeter, while dark chocolate adds richness.
5. How do I prevent the cups from sticking to the liners?
Lightly spray liners with nonstick spray before filling to ensure easy removal.
Tips & Tricks
For extra crunch, stir in a handful of chopped peanuts before shaping.
Add a drizzle of white chocolate on top for a decorative touch.
Chill the cups for a firmer bite, or leave them out for a softer, gooier texture.
Use silicone muffin cups for easy removal without paper liners.
Toast the Rice Krispies lightly in the oven for an enhanced nutty flavor.
Recipe Variations
Nut-Free Version: Swap peanut butter for sunflower seed butter or cookie butter.
Peanut Butter Banana Cups: Layer thin banana slices under the chocolate topping.
Mocha Twist: Add ½ teaspoon espresso powder to the melted chocolate for a subtle coffee flavor.
Caramel Drizzle: Drizzle warm caramel sauce over the chocolate before setting.
Holiday Style: Top with red and green sprinkles or crushed peppermint for a festive touch.
Final Thoughts
Recipes like these remind me why I love sharing my kitchen with family. They’re unfussy, yet they have a way of gathering people around the table with smiles on their faces. I like that these cups bridge the gap between classic Rice Krispie squares and a more grown-up chocolate treat. The little sprinkle of sea salt takes them from sweet snack to something you’d happily serve at a holiday party.
For me, the best part isn’t the crunch or the chocolate—it’s how quickly they disappear from the plate, a sure sign that I’ve made something worth repeating. My husband always claims he’s only having one, but I usually catch him sneaking another later in the evening. These are the kinds of small joys that keep me baking, creating, and sharing recipes with you.

Chocolate Peanut Butter Rice Krispie
Ingredients
- 3 cups Rice Krispies cereal
- 1 cup creamy peanut butter
- ½ cup unsalted butter
- 1 cup mini marshmallows
- 1 cup chocolate chips
- ½ tsp vanilla extract optional
- Pinch of sea salt optional
Instructions
- In a medium saucepan over low heat, melt butter and marshmallows, stirring constantly until smooth. Stir in peanut butter and optional vanilla until creamy and thick.
- Place Rice Krispies in a large mixing bowl, pour the peanut butter mixture over, and fold until evenly coated.
- Line a muffin tin with paper liners, spoon in the mixture, and press lightly to flatten the tops.
- Melt chocolate chips in the microwave in 20-second intervals, stirring until smooth. Spread over each cup and sprinkle with sea salt if desired.
- Cool at room temperature for 20 minutes or refrigerate to set faster. Once firm, remove liners and serve.


