Last summer, my granddaughter came to spend the weekend. We had already baked our fair share of cookies, made mini pizzas, and played dress-up at least twice. On Sunday afternoon, with the sun pouring through the kitchen window and our creative energy still bubbling, I remembered a project I used to do with my third graders during rainy recesses: homemade bouncy balls. But this time, I wanted to give it a twist—something magical, something that reminded us of seaside days and sparkling waves.
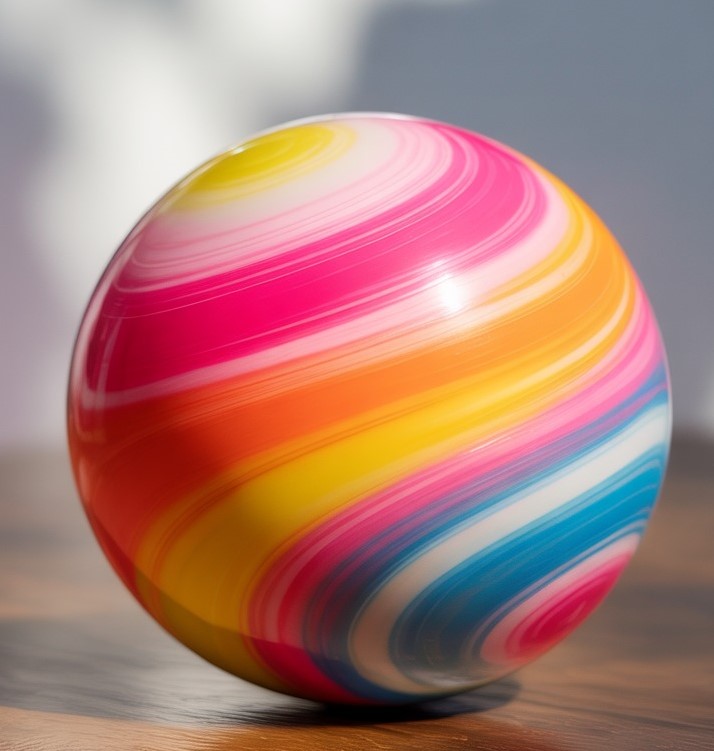
We pulled out the glue, starch, and a collection of ocean-inspired food colorings. I let her choose the shades—sky blue, seafoam, and a dash of deep turquoise—and her tiny hands sparkled with glitter before we’d even begun. We mixed and stirred, kneaded and rolled, laughing every time the colors swirled into little marbled galaxies. Once the balls were formed and drying on a tray, she looked at me and whispered, “They look like mermaid treasures.”
Now, every time I make these “Ocean Wave Bouncy Balls,” I’m taken back to that sun-drenched afternoon—hands sticky with glue, hearts full of joy, and that unmistakable feeling of creating something wonderful with someone you love. These aren’t edible (and definitely not for toddlers), but they’re a fun, safe craft perfect for school breaks or a creative weekend. Just like a favorite family recipe, this one’s passed down—only this time, it’s for play instead of the plate.
Short Description
Ocean Wave Bouncy Balls are a fun, hands-on craft made with school glue, starch, and a bit of food coloring. Swirled with ocean-inspired hues and glitter, they’re the perfect rainy-day activity for kids and adults alike.
Key Ingredients
- 1/2 cup white school glue
- 1/4 cup water
- 1/4 teaspoon baking soda
- 1 tablespoon cornstarch
- 1/4 cup liquid starch
- Food coloring (blue, turquoise, or any ocean-inspired shades)
- 1 tablespoon fine glitter (optional)
Tools Needed
- Small mixing bowls
- Measuring cups and spoons
- Spoon or stir stick
- Tray or wax paper
- Gloves (optional, to prevent stained hands)
Cooking Instructions
Step 1: Mix Glue and Water
In a small mixing bowl, stir together 1/2 cup of white school glue and 1/4 cup of water until smooth and fully blended.
Step 2: Add Baking Soda
Add 1/4 teaspoon of baking soda and stir until it’s completely dissolved into the mixture. This helps set the structure of the bouncy balls.
Step 3: Pour in Liquid Starch Slowly
Gradually pour in 1/4 cup of liquid starch while stirring continuously. The mixture will start to thicken. Keep stirring until a dough-like consistency forms—similar to soft clay.
Step 4: Add Cornstarch for Elasticity
Stir in 1 tablespoon of cornstarch to improve the ball’s stretchiness and bounce. If the dough feels too sticky, sprinkle in a tiny bit more until it’s smooth but pliable.
Step 5: Divide and Add Color
Split the dough into smaller portions. Add a few drops of food coloring to each one—blue, turquoise, aqua—whatever speaks to your inner sea sprite.
Step 6: Add Sparkle (Optional)
For that dreamy ocean shimmer, stir in a pinch of fine glitter into each colored dough ball. It’s optional, but adds a magical touch.
Step 7: Form the Balls
Roll the dough into small balls about 1–2 inches in diameter. Don’t worry if they’re not perfectly round—they’ll even out after some bouncing.
Step 8: Swirl for the Ocean Effect
To make the marbled “ocean wave” effect, take a piece from each colored portion and gently knead them together. Don’t overmix; just a few twists are enough to create beautiful swirls.
Step 9: Dry the Balls
Place the balls on a tray or sheet of wax paper. Let them dry at room temperature for 2–3 hours until firm to the touch.
Step 10: Bounce and Play
Once dried, bounce your ocean wave creations and enjoy! They won’t last forever, but the memories will.
Why You’ll Love This Recipe
– Fun and safe for kids with supervision
– No cooking or baking required
– Customizable with color and sparkle
– Encourages creativity and hands-on learning
– A fantastic rainy-day or weekend project
– Easy cleanup and minimal mess
– Great for school crafts or birthday parties
Mistakes to Avoid & Solutions
1. Dough too runny or sticky
Problem: You added too much water or not enough starch.
Solution: Mix in small amounts of cornstarch or liquid starch until the consistency thickens.
2. Food coloring stains on hands
Problem: Over-handling without gloves.
Solution: Use gloves while mixing or wash hands immediately after forming the balls.
3. Colors become muddy
Problem: Overmixing the different colored doughs.
Solution: Gently knead just enough to create swirls, not blend completely.
4. Balls won’t dry properly
Problem: Too much moisture or poor ventilation.
Solution: Spread them out on wax paper in a warm, dry area. Turn them halfway through drying.
5. Crumbly texture
Problem: Too much starch or baking soda.
Solution: Add a drop or two of water and re-knead until smooth again.
Serving and Pairing Suggestions
These aren’t for eating, of course, but you can pair them with:
– A beach-themed craft day
– DIY seashell necklaces
– Mermaid or ocean-themed storytime
– A calming afternoon with music and crafting
Serve them in:
– Mini cupcake wrappers for parties
– Decorative jars as party favors
– Colorful boxes as DIY science gifts
Storage and Reheating Tips
Storage:
Keep in an airtight container to prevent drying.
Store in a cool, dry place away from sunlight.
Rehydrating:
If the balls dry out, knead in a drop or two of water.
If they become too soft, let them sit uncovered for 30 minutes.
Shelf Life:
Best used within 3–5 days for optimal bounce.
Discard if they become sticky or develop an odor.
FAQs
1. Can I make these without glitter?
Yes! They’ll still look beautiful and ocean-inspired without the sparkle.
2. Is this recipe safe for toddlers?
It’s safe to make with kids, but not safe to eat. Always supervise young children.
3. Can I use clear glue instead of white glue?
Absolutely. Clear glue creates a more translucent, gem-like ball.
4. Why isn’t my ball bouncing well?
It might be too wet or under-kneaded. Let it dry more and try reshaping it.
5. Can I refrigerate them to dry faster?
Not recommended. It may affect the texture. Air drying at room temp works best.
Tips & Tricks
Use toothpicks to swirl colors gently without overmixing.
Sprinkle glitter as a top coat before drying for a galaxy effect.
Let kids create ocean-themed names for their balls—it adds to the fun.
Wear gloves to avoid colorful hands.
For a smoother ball, rub a bit of cornstarch on your hands before rolling.
Recipe Variations
1. Galaxy Bouncy Balls
Swap blue tones for purple, black, and pink food coloring.
Use silver glitter instead of blue.
Follow the same kneading and swirling steps. Great for space-themed parties.
2. Tropical Sunset Balls
Use orange, pink, and yellow food coloring.
Add gold glitter for a warm, sunny vibe.
Let kids create sunset patterns with overlapping colors.
3. Glow-in-the-Dark Balls
Use glow pigment powder instead of glitter.
Use white or clear glue.
Charge under light, then bounce in the dark!
Final Thoughts
These Ocean Wave Bouncy Balls turned out to be one of my most joyful kitchen-table creations. They reminded me that recipes aren’t always about baking and roasting—sometimes, they’re about crafting memories. From swirling shades of blue to sticky fingers full of laughter, this simple DIY project brings a splash of ocean magic into your day.
As someone who spent decades teaching and now finds peace in kneading dough or stirring batters, this blend of creativity and structure felt nostalgic in the best way. It’s fun, a little messy, and totally worth it. If you’re looking for a hands-on, no-oven-needed activity to light up your afternoon, this is the one.
Ocean Wave Bouncy Balls
Print ThisIngredients
- 1/2 cup white school glue
- 1/4 cup water
- 1/4 teaspoon baking soda
- 1 tablespoon cornstarch
- 1/4 cup liquid starch
- Food coloring (blue, turquoise, or any ocean-inspired shades)
- 1 tablespoon fine glitter (optional)
Instructions
Step 1: Mix Glue and Water
Combine 1/2 cup white school glue and 1/4 cup water in a bowl. Stir until smooth.
Step 2: Add Baking Soda
Mix in 1/4 teaspoon baking soda until fully dissolved.
Step 3: Stir in Liquid Starch
Slowly pour in 1/4 cup liquid starch, stirring until it thickens into a dough-like texture.
Step 4: Add Cornstarch
Add 1 tablespoon cornstarch for stretch and bounce. If sticky, sprinkle a bit more.
Step 5: Color the Dough
Divide the dough. Add ocean-colored food dye (blue, turquoise, aqua) to each portion.
Step 6: Add Glitter (Optional)
Mix in a touch of fine glitter for a sparkling finish.
Step 7: Shape the Balls
Roll into 1–2 inch balls. They’ll round out more as they dry and bounce.
Step 8: Swirl for Waves
Gently knead bits of each color together for a marbled, ocean-wave effect.
Step 9: Let Them Dry
Set on wax paper or a tray for 2–3 hours until firm.
Step 10: Bounce Away
Once dry, they’re ready to bounce and bring joy!