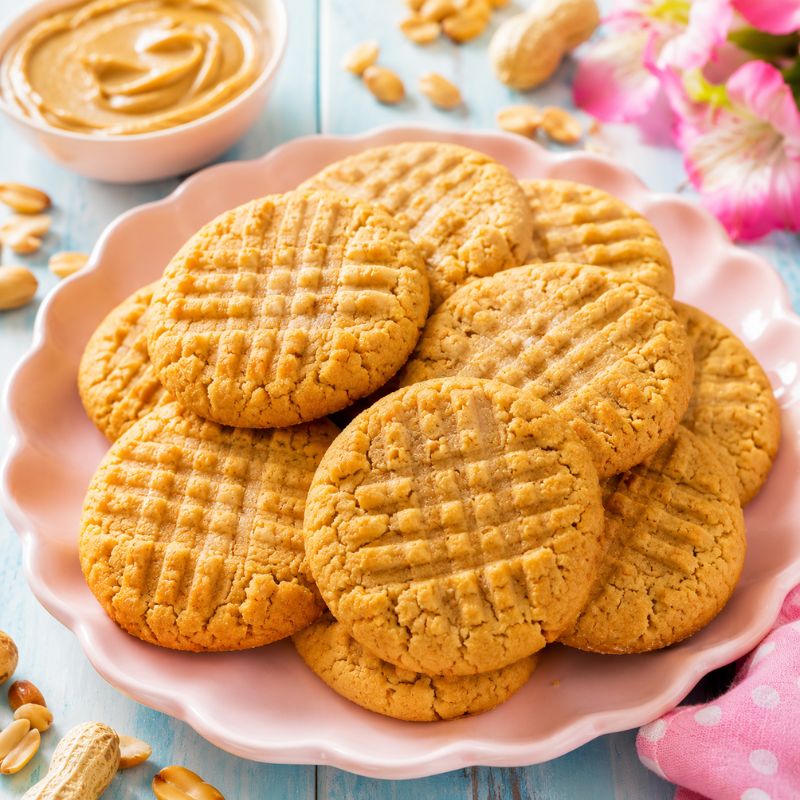
Peanut butter cookies have a special way of making the kitchen smell warm before the first bite even happens. The scent of roasted peanuts, butter, vanilla, and sugar feels cozy, familiar, and almost impossible to ignore. These cookies are simple, but they have a personality of their own: soft centers, lightly crisp edges, and that classic fork pressed pattern on top.
The best peanut butter cookies need more than just peanut butter and sugar. They need the right balance of fat, flour, sweetness, and baking time. Too much flour can make them dry. Too much baking can make them crumbly. The right method gives them a tender bite with a rich peanut flavor that lingers in the best way.
This recipe keeps the process friendly and reliable. Creamy peanut butter gives the dough a smooth texture, brown sugar adds moisture, vanilla rounds out the flavor, and a short chill helps the cookies hold their shape.
They bake quickly, cool beautifully, and work for lunch boxes, bake sales, holiday trays, weekend treats, and casual desserts. Each cookie tastes nostalgic but still fresh, with that sweet salty flavor that makes peanut butter desserts so loved.
Short Description
This soft chewy peanut butter cookies recipe makes tender, nutty cookies with lightly crisp edges and rich peanut butter flavor. They are easy to mix, quick to bake, and perfect for everyday desserts, lunch boxes, and cookie trays.
Key Ingredients
- Creamy peanut butter: 1 cup
- Unsalted butter: ½ cup, softened
- Granulated sugar: ½ cup
- Light brown sugar: ½ cup, packed
- Large egg: 1 egg
- Vanilla extract: 1 tsp
- All purpose flour: 1¼ cups
- Baking soda: ¾ tsp
- Baking powder: ½ tsp
- Salt: ¼ tsp
- Extra granulated sugar: 2 tbsp, optional for rolling
Tools Needed
- Large mixing bowl
- Medium mixing bowl
- Hand mixer or stand mixer
- Measuring cups
- Measuring spoons
- Rubber spatula
- Baking sheet
- Parchment paper
- Fork
- Cookie scoop or tablespoon
- Wire cooling rack
Cooking Instructions
Step 1: Prepare the Baking Sheet
Line a baking sheet with parchment paper. This helps the cookies release easily and keeps the bottoms from browning too quickly. Set the baking sheet aside while the dough is mixed. If using more than one baking sheet, line both so the cookie dough can be spaced properly.
Step 2: Cream the Butter, Peanut Butter, and Sugars
In a large mixing bowl, add 1 cup creamy peanut butter, ½ cup softened unsalted butter, ½ cup granulated sugar, and ½ cup packed light brown sugar. Beat with a hand mixer on medium speed for 2 minutes until the mixture looks smooth, fluffy, and slightly lighter in color. This step helps create a softer cookie texture. If mixing by hand, stir firmly for 3 to 4 minutes until well blended.
Step 3: Add the Egg and Vanilla
Add 1 large egg and 1 tsp vanilla extract to the bowl. Beat for 30 to 45 seconds until the mixture looks creamy and fully combined. Scrape down the sides of the bowl with a rubber spatula so no streaks of peanut butter or butter remain.
Step 4: Mix the Dry Ingredients
In a medium bowl, whisk together 1¼ cups all purpose flour, ¾ tsp baking soda, ½ tsp baking powder, and ¼ tsp salt. The mixture should look evenly blended before it goes into the wet ingredients. This helps the baking soda and baking powder spread evenly through the dough.
Step 5: Combine the Dough
Add the dry ingredients to the peanut butter mixture. Mix on low speed just until the flour disappears. Do not overmix, because too much mixing can make the cookies tough. The dough should look soft, thick, and slightly tacky. If it feels very sticky, chill it before scooping rather than adding too much flour.
Step 6: Chill the Dough
Cover the bowl and chill the dough for 30 minutes. Chilling helps the dough firm up, improves the flavor, and keeps the cookies from spreading too much. The dough should feel scoopable but not overly soft when ready.
Step 7: Preheat the Oven
Preheat the oven to 350°F while the dough chills or just before shaping. Let the oven fully heat before baking. A properly heated oven helps the cookies bake evenly and develop lightly crisp edges.
Step 8: Scoop and Shape
Scoop the dough into 1½ tbsp portions and roll each portion into a ball. Roll the dough balls in 2 tbsp extra granulated sugar if desired. Place them on the prepared baking sheet about 2 inches apart. The sugar coating gives the cookies a lightly sparkly finish and a delicate crisp edge.
Step 9: Make the Classic Fork Pattern
Use a fork to gently press each dough ball down, then turn the fork and press again in the opposite direction to create a crisscross pattern. Do not flatten the cookies too much. They should be about ½ inch thick so the centers stay soft.
Step 10: Bake the Cookies
Bake at 350°F for 9 to 11 minutes. The edges should look set, while the centers may still look slightly soft. Do not wait for the cookies to look fully firm in the oven, because they will continue setting as they cool. For softer cookies, bake closer to 9 minutes. For slightly crispier edges, bake closer to 11 minutes.
Step 11: Cool Before Serving
Let the cookies rest on the baking sheet for 5 minutes. They will be delicate when hot, so this short cooling time helps them firm up. Transfer them to a wire rack and cool for another 10 minutes. The finished cookies should smell nutty and sweet, with soft centers and lightly crisp edges.
Why You’ll Love This Recipe
The cookies are soft, chewy, and full of peanut butter flavor.
The recipe uses simple pantry ingredients.
Brown sugar helps keep the texture moist and tender.
The dough comes together quickly with no complicated steps.
A short chill helps the cookies bake thicker and softer.
The classic fork pattern makes them look nostalgic and homemade.
They work well for everyday desserts, parties, lunch boxes, and holiday cookie trays.
The flavor can be adjusted with chocolate chips, oats, cinnamon, or chopped peanuts.
Mistakes to Avoid & Solutions
Using Natural Peanut Butter That Separates
Natural peanut butter with a lot of oil separation can make the dough greasy or crumbly. For the most reliable texture, use a creamy no stir peanut butter. If using natural peanut butter, stir it extremely well before measuring and expect a slightly different texture.
Overmixing the Dough
Once the flour is added, the dough should be mixed only until combined. Overmixing develops the flour too much and can make the cookies dense or tough. Use low speed and stop as soon as no dry flour remains.
Skipping the Chill Time
Warm dough spreads faster in the oven. Chilling for 30 minutes helps the cookies hold their shape and gives the flour time to hydrate. If the kitchen is very warm, chill for 45 minutes. If the dough becomes too firm, let it sit at room temperature for 5 minutes before scooping.
Adding Too Much Flour
Too much flour can make peanut butter cookies dry and crumbly. Spoon the flour into the measuring cup and level it off instead of packing it down. If the dough feels sticky, chilling is usually better than adding extra flour.
Overbaking the Cookies
Peanut butter cookies can look underdone when they are actually ready. Pull them from the oven when the edges are set and the centers still look slightly soft. They will firm up as they cool. Overbaking can make them dry and sandy.
Pressing the Cookies Too Flat
The fork pattern is classic, but pressing too hard can make the cookies thin and crisp. Press gently until the dough is about ½ inch thick. Thicker cookies keep softer centers.
Moving the Cookies Too Soon
Freshly baked peanut butter cookies are fragile. Let them rest on the baking sheet for 5 minutes before moving them. This helps them set and prevents breaking.
Serving and Pairing Suggestions
Peanut butter cookies are delicious on their own, but they also pair beautifully with simple drinks and dessert spreads. Serve them with cold milk, hot coffee, black tea, hot chocolate, oat milk, or a vanilla smoothie. The nutty sweetness tastes especially good with creamy drinks.
For dessert trays, pair them with chocolate brownies, sugar cookies, oatmeal cookies, fresh berries, or dark chocolate squares. For a family style treat, place the cookies on a large plate with sliced bananas, apple wedges, and a small bowl of melted chocolate for dipping. For a plated dessert, serve two warm cookies with a scoop of vanilla ice cream and a drizzle of chocolate sauce.
They also work nicely in lunch boxes because they hold their shape well after cooling. For parties or bake sales, stack them in small paper bags, wrap them with ribbon, or place them in a cookie tin with parchment between layers.
Storage and Reheating Tips
Store cooled peanut butter cookies in an airtight container at room temperature for up to 5 days. Place parchment paper between layers if stacking them. To keep the cookies softer, add a small piece of bread to the container. The cookies will absorb a little moisture from the bread and stay tender longer.
For longer storage, freeze the baked cookies for up to 3 months. Place cooled cookies in a freezer safe bag or container with parchment between layers. Thaw at room temperature for 20 to 30 minutes before serving.
Cookie dough can also be frozen. Scoop the dough into balls, press with the fork pattern, then freeze on a baking sheet until firm. Transfer to a freezer safe bag and freeze for up to 3 months. Bake from frozen at 350°F, adding 1 to 2 extra minutes.
To refresh baked cookies, microwave one cookie for 8 to 10 seconds. This softens the center and brings back a fresh baked feel. Do not microwave too long, or the cookie may become dry after cooling.
FAQs
1. Why do peanut butter cookies have fork marks?
Peanut butter cookie dough is usually thicker than many other cookie doughs. The fork marks help flatten the dough so the cookies bake evenly. The crisscross pattern also gives peanut butter cookies their classic homemade look.
2. Can crunchy peanut butter be used instead of creamy?
Yes, crunchy peanut butter can be used for more texture. Replace the creamy peanut butter with the same amount of crunchy peanut butter. The cookies will have small peanut pieces and a slightly heartier bite.
3. Why are my peanut butter cookies dry?
Dry cookies usually come from too much flour, overbaking, or using peanut butter with too little moisture. Measure flour carefully, remove the cookies when the centers still look slightly soft, and use a creamy peanut butter for the best texture.
4. Can the dough be made ahead of time?
Yes. The dough can be made and refrigerated for up to 2 days. Let it sit at room temperature for 10 to 15 minutes if it becomes too firm to scoop. The dough can also be frozen in shaped portions for future baking.
5. Can peanut butter cookies be made without chilling the dough?
Yes, but the cookies may spread more and bake thinner. Chilling gives a thicker, softer cookie with better flavor. If skipping the chill, bake one test cookie first to check the spread.
6. How do you know when peanut butter cookies are done?
The edges should look set and lightly golden, while the centers should still look a little soft. They will continue to firm up on the baking sheet after coming out of the oven. Overbaked cookies often become dry and crumbly.
7. Can these cookies be made gluten free?
Yes. Use a 1 to 1 gluten free all purpose flour blend in place of the regular flour. The texture may be slightly more delicate, so let the cookies cool fully before moving or stacking them.
Tips & Tricks
Use softened butter, not melted butter.
Choose creamy no stir peanut butter for the most reliable texture.
Chill the dough for thicker cookies.
Measure flour carefully to avoid dry cookies.
Do not overbake the centers.
Let cookies cool on the baking sheet before moving.
Add a tiny sprinkle of flaky salt before baking for a sweet salty finish.
Use a cookie scoop so the cookies bake evenly.
Freeze shaped dough for quick future cookie batches.
Recipe Variations
Chocolate Chip Peanut Butter Cookies
Add ¾ cup semi sweet chocolate chips to the finished dough before chilling. Scoop, press, and bake as directed. The chocolate melts into little pockets that balance the salty peanut butter flavor. This version tastes rich, cozy, and perfect for chocolate lovers.
Peanut Butter Oat Cookies
Replace ¼ cup all purpose flour with ½ cup old fashioned oats. Mix the oats into the dry ingredients before combining with the wet mixture. The cookies become chewier, heartier, and slightly more rustic. Bake for 10 to 12 minutes until the edges are set.
Honey Peanut Butter Cookies
Replace ¼ cup granulated sugar with 3 tbsp honey. Since honey adds moisture, chill the dough for at least 45 minutes before baking. The flavor becomes warmer, softer, and lightly floral. These cookies may spread slightly more, so leave enough space on the baking sheet.
Double Peanut Cookies
Add ½ cup chopped roasted peanuts to the dough after the flour is mixed in. Roll the dough balls in sugar and press with a fork as usual. The cookies become crunchier and more intensely nutty. This variation is great for people who love texture.
Cinnamon Peanut Butter Cookies
Add ½ tsp ground cinnamon to the dry ingredients. Keep the rest of the recipe the same. The cinnamon adds gentle warmth without overpowering the peanut butter. This version tastes cozy and pairs especially well with coffee or hot chocolate.
Peanut Butter Sandwich Cookies
Bake the cookies as directed and let them cool completely. Mix ½ cup creamy peanut butter, 2 tbsp softened butter, ¾ cup powdered sugar, and 1 tbsp milk until smooth. Spread 1 tbsp filling on the flat side of one cookie and top with another cookie. The result is rich, sweet, and bakery style.
Flourless Peanut Butter Cookies
Use 1 cup creamy peanut butter, ¾ cup granulated sugar, 1 large egg, 1 tsp vanilla extract, and ¼ tsp salt. Mix until smooth, scoop into balls, press with a fork, and bake at 350°F for 8 to 10 minutes. The cookies are soft, rich, and naturally gluten free when made with gluten free certified ingredients.
Conclusion
Peanut butter cookies are the kind of dessert that feels familiar in the best possible way. They are simple, cozy, and full of sweet nutty flavor without needing fancy decoration or complicated technique. A good batch should smell warm, bake evenly, and cool into cookies that are soft in the center with just enough crispness around the edges. This recipe gives that classic texture while keeping the process easy enough for everyday baking.
The fork pressed tops, the tender crumb, and the rich peanut butter flavor all make these cookies feel timeless. They are just as welcome on a quiet afternoon as they are on a holiday cookie tray. The dough is easy to customize, easy to freeze, and easy to bake whenever a homemade treat sounds good.
Small details like chilling the dough, measuring flour carefully, and pulling the cookies out before they look fully firm make a big difference. Once the rhythm is learned, these peanut butter cookies can become a dependable recipe for sharing, gifting, or keeping close for a sweet little moment at home.
Peanut Butter Cookies

Ingredients
- 1 cup Creamy peanut butter
- ½ cup Unsalted butter softened
- ½ cup Granulated sugar
- ½ cup Light brown sugar
- 1 Large egg
- 1 tsp Vanilla extract
- 1¼ cups All purpose flour
- ¾ tsp Baking soda
- ½ tsp Baking powder
- ¼ tsp Salt
- 2 tbsp Extra granulated sugar optional for rolling
Instructions
- Line a baking sheet with parchment paper. This helps the cookies release easily and keeps the bottoms from browning too quickly. Set the baking sheet aside while the dough is mixed. If using more than one baking sheet, line both so the cookie dough can be spaced properly.
- In a large mixing bowl, add 1 cup creamy peanut butter, ½ cup softened unsalted butter, ½ cup granulated sugar, and ½ cup packed light brown sugar. Beat with a hand mixer on medium speed for 2 minutes until the mixture looks smooth, fluffy, and slightly lighter in color. This step helps create a softer cookie texture. If mixing by hand, stir firmly for 3 to 4 minutes until well blended.
- Add 1 large egg and 1 tsp vanilla extract to the bowl. Beat for 30 to 45 seconds until the mixture looks creamy and fully combined. Scrape down the sides of the bowl with a rubber spatula so no streaks of peanut butter or butter remain.
- In a medium bowl, whisk together 1¼ cups all purpose flour, ¾ tsp baking soda, ½ tsp baking powder, and ¼ tsp salt. The mixture should look evenly blended before it goes into the wet ingredients. This helps the baking soda and baking powder spread evenly through the dough.
- Add the dry ingredients to the peanut butter mixture. Mix on low speed just until the flour disappears. Do not overmix, because too much mixing can make the cookies tough. The dough should look soft, thick, and slightly tacky. If it feels very sticky, chill it before scooping rather than adding too much flour.
- Cover the bowl and chill the dough for 30 minutes. Chilling helps the dough firm up, improves the flavor, and keeps the cookies from spreading too much. The dough should feel scoopable but not overly soft when ready.
- Preheat the oven to 350°F while the dough chills or just before shaping. Let the oven fully heat before baking. A properly heated oven helps the cookies bake evenly and develop lightly crisp edges.
- Scoop the dough into 1½ tbsp portions and roll each portion into a ball. Roll the dough balls in 2 tbsp extra granulated sugar if desired. Place them on the prepared baking sheet about 2 inches apart. The sugar coating gives the cookies a lightly sparkly finish and a delicate crisp edge.
- Use a fork to gently press each dough ball down, then turn the fork and press again in the opposite direction to create a crisscross pattern. Do not flatten the cookies too much. They should be about ½ inch thick so the centers stay soft.
- Bake at 350°F for 9 to 11 minutes. The edges should look set, while the centers may still look slightly soft. Do not wait for the cookies to look fully firm in the oven, because they will continue setting as they cool. For softer cookies, bake closer to 9 minutes. For slightly crispier edges, bake closer to 11 minutes.
- Let the cookies rest on the baking sheet for 5 minutes. They will be delicate when hot, so this short cooling time helps them firm up. Transfer them to a wire rack and cool for another 10 minutes. The finished cookies should smell nutty and sweet, with soft centers and lightly crisp edges.